| Table of Contents |
|---|
What is a signature-set good for?
...
- Integration of macros to automate complex procedures, both before and after the signing process (e.g. Saving the document, sending it per email etc.)
- Defining individual signatures either as optional or obligatory
- Direct connection to form fields for digital signatures (DigSig fields)
- Showing a custom text on the signature device while signing
- Showing a custom dialog in eSignatureSuite prior to signing
- Defining additional information for each signature individually (like name, location etc.), which are also possible to be read dynamically from the loaded document and addable as stamp below the signature
- Defining individual document zoom levels for each signature
...
Working with signature-sets
...
A signature-set can be transfered to eSignatureSuite together with an already created PDF file by any pre-processing application (or a *.bat file).
You can create signature-sets for documents of variable sizes in two different ways:
| Method description | How to do it |
|---|---|
1. By adding characters or keywords, which are unique in the document to be signed: You can mark any individual signing field by...
| Please read the following chapter "Creating your own signature-set: a step-by-step tutorial" on how to configure signature sets (for dynamic string search).
|
2.Your application creates its own signature-set or it adjusts the position of the signing fields in an already existing set: Because the Signature-Set files (*.sss) are built similar to usual *.ini-files, they can be handled very easily. This leads to real "dynamic signature-sets" and so the most elegant way to achieve exact signature field positions. By using these "dynamic signature-sets", you can also transfer data like the signer's name or the reason for signing from your pre-processing application to eSignatureSuite. | The separate chapter Structure of a signature set file (*.sss) helps you to program real dynamic signature-sets. |
...
If you're loading a signature-set per command parameter when starting eSignatureSuite, then it will jump directly to the first found signature field and after signing this to the next one and so on. This is a comfortable way to automatically handle a complete document signing procedure without the danger of accidentially missing any of the required signatures. It's also possible to combine signature-sets with macro buttons, which offers even more automation features! In order to allow a automated, but smooth and comfortable signing, you should take great care to harmonise signature-sets and their corresponding macro buttons. You can find a detailed explanation about the macros in the chapter Automating complex processes: Working with macros.
...
Creating your own signature-set: a step-by-step tutorial
...
In the Getting Started beginner's guide, you can also find a version of these instructions, which is less complex and so easier to understand, because only the most important options are shown and explained.
Step 1: Opening a document (optional)
If you're not sure about the content of the later to be signed document, it's advisable to load the document to take a look at it while creating the signature-set. So, start eSignatureSuite and load your document via the "Open File"  icon in the tool bar.
...
Step 2: Creating the signature-set
...
| Anchor | ||||
|---|---|---|---|---|
|
...
Step 4: Signature-set settings
...
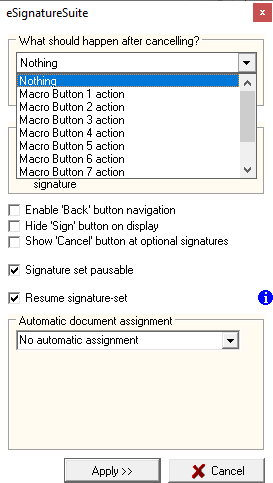 | First of all, you'll have to define what's supposed to happen, when the signature-set or the signature process itself is cancelled. Cancelling is caused by:
So, in the upper field, you can set any of the available macro buttons, which shall be triggered when the process is cancelled. If you choose the option "Nothing", no automatic action will be triggered.
Useful actions for macros, which shall be triggered upon cancelling a signature-set could be:
You can find a detailled explanation about macros here: Working with macros | |
 | The second settings defines, what shall happen after signing, so after all obligatory signatures of the signature-set have been completed and all defined signing fields have been processed (either completed or skipped). Here, you can also choose either any macro button or "Nothing". As example, macro button 2 is chosen here.
Useful actions for macros, which shall be processed after all predefined signatures have been completed could be:
You can find a detailled explanation about macros here: Working with macros | |

| Normally, it's not allowed to add further signature fields manually and to sign them after having used a signature-set, because it's assumed, that all necessary signatures are already included in the set itself. However, with the option "Enable manual signing after supervised signature", you're allowing the user to do that anyway. This option can be set individually for cancelling signature-sets as well as for successful completion (as defined in the two previous paragraphs). | |
By checking the option "Enable 'Back' button navigation", you're allowing the user to jump back to skipped (and so not-signed) optional signing fields within the signature-set. So, by checking this option, you can skip any signing field, which has not been defined as obligatory, and at any subsequent point in the signature-set, you can go back to this field and still sign it.
Important: If you want to allow going back to skipped signature fields even after the last signature, it's advisable to not define any macro actions after signing. Because if any macro action is defined, it will be triggered right after the last signature and depending on the action, it might be impossible to go back to skipped signature fields, because the macro action has to be completed first. | ||
The option "Hide 'Sign' button on display" hides the green "Start" button on the signature device, which can be used to directly jump to the first signing field in a signature-set. This option currently only affects the products naturaSign Pad Colour and the duraSign variants, because on the other devices, this button isn't shown anyway. | ||
The "Cancel" button in the footer of eSignatureSuite allows the user to cancel the whole signature-set while signing obligatory signing fields. With the checkbox "Show 'Cancel' button at optional signatures", you can allow this behaviour for optional signing fields, too. Please take note, that due to technical reasons in the current version, this option is always applied for smartphones and tablets. | ||
The option "Signature-set pausable" is a very special one with several restrictions and applies only when using optional signature fields. If you activate this option, it's possible to pause signing when using this signature-set for a while by clicking one of the Cancel buttons either on the sign pad or in eSignatureOffice. This offers the possibility to change the signer or read each chapter of the document again. As soon as you are ready to proceed, you can click the green "Sign" button on the sign pad to resume the signature-set. But please take note! There are several restrictions for this option:
| ||
Checking the option "Resume signature-set" will make the program check, if there have already been added signatures to the currently loaded document by the current signature-set (either in an earlier session or after a signature-set has been cancelled). If yes, these signatures will be skipped automatically. | ||
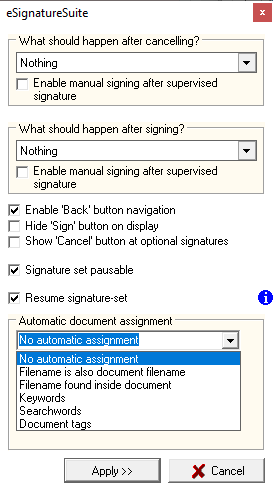 | The "Automatic document assignment" feature means, that you can assign one or multiple signature-sets to any document. This way, you can prepare your document in such a fashion, that when starting the signing procedure, the matching signature-set is chosen automatically! To make this possible, the chosen signature-set folder is scanned for the specifications of all sets at the program start as well as after changing the signature-set folder and also after saving any set. These specifications for all sets are buffered until you close eSignatureSuite and so can be accessed very fast as soon as you press the "Sign" button. Currently, there are 5 different ways to...
Because this topic is way too big to explain it in some few sentences, all 5 methods will be explained in great detail in the directly following paragraph Step 4b: Automatic document assignment
|
...
| Method | Explanation | Example |
|---|---|---|
1. Filename is also the document filename | This is the easiest method of them all and is the best one, if only one signature-set is assigned to only one document. Here, the filename of the document has to be exactly the same as the filename of the signature-set, except the file extensions, of course. You can see, which filename is currently used for the assignment scan (so, the filename of the currently loaded document) on the right side of the footer in eSignatureSuite. | Mustermann.sss + Mustermann.pdf |
2. Filename found inside document | For this method to work, the filename of the signature-set to use has to be written as text somewhere in the document to sign and it always has to be introduced with the code "#SSSFilename" (without " "), then a blank space and then the filename of the signature-set including the file extension *.sss. This text does not have to be visible to the reader, so you can hide it elegantly anywhere with white letters on white background. Please take note, that with this method, only the first found file name will be used. If you want to assign multiple signature-sets to this file, please use one of the other assignment methods. | 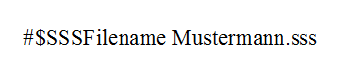 |
| 3. Keywords | When choosing the option "Keywords", a small text field will appear, in which you can write one keyword of your choice in each line. If at least one of these keywords is found later in the document, either the corresponding signature-set will be chosen or (depending on your settings in the administration menu) the user will be presented with a list of all matching signature-sets to choose from. Of course, these keywords also have to be written in the document and they must have the following format: "#$SSSKeyword protocol;" (without quotation marks, but the semicolon at the end is important to mark the end of the keyword!) You can use multiple keywords to be able to choose from multiple signature-sets later. However, for this, all keywords in the document after the first one need consecutive numbering and so the format changes to: "#$SSSKeyword1 inspection;" --> "#$SSSKeyword2 invoice;" etc. The reason for this is, that in order to speed up the whole process, eSignatureSuite will only keep on searching for keywords within a document as long as this format is kept. The order of the chosen keywords in the document and in the signature-set do not have to be the same. | 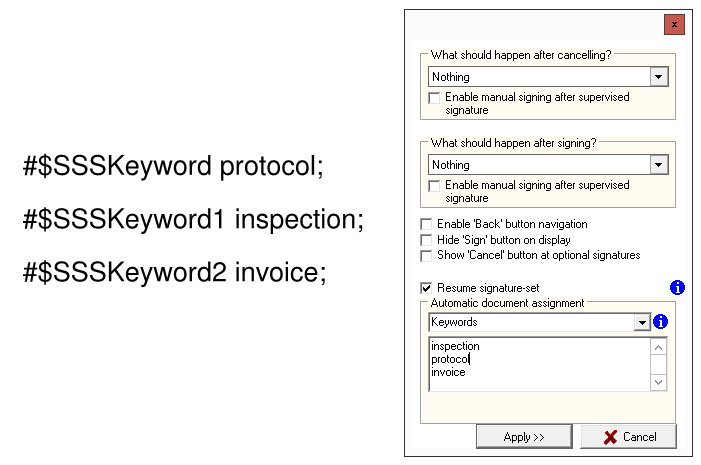 |
| 4. Searchwords | Searchwords are exactly what the name is advertising: they are words, which can be part of the document's text, but which do not have to be marked explicitly as keywords like in the previous method. Just as with keywords, you can add any number of searchwords, each in its own line. Again, the order of the searchwords does not matter and when checking the option "Match of all words is required", this signature-set will only be assigned to documents, in which all of the chosen searchwords are found. Please take care, that this assignment method is by far the slowest one, especially with large documents with a lot of text and/or with many available searchword signature-sets. | 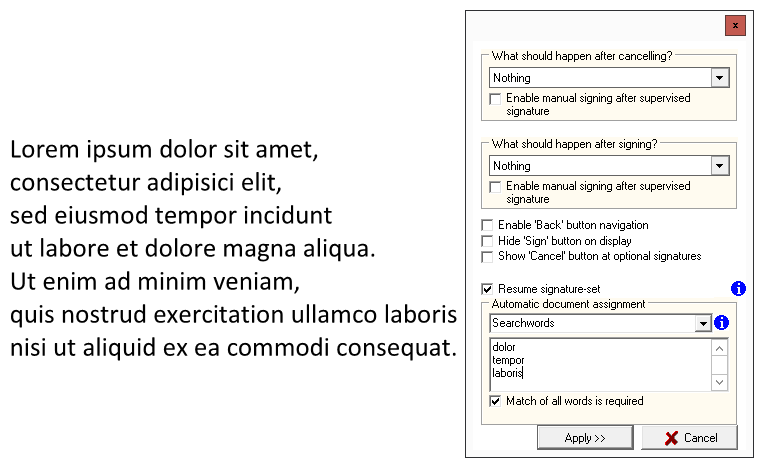 |
| 5. Document tags | Document tags are supporting file attributes, which can be read from a file by hard- or software, in order to make handling the file easier. Here in this case, you can use these document tags to assign documents and signature-sets to each other. These document tags are not included in the document text itself, but have to be added as file attribute, for example when saving them with "Save As..." in Microsoft Word or with the help of a PDF editor. If you are not sure if your file does have any document tags or what they are, you can load the file in eSignatureSuite and check it with the "Read document tags" button. This button is not visible as long as no document is loaded and it shows all found tags, each on its own line. |  |
Step 5: Creating signature fields and fine tuning the signature-set
...
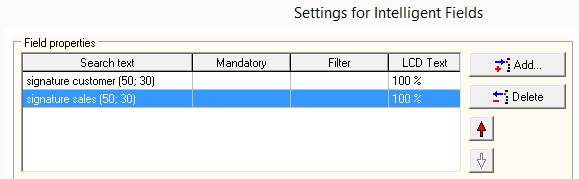
- In the given example, we chose the "Defined by one mark and size" option and now we can enter our string of characters into the "Search text" field. In this example, we're using "signature customer".
- Then we set the width and height of the field in millimetres.
- In our example, this only leaves the question, in which relative position to the search text the signing field shall be opened. You can define this by clicking the "Edit" button in the "Displacement" area. Afterwards, the following dialog will appear:
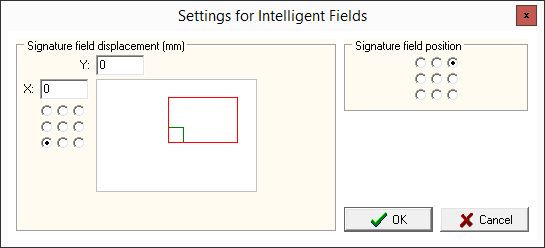
- The green rectangle in the middle of the screen stands for the position of the search text. The red rectangle stands for the relative position of the signing field. With the grid pattern, you can set the approximate alignment between those two. With the X and Y fields, you can adjust the displacement accurately to a millimetre. In case you're using a signing field with two corner marks, there will be a second grid pattern with its own X/Y fields. You can enter positive as well as negative numbers here.
- The grid pattern "Signature field position" specifies the general position of the signing field relativ to the marker. In this example, the search text "signature customer" would be within the lower left corner of the signing field.
Generally, we'd be done now and with this example we'd have created the easiest version of a signature-set with signing field. However, there are still some more options:
- Search order
- Limit search result(s)
- A confirmation dialog before signing
- Signing with an image file instead of the usual signature by hand
- Assigning a signature field to a specific kind of device or even to one single device (for example, when multiple different devices are connected to the same computer)
- Displaying custom text on the device display
- Defining the signature mode (showing the document in the background on the device display or not)
- Defining, if a signature field absolutely has to be signed (mandatory field) or not (optional field)
- Configuring a stamp, which can be added below the signature
- Configuring a Signature Information Window, which can be shown for further information of the signature right after signing
- Defining the zoom level of the document while signing
...
Search order
Here you can change the direction in which your document shall be searched for your search strings. Either the commonly used way to read documents/book "From top left to bottom right" or the "Order of appearance in PDF".
...
Beware! The order of appearance within a PDF file is not necessarily the same order, which you can see in the document itself, because this sequence can vary strongly, depending on the origin of your file before its conversion and on how it was converted! |
...
Furthermore, you can choose the execution order. This can be useful, when more than one person has to sign the document. With this option you can configure the sequence of signing fields in a way, that one person adds all its signatures first before the next person starts its first signature at all. For this, the shown letters correspond to your previously created signing fields.
An explanation of the different execution orders:
| Option | Effekt |
|---|---|
| ABC ABC ABC | eSignatureSuite will search your document for the first search string and presents the corresponding field to sign it. Then the second string is searched etc. until all strings have been searched once. Then the sequence is started anew, but search strings, which are not found anymore, will be skipped, of course. |
| AAA BBB CCC | With this option, all signing fields with only your first search string will be shown first, then all fields with the second string and so on. This is especially useful, when multiple users are supposed to sign the same document but the signing device should not be switched between the users for each signature. |
| As sorted | Choosing this option will ignore the order of search strings and the document will be searched in the previously determined sort order (so, normally "From top left to bottom right") and so, all signing fields will be treated equally and will be shown in the order they are found. |
...
...
Additional search result filters
...
In the end, it could look like this:

...
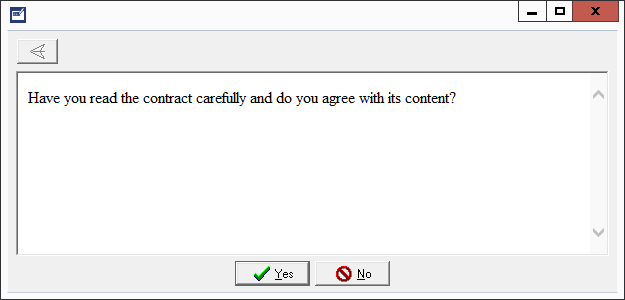
Confirmation dialog before signing
...
- no confirmation dialog at all (default setting)
- only the possibility to confirm via an "OK" button
- two buttons, with the options to either go on with the signing procedure by clicking "OK" or stopping it with "Cancel"
- two buttons, with the option to either confirm with "Yes" and go on with the signing procedure or to answer "No" and so stopping it
After you have chosen, which option the user will see later on, you can use the lower of the two dropdown menus to decide, what is supposed to happen with the whole signature process, if the user clicks the "No" or "Cancel" buttons in this confirmation dialog:
- the signing process is completely cancelled, including all other signatures, which might come later in this signature set
- only the current signature field is skipped instead of allowing it to be signed. However, please be aware, that skipping signatures is only possible for those, which are not mandatory signatures.
This is an example of how your confirmation dialog could look like:
However, your confirmation dialog can also look like this:
...
Beware! If there are any check boxes within your confirmation dialog, they all have to be checked before the "OK" or "Yes" button is useable. You could use this feature, for example, to create check lists, which have to be completed before the customer is allowed to sign. |
|
...
Using images as signatures
Since version 5.4 of eSignatureSuite, it's possible to make a signature-set add an image file as signature instead of the former manual signature. For this, you can select one or multiple image files and when the signature-set is processed, those pictures will be added at the position of your choice and in the size of your choice. The following details will explain the neccessary steps:
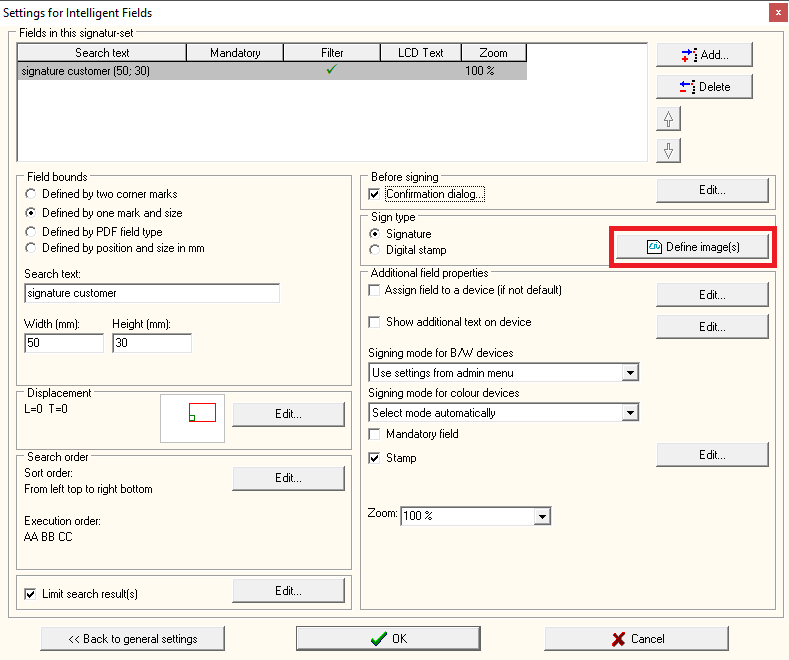
- Start off by clicking the "Define image(s)" button
- A new dialog will open, in which you can either...
a) start a file selection window by clicking the "Add..." button or
b) start a folder selection window by clicking the "Folder..." button. - Depending on your choice, you now can select any picture with either the PNG, BMP or JPG format or even a whole folder, from whose content you will be able to select another picture each time you sign.
- Now the path to the chosen image file and/or to the chosen image folder will be saved in the picture list. For single images a (possibly zoomed) preview will be shown.
...
 | Beware! Some things you should take care about when using this feature:
|
...
Assigning the signature field to a (group of) device(s)
...
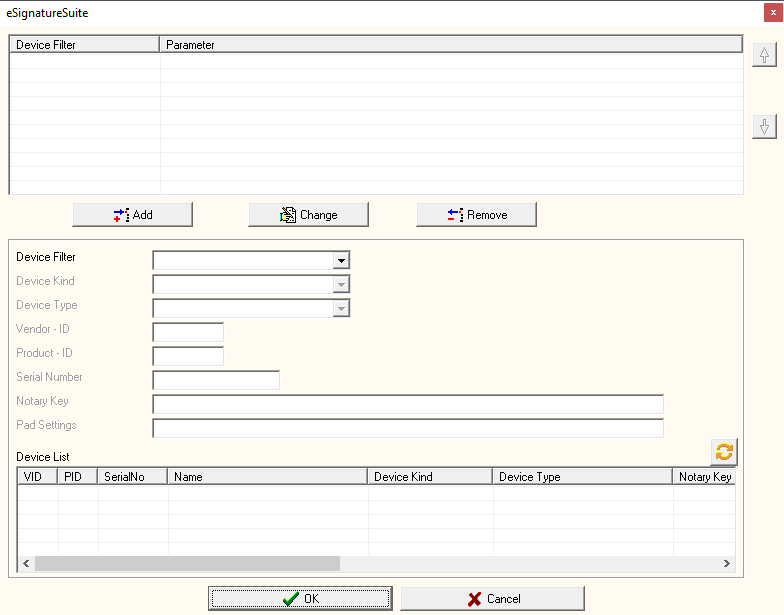 | |
| Insert | This adds a device filter, which you set up in the lower part of the menu. The type of filter is selected with the "Device Filter" drop down menu and then the respective value can be changed in the unlocked text field. |
| Change | Select one of the previously added filters in the list on the top, then make the desired changes to the filter and then click the "Change" button to save your edited device filter. |
| Remove | With this button, you can remove the currently selected device filter from the list. |
| Device Filter | This drop down menu determines the type of filter to be used. Depending on your choice here, the following text fields are unlocked and the available choices will be explained now. |
| Device Kind | With this filter, you can restrict signing this signature field to only the selected device kind. Here you can differentiate between the various StepOver products, for example duraSign Brilliance or naturaSign Colour, but also more general device kinds like tabletPCs or computer mice (select the MSInk Tablet for this). |
| Device Type | With this option, you can restrict the allowed devices to different attributes, which different devices could have in common, for example only devices with colour displays, only black-and-white devices or only StepOver devices. |
| Vendor - ID | Both of these ID variants allow to exactly correlate any device to its manufacturer (normally, the StepOver GmbH has the vendor ID "2689") and/or a certain group of products. Please scan the IDs of your connected devices (yellow button, see below) or consult the following table: StepOver IDs and display resolutions |
| Product - ID | |
| Serial number | With this filter, the current signing field can only be signed with exactly one device, which needs exactly the given serial number. StepOver device serial numbers are always unique and can be read from the currently connected devices with the yellow "Read devices" button (see below). Additionally, the serial number of any device is always shown right after it has started in the lower right corner of the device display. |
| Notary Key | Only devices with the given Notary Key are allowed to sign this field. Generally, the Notary Key is the same for all StepOver devices. However, some companies want us to produce their ordered devices with their own Notary Key to raise the level of security even further. Select this filter if your company is using devices with their own special Notary Key and you wish to restrict signing only to these devices. Because you are most likely to not know your Notary Key, you should read it from the connected devices with the yellow "Read devices" button (see below). |
| Pad Settings | The Pad Settings are a collection of various device attributes, like for example the product name, Vendor-ID and Product-ID as well as the serial number. This makes this filter restrict signing to exactly one specific device. Read the Pad Settings of the currently connected devices with the yellow "Read devices" button (see below). |
| Device List | When clicking the yellow "Read devices" button Now, if you select any of the devices in the list on the bottom, the fields above will be pre-filled with their respective data and now you just need to select your desired filter from the "Device Filter" dropdown menu and click the "Insert" button. This is by far the fastest method to set up the device restrictions for a specific signature field. |
...
...
Show additional text on device
...
For this feature to work, please make sure to select the correct signature mode (Custom sign mode) as described in the next paragraph!
...
Determining the signature mode (with or without the document in the background)
...
The following options are available and you can select them separately for black-and-white devices and for devices with a colour display: | |
|---|---|
| Use mode from admin menu | The global settings from the administration menu for each of the device types will be used ("Show document context on display while signing" in the "Display" tab). |
| Custom sign mode | By default, the custom sign mode shows a neutral background; on devices with colour display this is a request to sign in different languages. This mode is named "Custom Mode" because its quite customizable, for example by allowing to show your own text or on colour devices even your own background pictures. If you want to use the previously described feature "Text on pad", you have to select this mode for your device type. Another advantage of this mode is, that no document contenct has to be sent from the computer to the signing device and so whole process gets a tiny bit faster. |
| Sign in document mode | By default, this mode is selected for devices with colour display, but not for black-and-white devices, because the quality of the document is much better on colour devices, if course. In this mode, a certain area of the document is shown around and in the background of the signing field. That's why this mode is especially useful to show and prove to a customer that he's signing exactly, what he wants to sign, right before he is signing it. |
| Select mode automatically | For devices with colour displays, this is an additional option, which will check the other settings for this field and if "Text on pad" is supposed to be displayed, the signature mode is automatically set to the "Custom sign mode" and otherwise to the "Sign in document mode". In signature sets, this mode is the default setting for colour devices. |
...
...
Mandatory and optional signing fields
...
- The user must add this field's signature in order to complete the whole signature-set succesfully.
- Cancelling while signing a mandatory field will show a warning note and then offers the possibility to either cancel the complete signing process or to eventually sign the field. Contrary to this behaviour, cancelling an optional field won't cancel the whole signature-set, but might allow to resume it later on.
- You cannot skip mandatory fields to sign them later, but you can skip optional fields.
...
...
Stamp
Clicking the "Stamp" button in the signature-set options will open the following menu:
...
The checkbox next to the "Stamp" option in the signature-set menu determines if a stamp shall be added below the signature or not.
...
Zoom
The last option to customize your signature field is the displayed zoom level in eSignatureSuite (but not on the device display!) while signing.
...
| Apart from fixed percentages, the following options are available: | |
|---|---|
| Fit to screen | Zooms out until the whole document page is visible. Please be aware that this can make the signature field look quite small, even on a large monitor. |
| Fit to width | The document is enlargened until it effectively fills the whole width of the monitor. |
| Keep zoom | No zooming is done and the document is kept in the same zoom level as it has been before the signature process has started. |
...
Additional signing fields
Click the "Add" button to create more fields or click "Delete" to remove previous entries. Each new signing field search entry will be added to the list and with the up and down arrows you can rearrange their processing order.
...
Step 6: Completing and using the signature-set
...
All settings you made until now, were saved immediately after making them. So after confirming the signature-set creation and leaving the dialog with the OK-button, it's not necessary to save the *.sss file separately, because the file has already been saved to the path, which you appointed in step 3.
Now, you can use the freshly created signature-set to...
- transfer it automatically to eSignatureSuite by using a startparameter
- drag&drop it together with your PDF file on the eSignatureSuite starting executable "SOSigOffice.exe"
- load and execute it in eSignatureSuite itself
...
If you want to manually load and execute a signature-set file in eSignatureSuite, you have to:
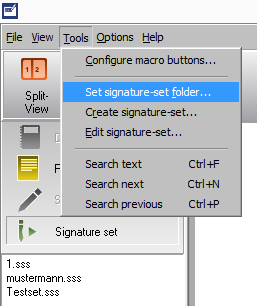 | If your signature-set is already shown in the list in the left sidebar, just double-click it and eSignatureSuite will start it automatically with your first signing field - depending on your search strings and settings. This should be the normal case, because in step 3, you already defined the saving path for your signature-sets. If the signature-set is not shown there (for example, because you want to start another signature-set than the one you created last), please go to the next step. |
If your desired signature-set is not shown in the sidebar, the reasons for this could be as follows:
| |
If the correct saving path is not set, yet, you can find the option to do so in the "Tools" menu. It's named "Set signature-set folder..." | |
Now, after finding your signature-set in the sidebar, start it with a double-click and eSignatureSuite will jump to your first signing field.
|
In case you want to edit an already existing signature-set file, use the "Edit signature-set..." button and in the following dialog, select the signature-set file, you want to work on.
Now some useful hints on how to combine the usage of signature-sets together with macro buttons and some other settings:
...
- Take care when using "Defined by marks" to set up your signing field:
If your defining mark is a string of characters like in the given example ("signature customer"), then the first character (so, in this case the letter "S") will be used as starting- and corner point.
If the same marks can be found more than once in the document, for each found mark, another signing field will be created with the same given settings. So, if you want to change the settings for each field, you also have to change the characterizing marks for each field to a unique one!
You should also take care, not to use character strings, which can also be found in the document content. Following this, the defining mark "signature1" might be more useful than just "signature".
White letters on white background: Generally, you can make your character strings invisible to the reader by writing the string in the same colour as the document background (so, mostly white on white). However, when creating the PDF, please make sure, that the text is really included in the file! Some PDF converters might not transfer white text on white background from a text editing tool to the printing data stream (because a normal printer couldn't use this data anyway).