...
 | Beware! Some things you should take care about when using this feature:
|
...
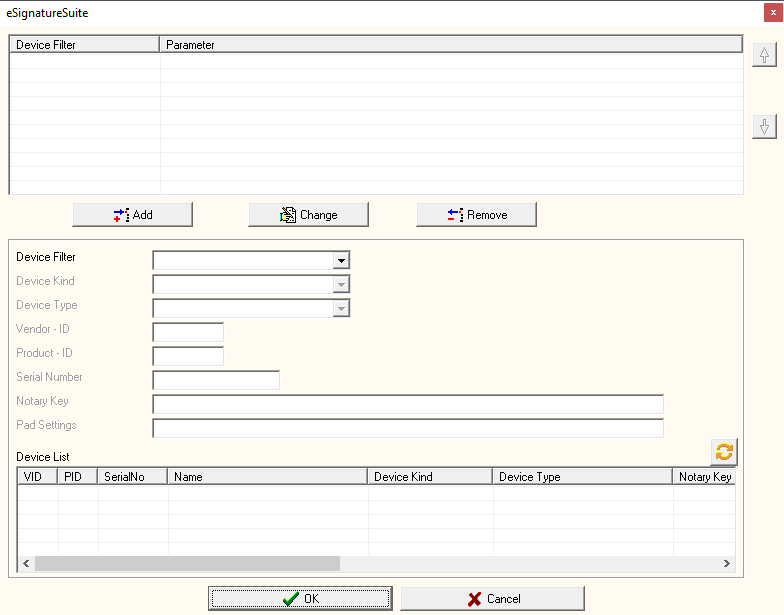 | |
| Insert | This adds a device filter, which you set up in the lower part of the menu. The type of filter is selected with the "Device Filter" drop down menu and then the respective value can be changed in the unlocked text field. |
| Change | Select one of the previously added filters in the list on the top, then make the desired changes to the filter and then click the "Change" button to save your edited device filter. |
| Remove | With this button, you can remove the currently selected device filter from the list. |
| Device Filter | This drop down menu determines the type of filter to be used. Depending on your choice here, the following text fields are unlocked and the available choices will be explained now. |
| Device Kind | With this filter, you can restrict signing this signature field to only the selected device kind. Here you can differentiate between the various StepOver products, for example duraSign Brilliance or naturaSign Colour, but also more general device kinds like tabletPCs or computer mice (select the MSInk Tablet for this). |
| Device Type | With this option, you can restrict the allowed devices to different attributes, which different devices could have in common, for example only devices with colour displays, only black-and-white devices or only StepOver devices. |
| Vendor - ID | Both of these ID variants allow to exactly correlate any device to its manufacturer (normally, the StepOver GmbH has the vendor ID "2689") and/or a certain group of products. Please scan the IDs of your connected devices (yellow button, see below) or consult the following table: StepOver IDs and display resolutions |
| Product - ID | |
| Serial number | With this filter, the current signing field can only be signed with exactly one device, which needs exactly the given serial number. StepOver device serial numbers are always unique and can be read from the currently connected devices with the yellow "Read devices" button (see below). Additionally, the serial number of any device is always shown right after it has started in the lower right corner of the device display. |
| Notary Key | Only devices with the given Notary Key are allowed to sign this field. Generally, the Notary Key is the same for all StepOver devices. However, some companies want us to produce their ordered devices with their own Notary Key to raise the level of security even further. Select this filter if your company is using devices with their own special Notary Key and you wish to restrict signing only to these devices. Because you are most likely to not know your Notary Key, you should read it from the connected devices with the yellow "Read devices" button (see below). |
| Pad Settings | The Pad Settings are a collection of various device attributes, like for example the product name, Vendor-ID and Product-ID as well as the serial number. This makes this filter restrict signing to exactly one specific device. Read the Pad Settings of the currently connected devices with the yellow "Read devices" button (see below). |
| Device List | When clicking the yellow "Read devices" button Now, if you select any of the devices in the list on the bottom, the fields above will be pre-filled with their respective data and now you just need to select your desired filter from the "Device Filter" dropdown menu and click the "Insert" button. This is by far the fastest method to set up the device restrictions for a specific signature field. |
...
You can add this data to the *.sss-file for each signature with the help of a text editor. Learn more about this topic here: Structure of a signature set file (*.sss)
The checkbox next to the "Stamp" option in the signature-set menu determines if a stamp shall be added below the signature or not.
...