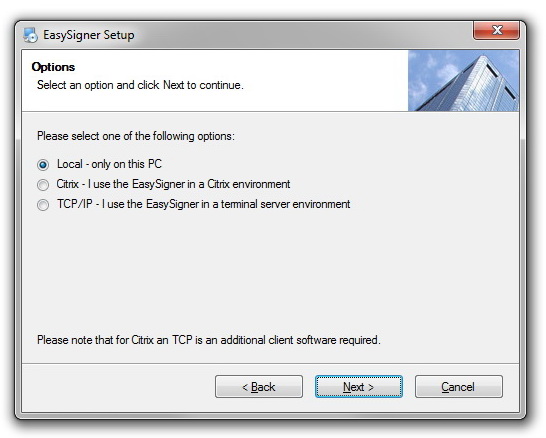
Using SimpleSigner over a TCP/IP Network
Using SimpleSigner over TCP Network with Startparameter
Parameter | Usage | |
|---|---|---|
| tcp- | This parameter defines TCP address and port of the remote client. Address and port should be entered directly after the tcp- parameter. tcp-192.168.5.66:8888 |
Note: the SimpleSigner still trys to Access the Config.ini, to solve this you can copy the config.ini into the Installation Folder with the IP 0.0.0.0
[server]
ip=0.0.0.0
port=8888
logEnabled=0
logLevel=0
logLenMax=2048
logFile=C:\temp\logs\soClient.log
Server configuration
General
In case the application is running on the same system where the pad is connected, we can access the signature pad by USB. But in case the application can´t have a direct access to the USB device, which is the case by RemoteDesktop and Citrix, we are forwarding all device requests to our Client Component. This Component will execute the requests and will send the results back to the server application.
We designed the remote component/layer in the way, that the main application don´t need to be modified in case the signature device is not local connected. Therefor we are tunnelling our device-communication between our SOPAD.dll (High Level Pad Comunication) and the SOPADCOM.dll (USB-Level), which means we are replacing the normal SOPADCOM.dll on the server with mediator version. This version takes care that the signature pad request will be forwarded to the client (by TCP or Citrix), where the local SOPADCOM.dll will perform the request.
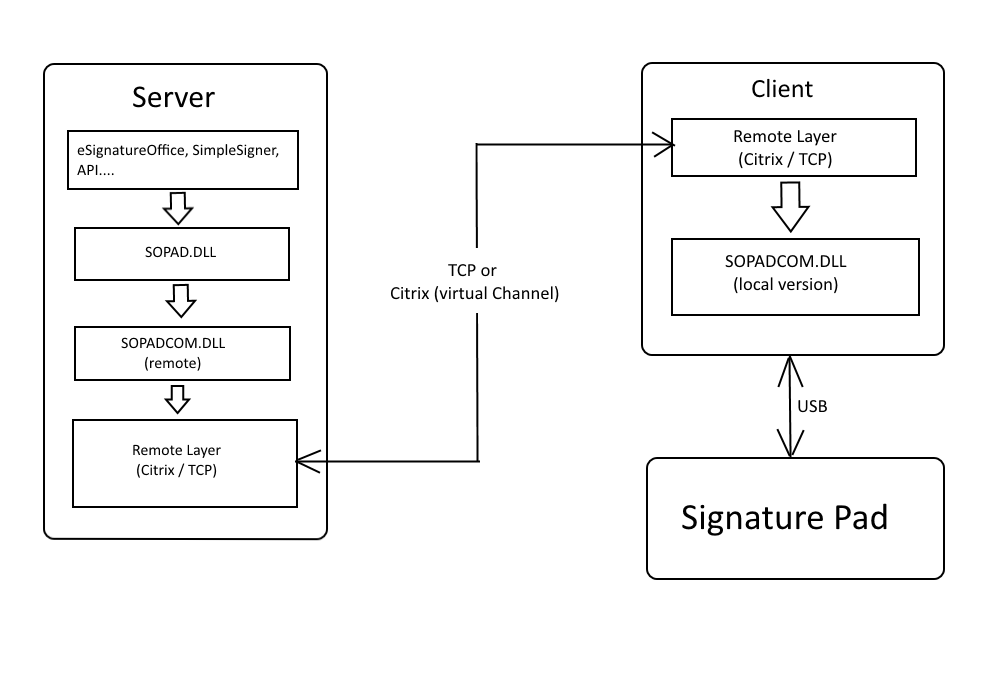
Which Type of communication is used dependents by the DLL Version which is used from the Application. This means you need already to decide by the installation which communication type you want to use.
Requirements
- Visual C++ Redistributable für Visual Studio (32Bit / x84)
https://support.microsoft.com/de-de/help/2977003/the-latest-supported-visual-c-downloads - universelle C RunTime (ussually installed with Windows Update, but needs to be installed incase api-ms-win-crt-stdio-l1-1-0.dll is not found)
https://support.microsoft.com/de-de/help/2999226/update-for-universal-c-runtime-in-windows
Configuration
Because the Communication is controlled / initialize by the Server it means the remote components needs to know where the client system is. For TCP it means the server needs the client-IP and Port, these information needs to be configured inside the config.ini
[server]
ip=0.0.0.0
port=8888
[common]
logEnabled=0
logLevel=0
logLenMax=2048
logFile=C:\temp\logs\soClient.log
You need to replace the IP address (0.0.0.0) with the one of the client. Additional to the IP and the port there are settings for logging, but this should only be enabled in case of a problem.
There are 2 ways to use the config.ini, in case you place it into the same folder where the executable file of the application is, all users which are using the application will use the same TCP Settings. In case one of our products is being used, you need to place the INI in the installations folders next to the executable files (SOSigOffice.exe, SimpleSigner.exe). In case you used the DeviceAPI with your own Software you need to place the INI in the Folder of your own executable file.
In case of an Multi-User System you should use the second option and place the config.ini into the user folder (C:\Users\<USER>\AppData\Roaming\StepOver\TCPIpExtension), on that way every user can have different TCP-Settings for the same Application.
You need to create this Config.ini by your own (create a textfile with the values above and save it under the name config.ini) or you can use the RDP-IPConfig tool. The Setup is not creating the config.ini.
RDP-IPConfig Tool
Because the Client-IP can be dynamic we created a small tool which can be used to set / update the config.ini. The tool will check the network status for open RDP Sessions to identify the Client-IP and will write it into the user folder. This means the tool works only when the TCP Session is active, for example you can start it automatically with the login (see details here) of the user (or run it manually). This tool is optional and not required for the TCP Solution.
https://www.stepoverinfo.net/download.php?file=RDP-IPConfig-Set_V3.zip
optional Parameters:
| Parameter | Info |
|---|---|
-save2config=<saveToPath> | To set a different save path of the config.ini |
-basicconfig=<path> | config.ini which should be used as Basic (it will be copied to AppData) |
| -useExternalIP | try to read the external IP |
Problems / Errors
In case the Server can´t find the Configuration file (config.ini) or establish the connection to the client. It will show the following message.
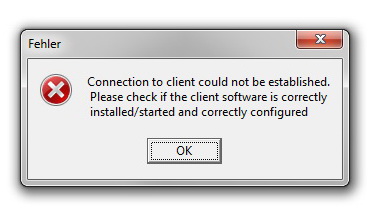
possible Problems
- missing config.ini, please check if the file exist and has the correct Client values
- blocking firewall, wrong Client-IP or other network issues. To figure out where the problem is you can use telnet service from the server side to check if you can connect to the TCP-Client.
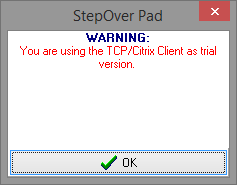
In case the Client is not activated there will an Demo Message each time when you start a signature.
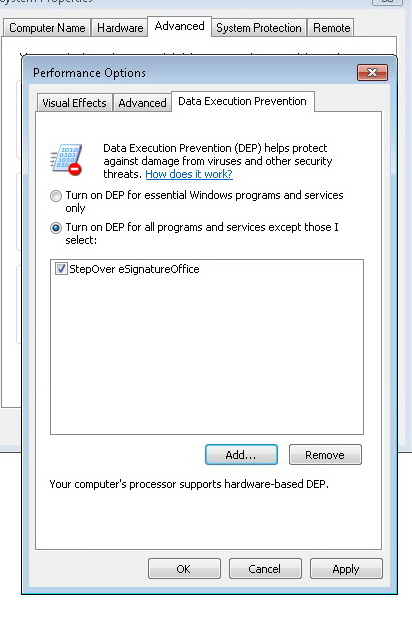
Access Violation of BEX or APPCRASH occurrs on Windows Server 2008 R2 with Terminal Service.
- Right click on my computer
- go to properties
- click on advanced system settings
- under performance, click settings
- click the Data Execution Prevention tab, and then click Turn on DEP for all programs and services except those I select.
- click Add, browse to the executable file for the program and add it.
Windows client configuration
General
The StepOver Citrix Client is an extension for the Citrix Receiver (also called Citrix Client or ICA Client), which will register our components on the local system. This allows us to open a virtual channel between the server application and the client which is used to communicate data, in our case we using it to transport the device commands and responses. The channel between the Client and Server is part of the Citrix Connection, which means the server identifies the client over the Citrix session and does not need an IP like we need it by our TCP Solution. We also don´t need Firewall changes.
Windows
Requirements:
- Installed Citrix Receiver (after Update of Citrix Receiver you might need to reinstall the StepOver Citrix Client)
- Visual C++ Redistributable für Visual Studio (32Bit / x86)
https://support.microsoft.com/de-de/help/2977003/the-latest-supported-visual-c-downloads - universelle C RunTime (ussually installed with Windows Update, but needs to be installed incase api-ms-win-crt-stdio-l1-1-0.dll is not found)
https://support.microsoft.com/de-de/help/2999226/update-for-universal-c-runtime-in-windows
Download:
https://www.stepoverinfo.net/download.php?key=citrix-client
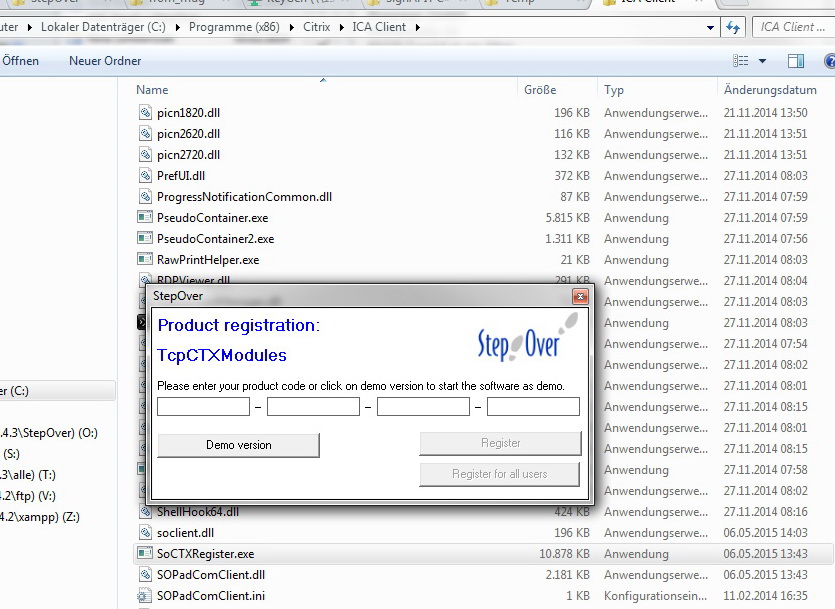
License:
The Client can be used as Demo but this means there will be a Demo Message on the Server side each time you try to sign. To enter a client license you have to start SoCTXRegister.exe which is located on the client system under C:\Program Files (x86)\Citrix\ICA Client (or C:\Program Files\Citrix\ICA Client).
Igel
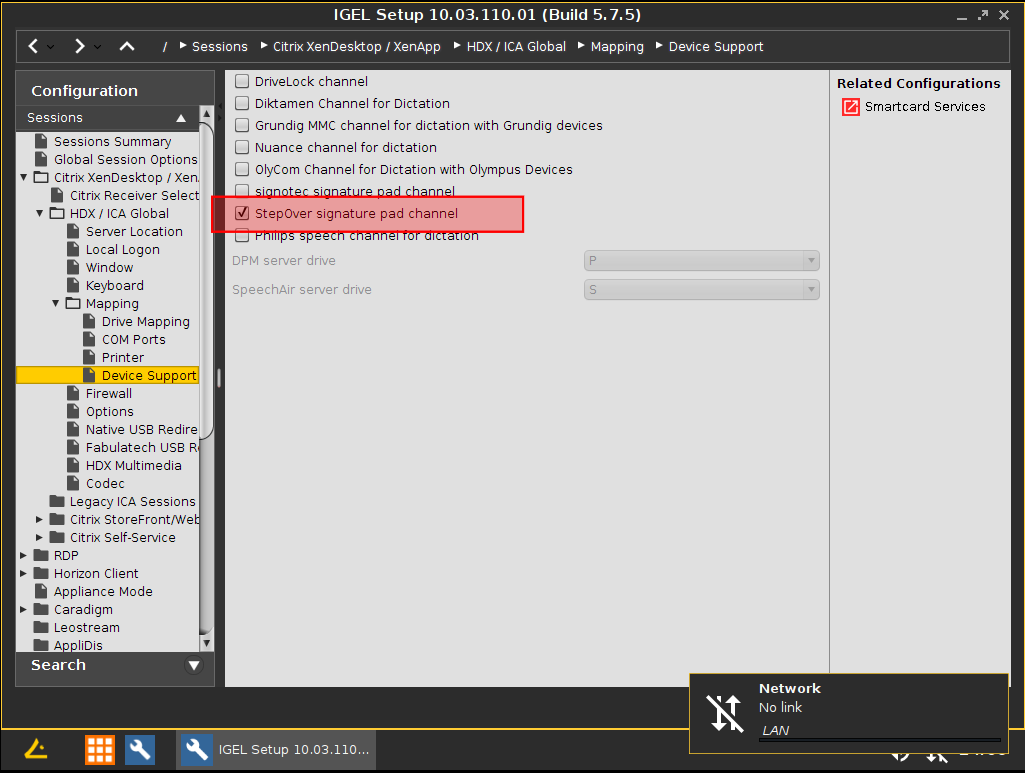
Since Firmware 5.12.100 and 10.03.110 the StepOver Citrix Client is part of the Igel System. This Client allows to forward the StepOver Pads from the Igel to the Citrix Server. You might need to activate the Option, you find it under Sessions | "Citrix XenDesktop / XenApp" | "HDX / ICA Global" | Mapping | Device Support, make sure the Option is enabled.
On the Server side you need to install the StepOver Software with the Option Citrix
eLux
We also have an package for eLux Clients, you can find the details here.
Alternative - VCOM
In case you have an older Firmware on the Igel which you can´t Update, you can activate the virtual COM-Port on the Signature Pad and let it forward by Citrix. See more about this solution here.
Linux client configuration
Overview of Server TCO Client Linux
The TCP/IP application for organizing access to StepOver signature devices by Network is called sotcp under Linux.
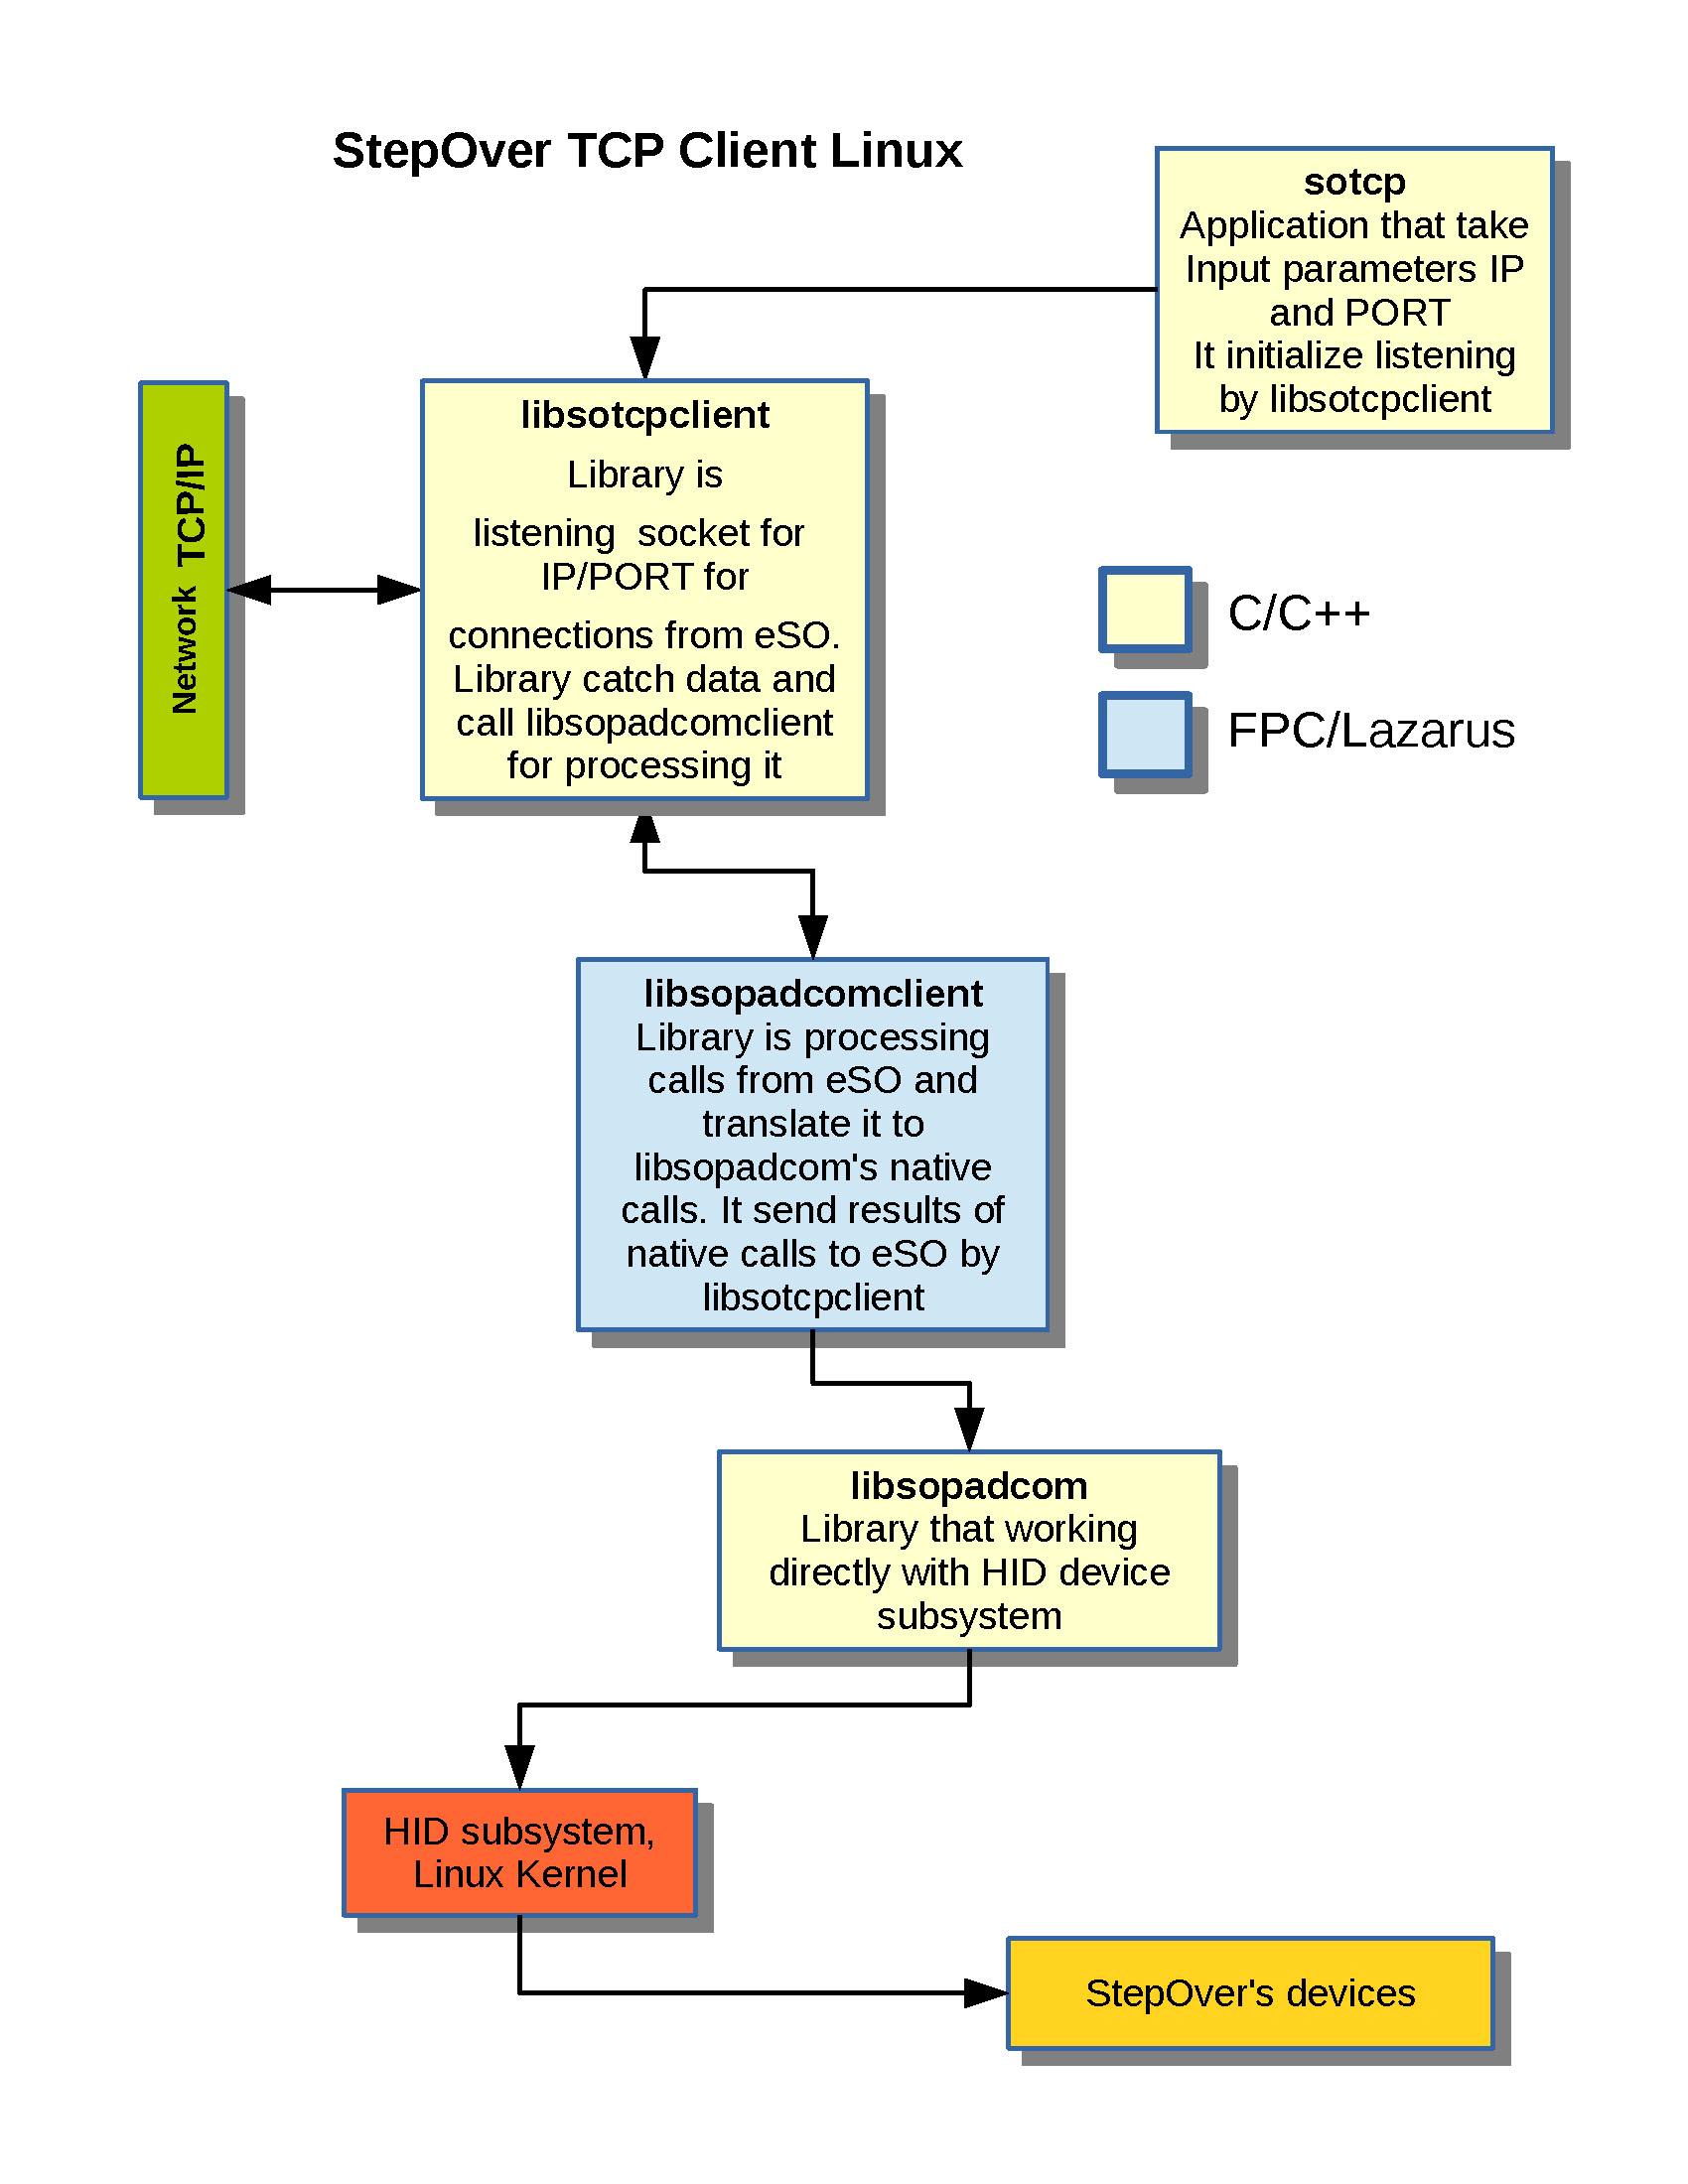
Configuration of sotcp
SYNOPSIS
sotcp [ --hostname=<hostname/IPaddress> ] --port=<service/port>
DESCRIPTION
sotcp is the TCP/IP application for organizing access to StepOver signature devices by network. Application is using for network communication with StepOver signature devices from remote computer. It can be used with eSignatureOffice.
sotcp is listening specified by -p port number for remote request form application.
OPTIONS
-h, --help Display a short usage description, including all available options and examples.
-n, --hostname=Specify IP address or hostname of interface for listening.
-p, --port=Specify a port number or service name for listening.
-v, --version Displays the version number of sotcp to stdout.
EXAMPLES
sotcp -p 8888
sotcp --hostname=192.168.117.142 --port=8888
sotcp -n mypc.stepover.de -p 8888
sotcp -n localhost -p 9977
IGEL Configuration
https://kb.igel.com/igelos-11.08.330/en/with-stepover-tcp-client-88020892.html