4. Getting Started: An introduction to the basic features of eSignatureOffice
In this part of the manual, you will learn using eSignatureOffice with the help of various examples, numerous screenshots and step-by-step instructions. Comments and hints concerning different options will help you to adjust the program according to your wishes. The explanations for these options will then be expanded in other chapters of this manual.
For the sake of convenience, we assume, that you're taking your first steps in eSignatureOffice with the standard options and thus all screenshots will show the standard user interface.
In the following chapters, you will learn...
- what you will see upon your first start
- how to choose your preferred signature device
- how to open documents
- how to sign your documents
- how to speed up and optimize your working processes with eSignatureOffice
The first start
Just like other programs, eSignatureOffice can be started either via Windows start menu or with the link on your desktop, which you can opt to create during the setup process.
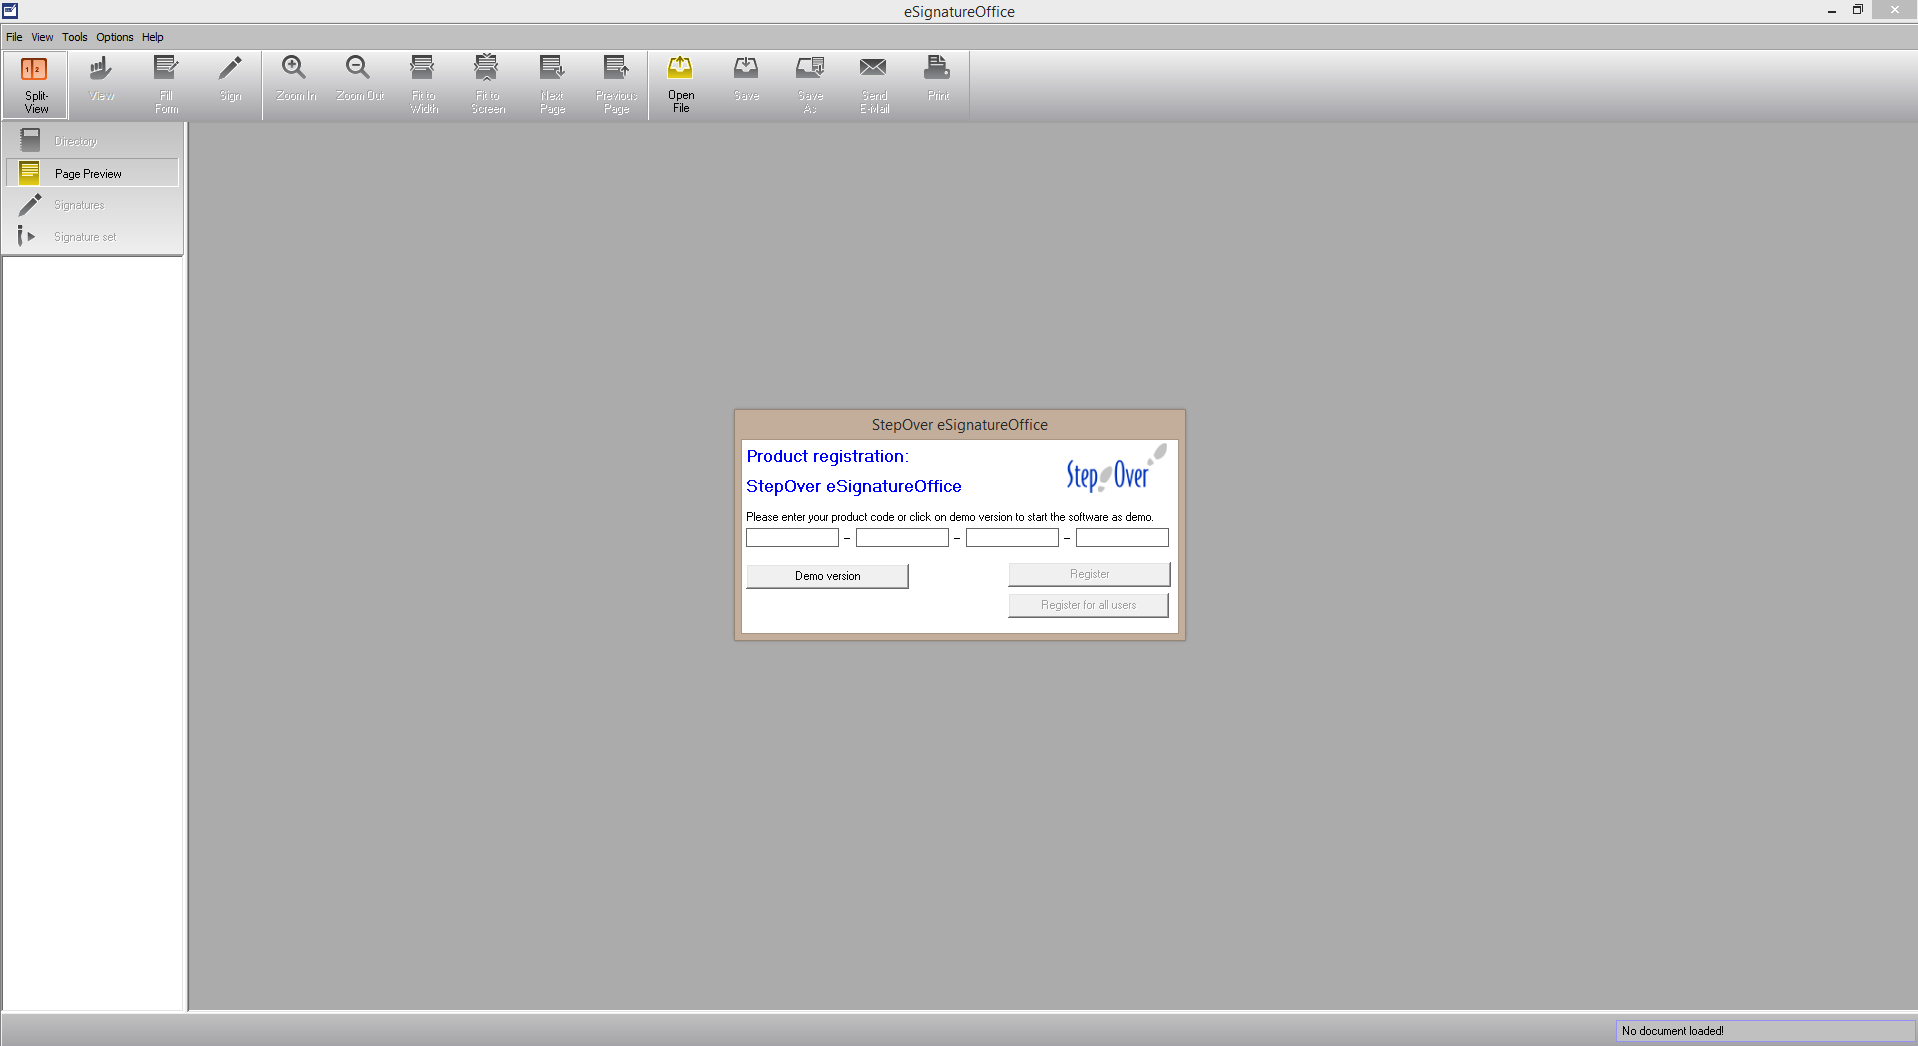
Afterwards, you will see this:
The registration window in the center is only visible until you register your version of eSignatureOffice. Until then, you are using an unrestricted demo version, which is only distinguishable by an eye-catching label under each signature. A detailled explanation on how to register eSignatureOffice, can be found here.
However, if you just want to familiarize yourself with the program, use the "Demo version" button for now. From now on, the following areas are available to you:
The yellow area is the main menu, which allows you to use various basic functions like opening and saving files, zooming, turning pages etc. However, in this area you also find options to create or edit macros and signature-sets and to access the administration menu or this user manual. |
The blue area is the tool bar, in which you find the most common functions (some of those can also be found in the main menu). In the administration menu, you can customize its design as well as the available buttons. |
The green area is the directory, which you can switch on and off via the first button in the tool bar ("Split-View"). With the help of this directory, you have easy and fast access to
|
The red area in the lower part of your display is the footer. Here you will find different buttons while signing on the left side. On the right side, you can read the file name of the currently loaded document. |
The whole remaining area in the middle (currently grey) is where your document will be displayed once it's loaded. |
How do I open documents?
There are multiple possibilities available to open documents in order to sign them. The easiest and fastest way will be shown here.
Advanced alternatives like transmitting the file as parameter from other programs to eSignatureOffice or the StepOver PDF Converter will be explained here.
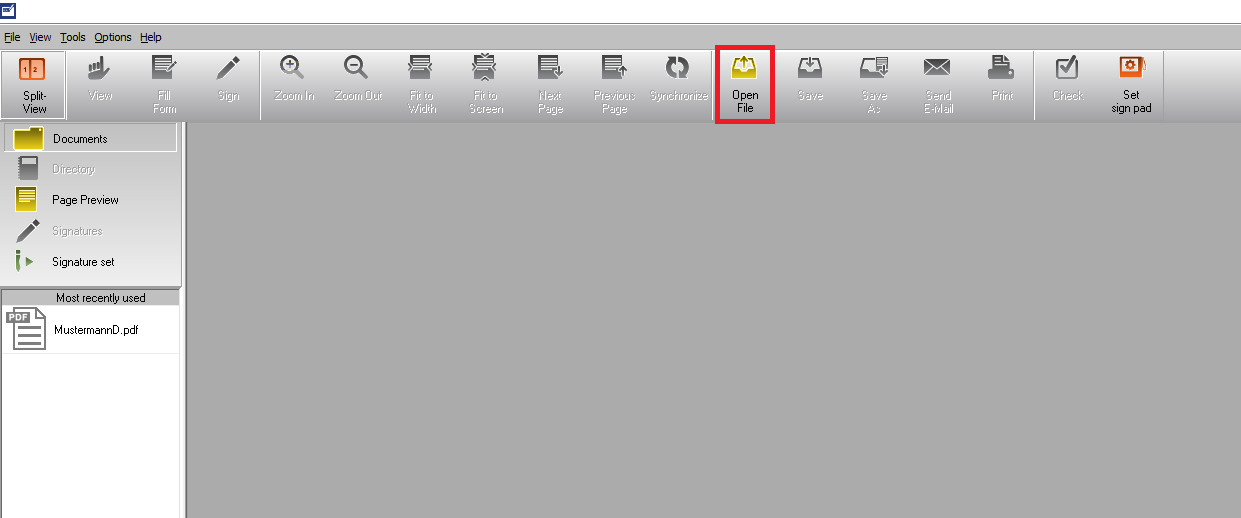
The easiest way is opening a file by clicking on the yellow "Open File"
Of course, just like in most other similar applications, you can also use the "File | Open" button of your main menu at the top left. If you have opened a document previously, eSignatureOffice by default saves a link to this file in the "Most recently used" area in the "Documents" tab in your sidebar. |
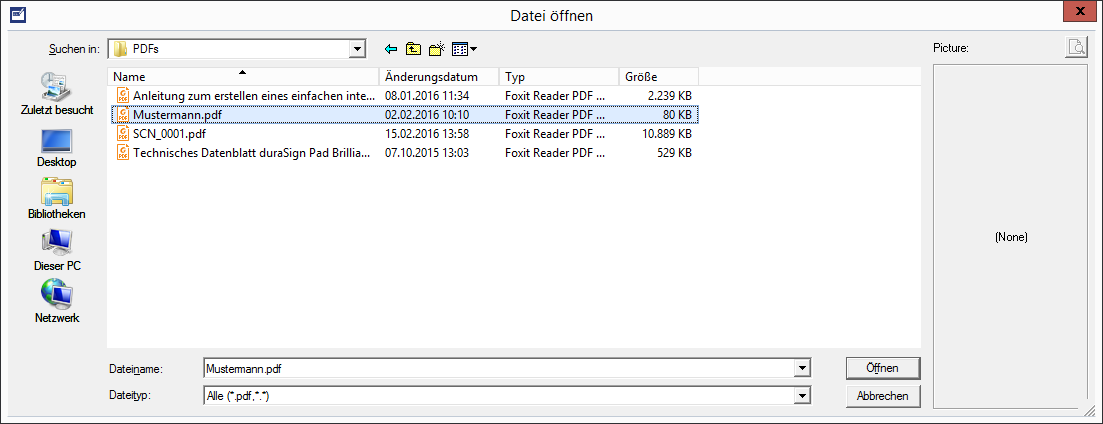
Both ways will lead to a standard Windows "Open File" dialog, in which you can go to wherever your documents are stored and then open the file of your choice.
With the "Open" button at the bottom right, the chosen file will be loaded into eSignatureOffice and presented to you in full width view. |
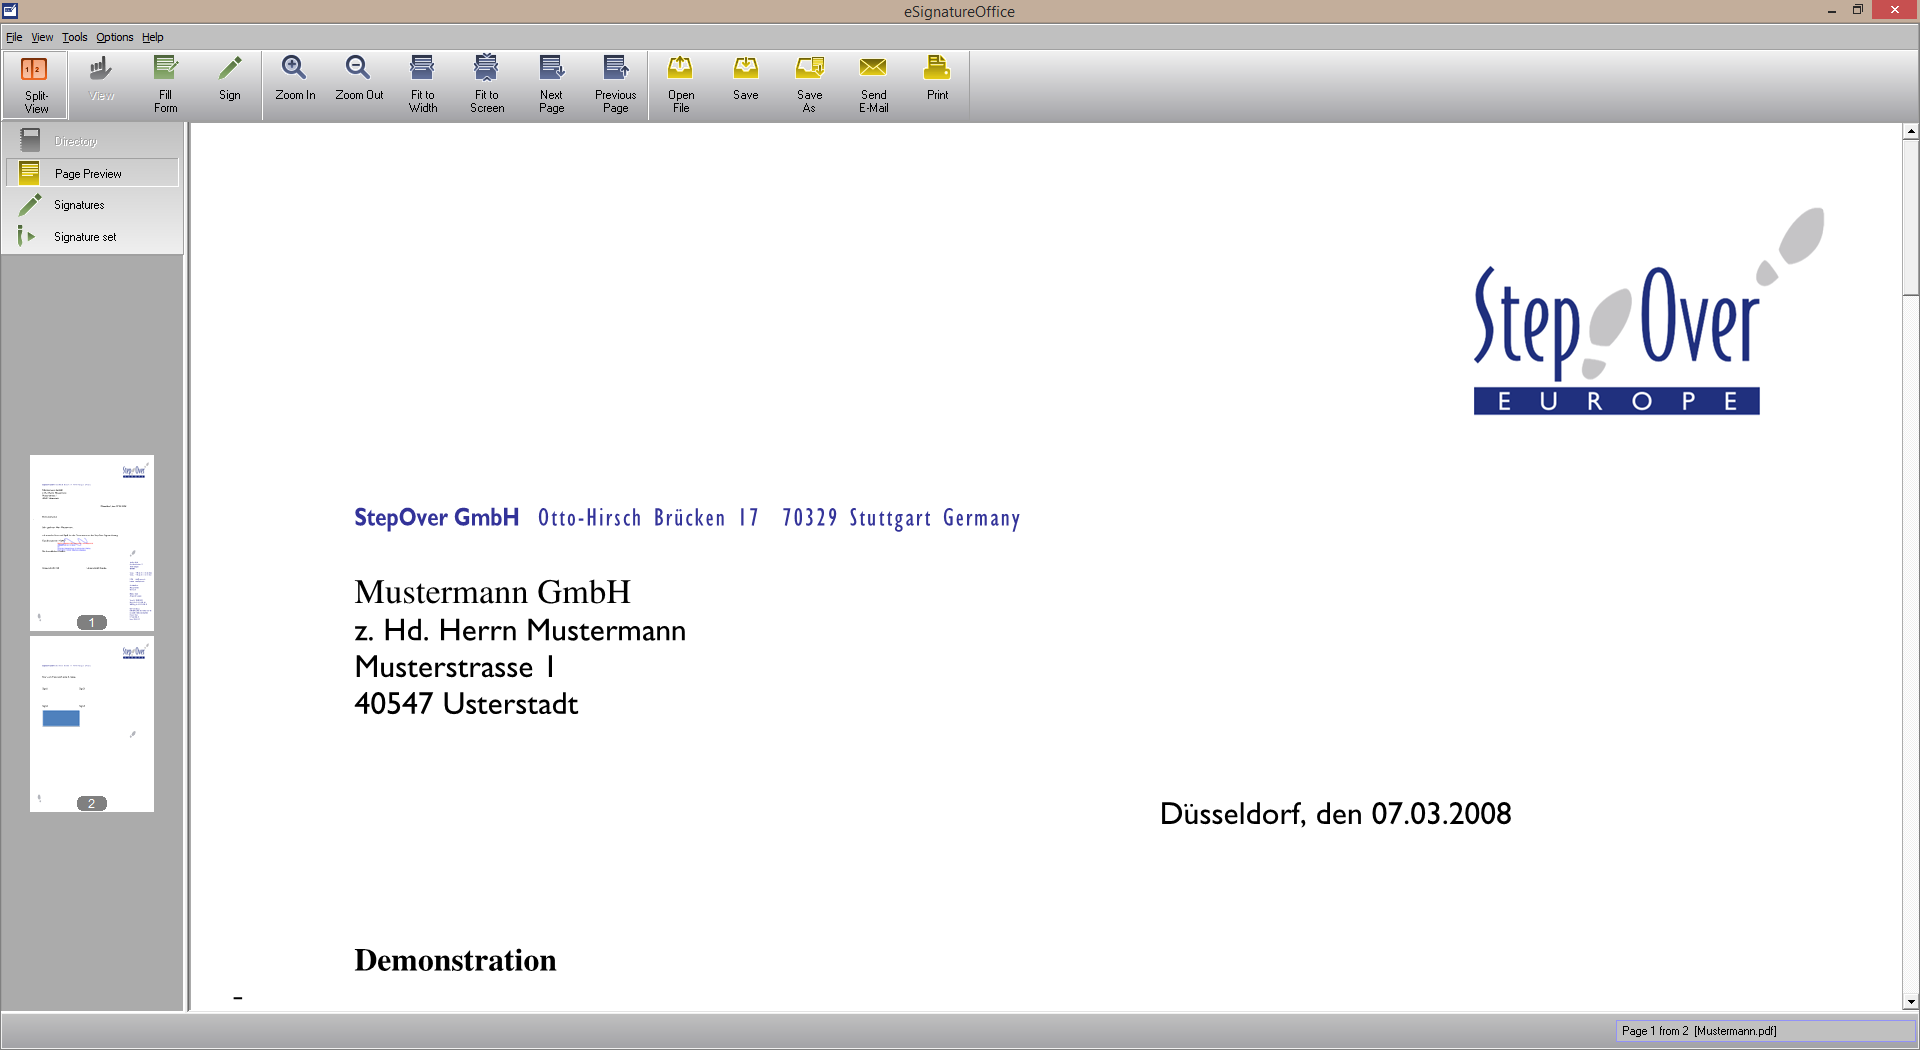
This should look like this:
Your file is opened and you're ready to sign now. How this works, will be shown in the next chapter. |
How do I sign a document?
Here you will learn step-by-step how a normal signature procedure with all available options looks like. However, at some points, you will be shown alternative ways to handle the respective step, for example when you can alter a dialogue or switch it off completely in order to speed up the whole procedure of adding a signature to your document.
In the end, you will have learned, how a complete and detailed signature with all available security options and dialogues will look like, but also how to add a signature fast and without any impediments like queries or dialogues.
In the previous chapters of this introduction, you already made your first steps by opening your soon-to-sign document and configured your preferred signature device. Now your display should look like this (just with your own document shown):
This means:
| ||
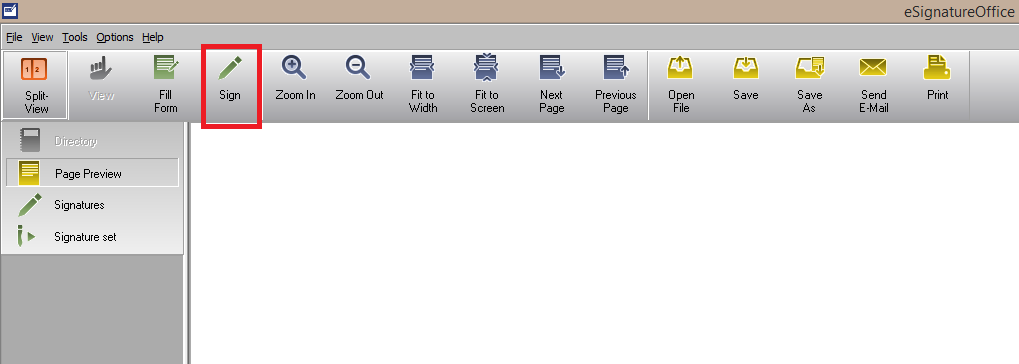
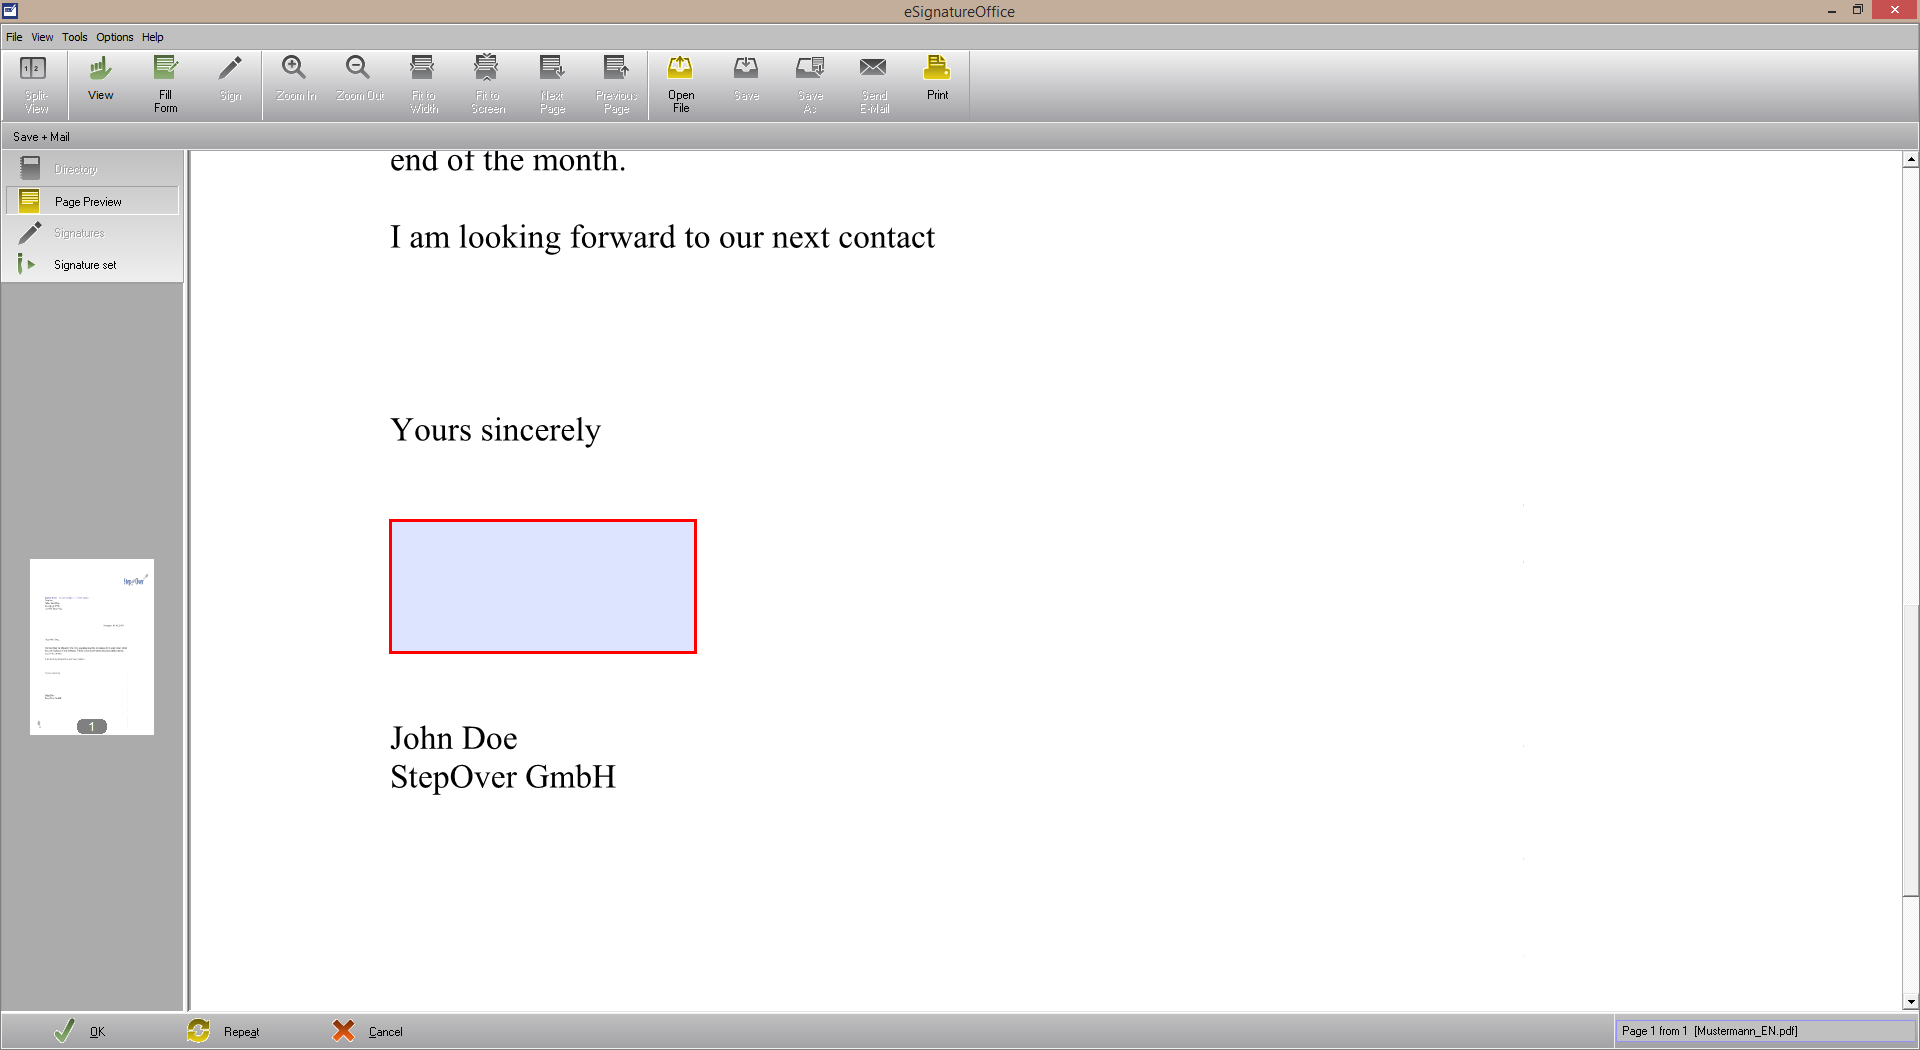
After having read, what you're supposed to sign and after having chosen a fitting position to place your signature, it is time to change into the "Sign Mode" by pressing the green "Sign" button
In this mode, you can still navigate with the blue buttons of your tool bar and with your mouse-wheel. However, clicking your mouse leads to a completely new effect. | ||
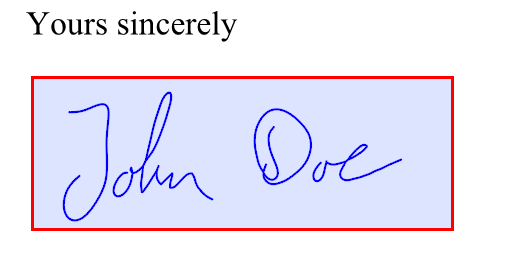
Because by clicking your mouse button and dragging your cursor, you can draw a so-called signature field of any size. This field works as optical marker for your signature as well as a real boundary, over which it's not possible to draw lines. By default, this field is coloured light blue with a red frame to show the user exactly, where in the document he is signing. These colours can be customized in the administation menu. Learn more about this here. Here a sample picture of how this looks like:
| ||
So, go to the exact area, where you want to add your signature to the document and click at a supposed, imaginary corner of your future signature rectangle. To warrant a higher precision for this task, the cursor in this sign mode is a cross and its crossing point is used to draw the signature rectangle. For this, it doesn't matter, in which corner you are starting and in which direction you are drawing. Just keep the left mouse button pressed and draw the cursor until the red rectangle is as large as you want it to be. Then release the mouse button.
Now the coordinates of this field will be sent to the signature device, together with the current page of your document. If you are using a signature pad with a coloured display, you will not only see the signature field, but usually a part of the surrounding document, too - however, never more than the current document page. This way, you can still be sure to sign at the correct position. When using black-and-white devices, you generally can't nagivate your document on the device and your signature field also spans the whole display. | ||
Your signature device is now showing the red rectangle (or the whole signature field without borders), in which you can finally sign with the appropriate sign pen. While doing this, it helps a lot to imagine a normal signature on usual paper, while using the same pressure and speed as you would normally use.
Once you have started the signing process, you can cancel it any time by clicking the red "Cancel" button in the lower left corner of eSignatureOffice or - if provided - with the red button on your device display. In this way, the whole signature field will be deleted and you can draw a new one in your document. In case you are just not satisfied with your current signature, you can use the yellow "Repeat" button in order to keep the current signature field, which will just be reset to an empty one to sign anew. By default, eSignatureOffice will detect on its own when your signature is complete: this means, when there is no new pressure data for at least 2 seconds (and so the pen has been lifted from the device). According to experience, these 2 seconds offer enough time to add all kinds of dots and switch between multiple words. Is this time is too short or too long for you or do you wish, that your signature is only considered as completed when you press a certain button? Then you can change the settings for this behaviour, of course. How to do that, will be explained here . | ||
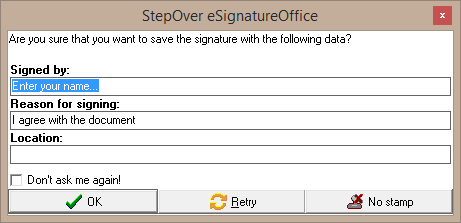
After completing your signature, the so-called stamp-dialogue will be shown, which allows you to provide additional information about your signature.
The distinctive fields are generally self-explanatory and have two functions:
Additional options here are as follows:
This additional information can be further individualized and using this feature can be made easier by using a stamp history or a list of prescripted answers. Learn more about stamps here . | ||
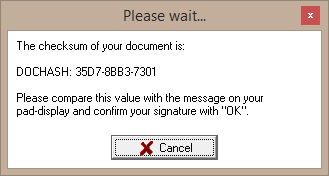
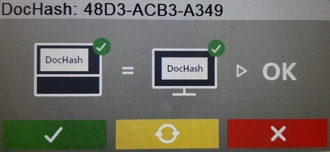
After having provided additional data to the stamp-dialogue as desired (or after skipping it), but before finally adding your signature to the document, another dialogue will appear simultaneously on your signature device as well as in eSignatureOffice: the so-called hash-dialogue, which can be especially useful for your data security.
Compare this string of digits and letters on your device with the string on your computer monitor. If everything is matching, you can be sure, that nothing has been manipulated. This string of characters is the hash-sum and it is calculated by using multiple parameters both of your document and your signature. If the two strings do not match, there could be a security problem and you should cancel the signature process immediately. Further options, you're having now:
| ||
Congratulations! You have added your digital signature to a document with the help of eSignatureOffice and now you can for example save it, print it or send it per mail. We admit, that this whole detailed procedure with all options can be quite long and arduous, but in the following chapters, you will learn a lot about several automating options, settings and shortcuts to help you speed up this process (and more) decisively. . |

How can I optimize this signature process?
In the previous paragrah, you were shown a very detailed, complete signature process. Because in this process, there are several steps, which you can skip, shorten oder automate, in this chapter each part of the process will be presented again separately and you will be shown, what you can change (some steps have to be repeated for this):
The following steps or with the following measures, you can save time (and so in consequence money):
- Load a document directly together with the start of eSignatureOffice
- Shorten the signature procedure - less dialogues!
- Automated creation of signature fields with the help of signature-sets - no drawing by hand anymore!
- Automation of complex procedures with the help of macros - fast saving, renaming, printing and sending per mail with a single mouse click (or even none at all!)
These 4 chapter will be explained now one after another and the shown content will rise both in complexity as well as in helpfulness. In the end, you will have a general knowledge of most advanced functions of eSignatureOffice. However, keep in mind, that each chapter presents only a simplified, basic (yet use-oriented) example of what you will be able to do, in order to provide easy access to the respective functions.
1. Load a document directly together with the start of eSignatureOffice
A very simply way to save time is just not to start up the application and then afterwards load your PDF-file, but to do both steps at once to directly present the document to sign. This helps especially in those cases, in which you are using the same documents over and over again (like standard contracts, protocols, logs etc.)
For this, we have 3 different possibilities:
a) transmitting the document from another application (e.g. Microsoft Word) to eSignatureOffice via StepOver PDF Converter
You can find a detailed tutorial on where to get the PDF Converter from and how to install and use it here .
From now on, we assume that you already have the PDF Converter installed on your system.
This is most likely the most frequently used way to make eSignatureOffice prepare a document for signatures. This way, you can convert any file from any application into a PDF by using an emulated printer and then transmit this PDF file directly to eSignatureOffice - all in one simple step. In the end, your document will be presented by eSignatureOffice and it will be ready for your signatures. If your document is not a PDF-file in the first place, using the PDF Converter is essential, because only PDFs can be signed digitally with a signature device.
Attention! eSignatureOffice should not be running while you are doing this, because it will be started automatically in a later step, together with your document! | |
If your document is ready, use the option to print in your program, but do not choose your usual printer, but the "StepOver PDF Converter".
This is no real printer and it can be used any time, even if you don't have a real printer. The whole process is only made possible with this simulated printer and so ensures, that each application, which may print, may also create PDF-files. | |
If you press the "Print" button now, the file will not be printed but eSignatureOffice will be started with your freshly created PDF-file, which you can sign afterwards. | |

b) hand over the document per drag&drop
This is really the easiest way to load a document together with eSignatureOffice, but it only works if your document is already available as PDF-file.
Just click on the icon of your file (e.g. on your desktop) and drag it over the link, which you are using to run eSignatureOffice.
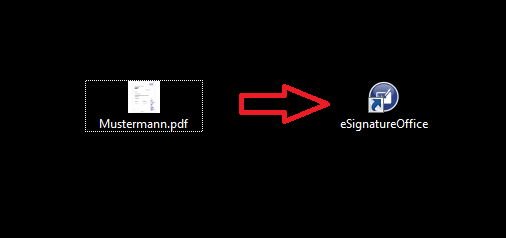
The main advantage here is, that you can copy a link to eSignatureOffice into your documents folder and each time just drag the document, which you currently need, on the link.
c) transmit the document as start parameter
Using start parameters requires the most knowledge when compared with the other two options presented here, but in the long term it promises the highest optimisation- and automation potential.
Learn more about start parameters here.
However, in this simple example, we just want to show you, how you can start eSignatureOffice each time with the same document with just one click.
The most clearly arranged and best way to run any application with a start parameter is a so-called batch-file (*.bat), because here you can write down your commands simply by adding plain text and later, when you start this batch-file with a simple (double-) click, the complete content will be processed.
Creating a bat-file directly in Windows is not possible, but you can simply create a usual text file, write down your commands in it and then save it as Batch-file.
So, the easiest string of commands includes:
- the path to your eSignatureOffice executable file (normally "C:\Program Files (x86)\StepOver\eSignatureOffice 5.0\SOSigOffice.exe")
- the path to the PDF-file, you want to sign, e.g. "C:\MyDocuments\Mustermann.pdf"
This could look like this:
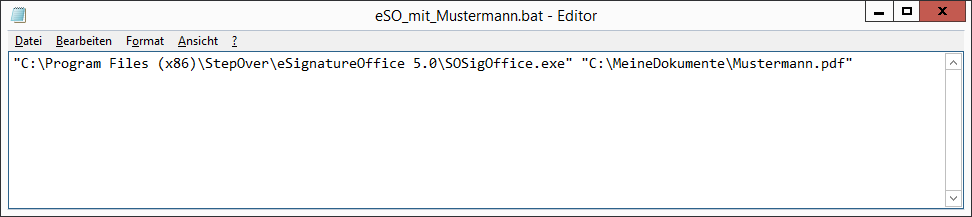
If this file is saved now and from then on started like any other file in your operating system (e.g. with a double click), then it will each time start this SOSigOffice.exe in this specified folder, and each time the file "Mustermann.pdf" from the other specified folder will be loaded.
At first sight, this method doesn't seem to offer real usability, but when you incorporate all the other start parameters, you can specify many options in a single file and you could also create different batch-files with different parameters for different documents or scenarios.
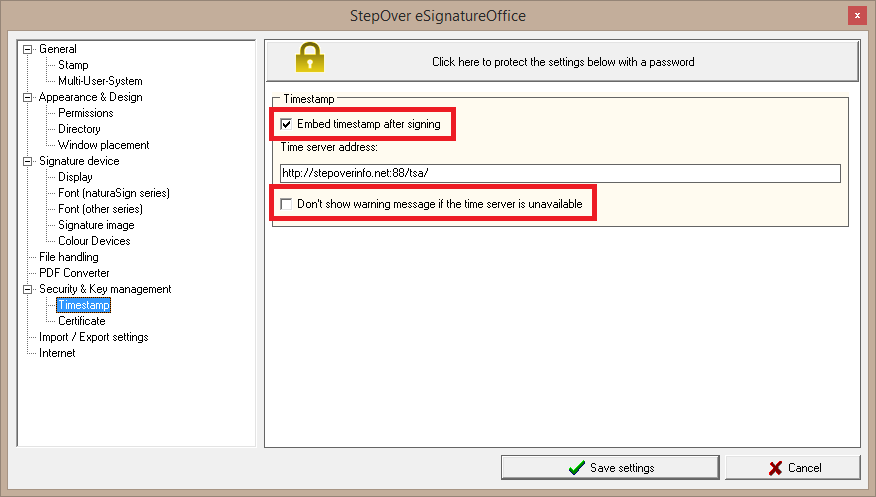
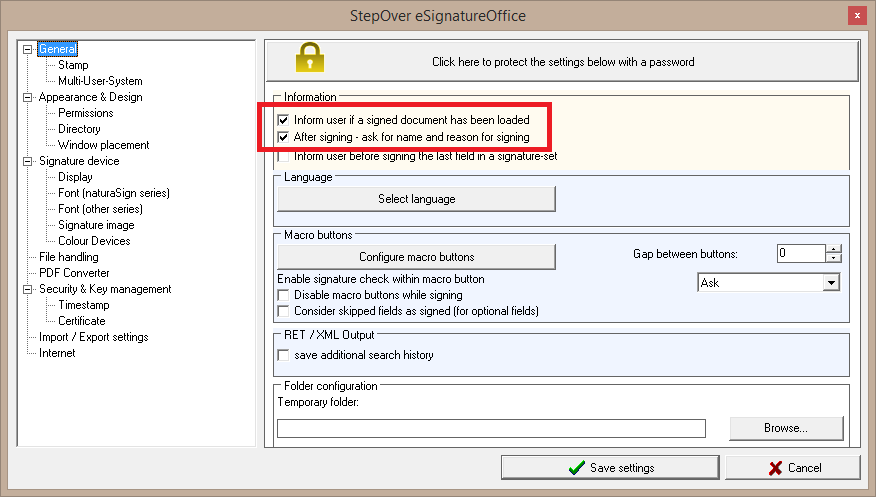
2. Shorten the signature procedure - less dialogues!
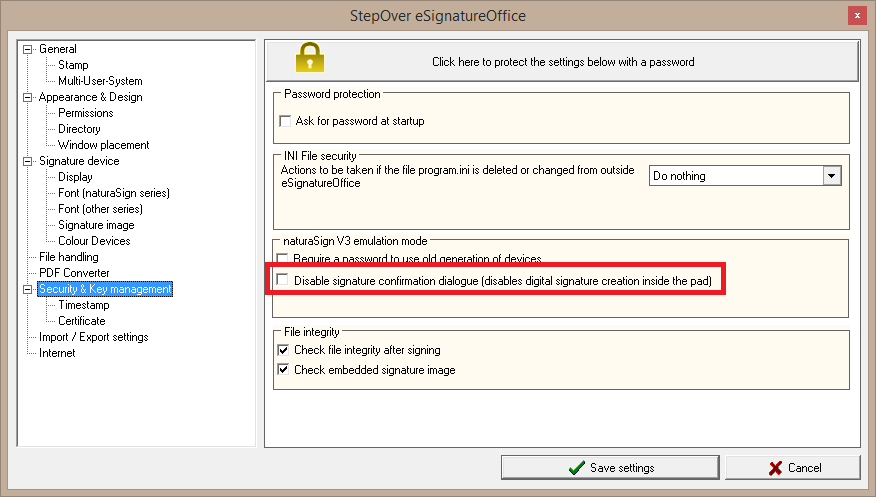
In this chapter, all options to optimise your signature procedure by removing dialogs and queries or by speeding up the communication with the signature device, will be summarized.
To achieve this, there are several settings in your administration menu, which will each be presented to you here:
| Picture of the respective administration menu with its default settings | Changeable options |
|---|---|
|
|
 |
|
 |
|
3. Automated creation of signature fields with the help of signature-sets - no drawing by hand anymore!
In this chapter of the introduction, you shall learn in 8 easy steps how to create a simple signature-set, with whose help you don't have to draw your signature fields by hand anymore, because eSignatureOffice does this for you according to your specifications. The obvious advantage here is, that a single set is re-usable infinitely and as side-effect your whole signature process is reduced to start → sign → save/exit.
You can find an extended version of this topic here with more options, explained in detail.
It's advisable (but not necessary) to load the document prior to starting the signature-set creation due to having a better overview of the document and its content.
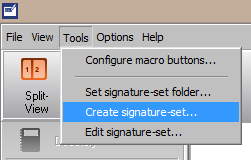
Step 1: Start the creation of your signature-set file via "Tools | Create signature-set" in your main menu.
Then, a usual "Save as..." window of your operating system is opened, in which you can choose your desired file name and saving path. StepOver Signature-Set files are always saved with the file extension *.sss and by default "StepOver\SignatureSets" in your documents folder is set as save destination. |
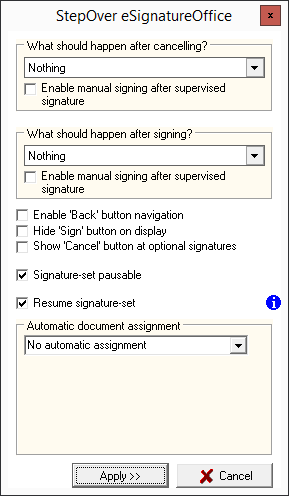
Step 2: In this example, please just ignore these options and just press the "Apply" button. The drop down menus can be used to set up automatically running processes (macros) for this signature-set, which can run before or after signing the given signature-fiels. These macros will be explained to you in the following chapter and you can also find a detailed explanation here .
|
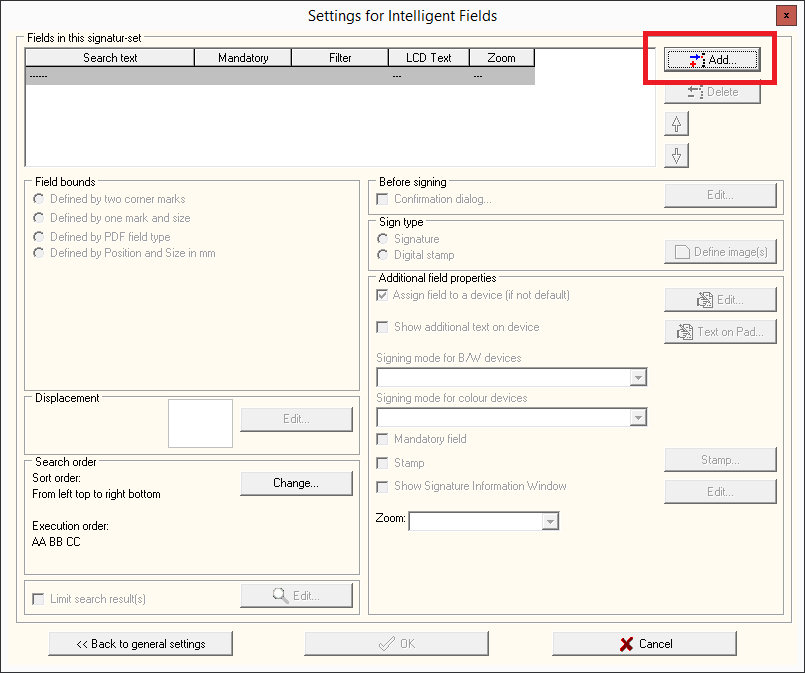
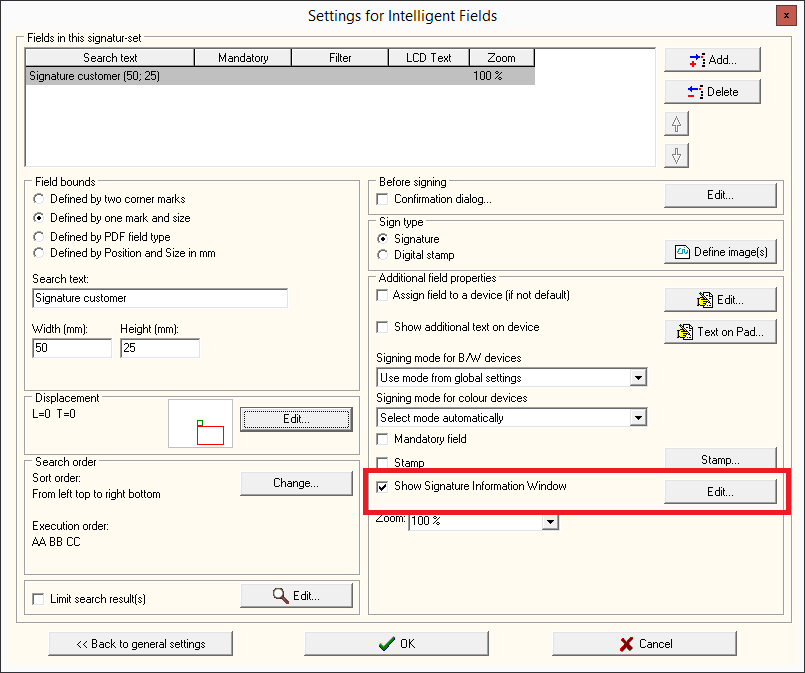
Step 3: This is actually the proper menu, in which you can define your signature fields. Press the "Add..." button at the top center to unlock the options for a new field.
|
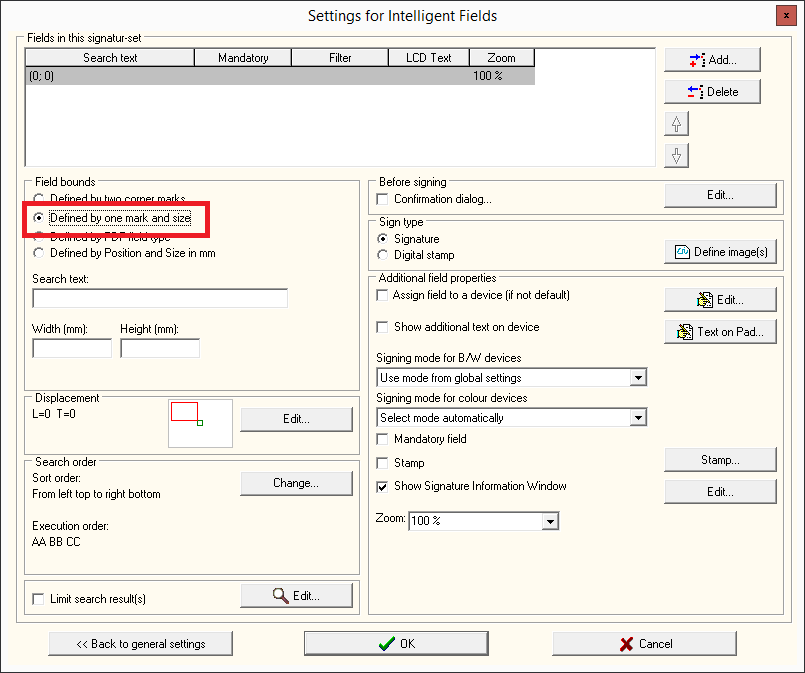
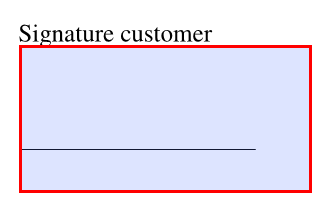
Step 4: For this example, in the left part please use the option "Defined by one mark and size". With this option, most PDF-documents are usable without the need to create special documents, in order to use them effectively in conjunction with signature-sets (or macros). The reason behind this is, that most documents already contain certain keywords at the desired signing positions, like "signature customer" for example. Consequently these keywords can easily and repeatedly be used to mark your signature fields.
|
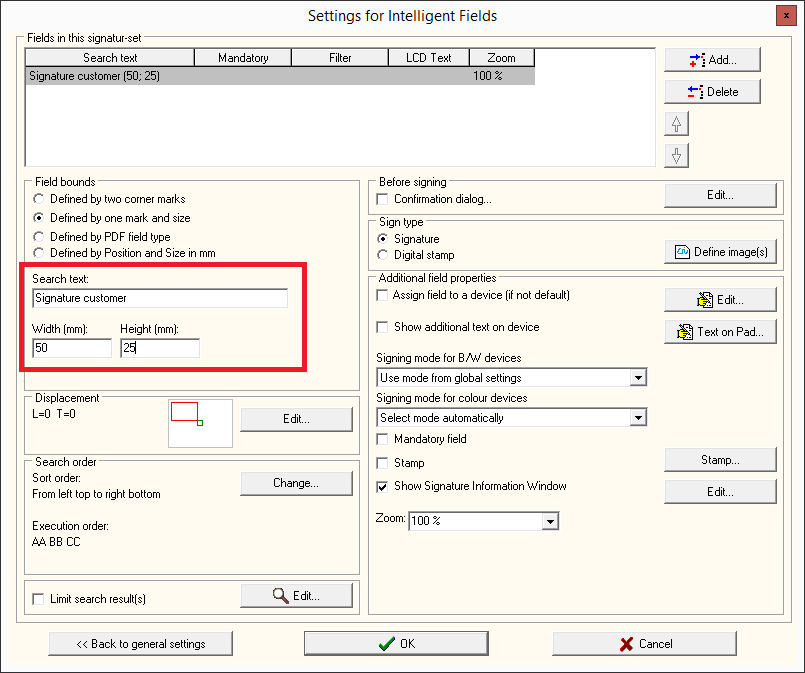
Step 5: Now enter the "Search text", that can be found at the position in your document, which will later be signed. The relative position (above, below or next to it) does not matter for the moment, because the position will be adjusted in the next step. For this example, we are using the word combination "signature customer, because it is to be found in our sample document, where the signature ought to be added later. Furthermore, you have to specify the height and width of your desired signature field in milimeters. According to experience a width of 50mm and height of 20-30mm is a comfortable sized signature field, well fitting for a usual signature on a sheet of paper.
|
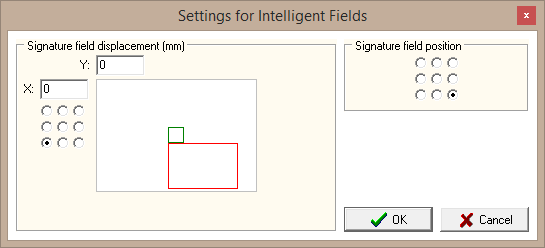
Step 6: In this step, you need to set the displacement between your keywords and the actual area, where your signature is supposed to be inserted, later. This is important, because in some documents, the keywords can be found below the designated area for your signature, while in other documents they are above or next to that area. So, click the "Edit" button in the middle of the screen in the "Displacement" field and this menu will open.
|
Step 7 (optional): In case you wish to speed up the signature process, you can enable or disable the stamp dialogue for each single keyword of your signature-set, irrespective of the general settings in the administration menu, which were explained previously.
|
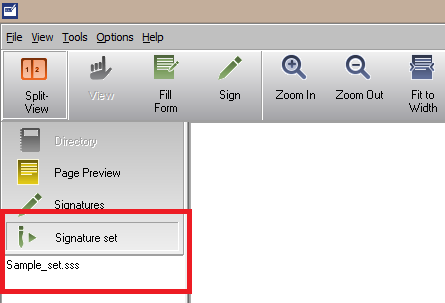
Step 8: No matter what you opted for in step 7: as soon as you press the "OK" button, your signature-set will be completed and ready-to-use! Now, the easiest way to start the signature-set is the sidebar in the general user interface of eSignatureOffice.
|
4. Automating complex actions with the help of macros - fast saving, renaming, printing and sending per email with a single click (or none at all!)
In this chapter, you will learn in 7 easy steps (and an 8th optional step) how to automate complex actions instead of clicking through multiple options and menus each time. For this, we will show a practical, use-oriented example, in which you will create a macro, that can be integrated into a signature-set (and so processed without any additional clicks together with your signature-set) or executed manually and which includes all of the following four actions:
- The user will get an information dialogue, which he has to confirm
- The document will be saved
- The document will be transmitted ready-to-send to your email application
- and finally eSignatureOffice will be closed
More possible actions and more detailed explanations about macros or rather about automating complex procedures, are explained here.
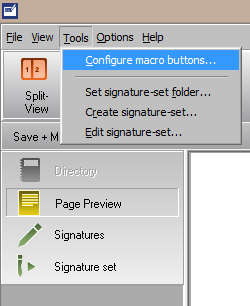
Step 1: Open the macro button menu via "Tools | Configure macro buttons" in your main menu.
| |
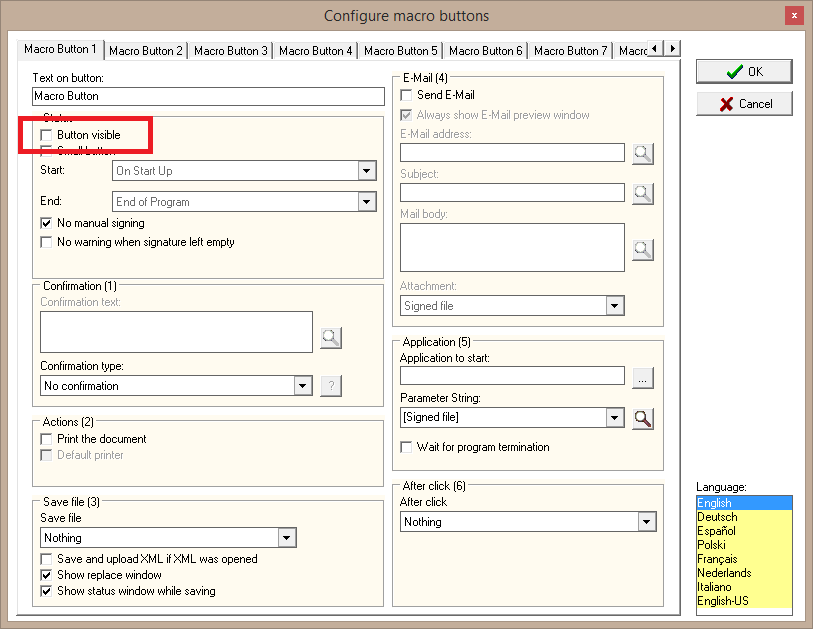
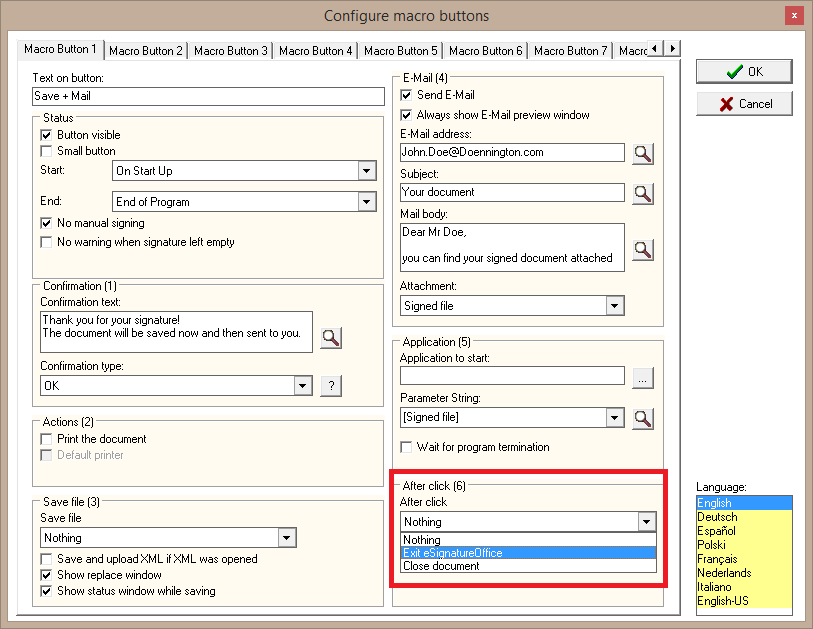
Schritt 2: Now, you will see this menu, where you can create up to 10 different macro buttons with a combined action each. You can name them as desired ( = "Text on button") and make them visible or invisible by activating or deactivating the option "Button visible" in the status field. If you want to use a macro in a signature-set, you can easily leave it invisible and so prevent it from being triggered manually. However, we want to trigger this example macro on demand and so, you should check "Button visible". This activates a new bar in the eSignature main user interface (below the tool bar), which includes all visible macro buttons.
| |
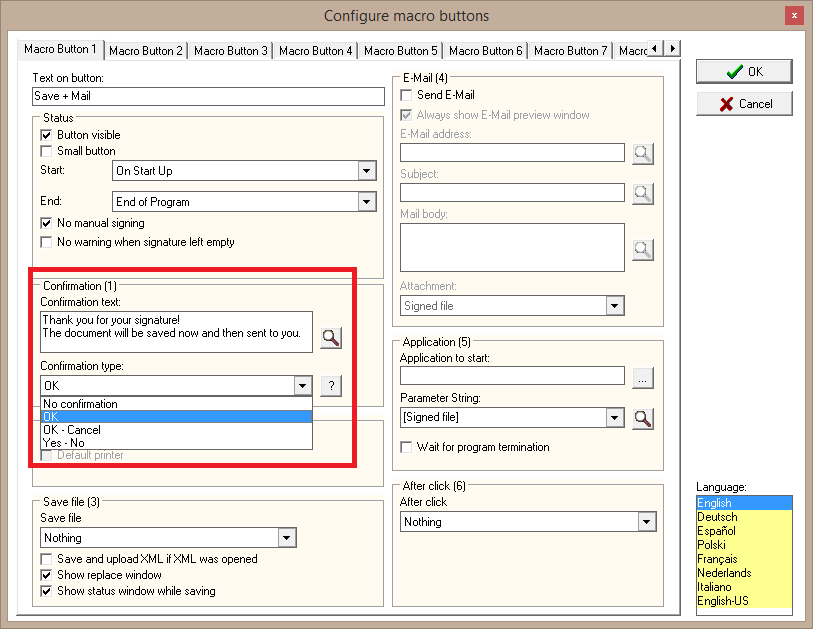
Step 3: Entering the confirmation message will only be unlocked after choosing one of the "confirmation type" options from the drop down menu in the "Confirmation (1)" field. So, you could even offer the option to cancel the process. In our example, however, we just use a simple confirmation message with an "OK" button and now can enter a message into the text box, which the user shall read later on, such as a hint to be shown before or after signing. With the help of the question mark button, you can get a preview of your confirmation dialogue.
| |
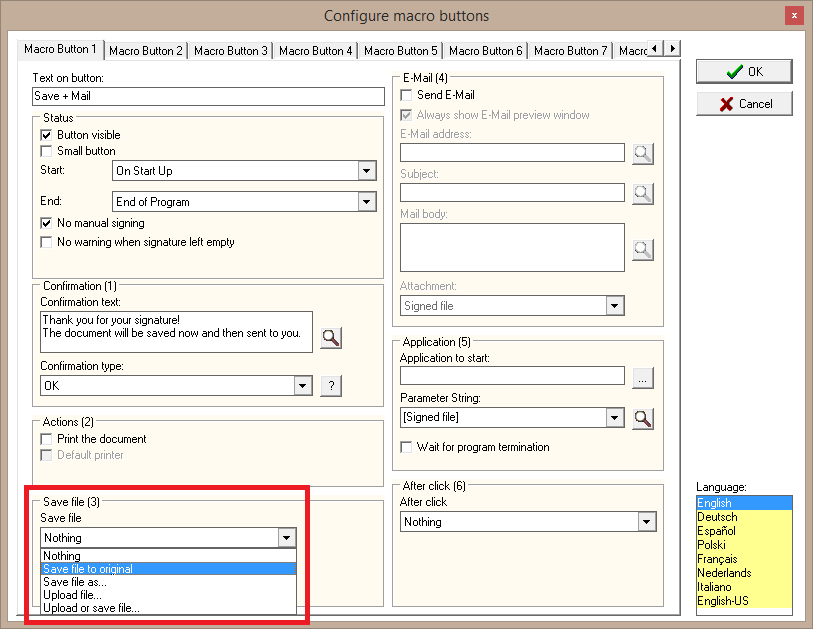
Stept 4: Now, appoint a method to save your document. The most common variant is overwriting the original file, of course. So, choose "Save file to original" from the drop down menu, please. This way, upon saving the original file will be overwritten without inquiry.
| |
Step 5: Now activate the subsequent sending per e-mail by activating the option "Send E-mail" on the right side of the menu. This way, your standard e-mail application will automatically be used and if you wish, you can get an editable preview of the E-Mail before it's sent by activating the option "Always show E-Mail preview window". If you want to add individual text to your e-mail, you obviously have to check this option. Additionally, you can enter the designated mail-adress, a subject and a text body now. Finally, you just have to choose what is to be attached to the mail. Normally, this would be the signed or saved document, but if you want, you can even send the original unsigned file, because upon loading the document, it is always saved as temporary file and so could be sent in its original state. 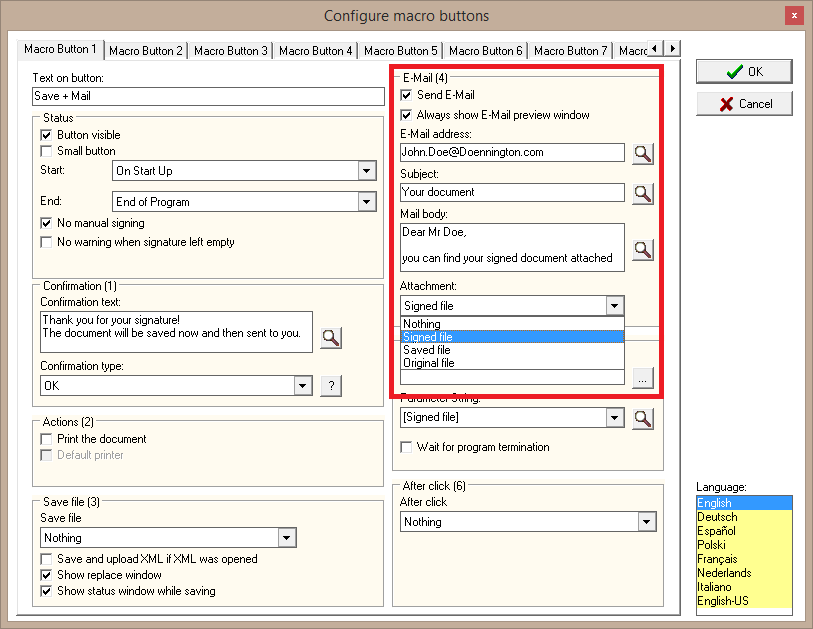
| |
Step 6: In this second-to-last step, you're telling your macro to close eSignatureOffice after performing all the other actions, by choosing "Exit eSignatureOffice" from the drop down menu in the field "After click (6)" on the lower right side.
| |
Schritt 7: Finally, the creation of your macro is complete. When clicking the "OK"-button on the right side of the menu, you get back to the main user interface of eSignatureOffice and a new bar will be added just below the tool bar. There, you can find the new macro button, which can perform all the previously added actions one after another with only a single click and in the end, eSignatureOffice will be closed.
Congratulations! You are done! | |
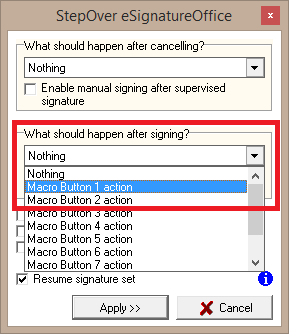
Step 8 (optional): Let's take some steps back to the previous chapter, which was about signature-sets. In one of the first steps, you were told to ignore the given drop down options, because they wouldn't do anything at this time. Now, you can add the freshly created macro in the "common settings" menu by choosing it from one of the drop down menus. Considering the nature of the chosen actions, it's advisable to let the macro be executed only after signing, not before.
|