...
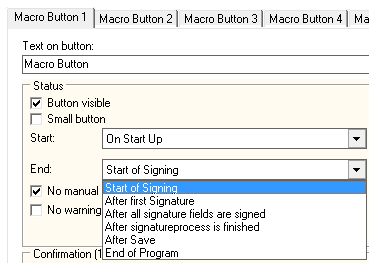
If the user is supposed to decide himself, when or if he wants to trigger the action, you have to make this button visible to him (the first checkbox in the upper left). In order to achieve useful results and to help reducing possible mistakes when using the button, you should set up limiting conditions with the drop down menus "Start:" and "End:", under which the button is either active or not.
You can use the following options as limiting conditions for the active usability of your macro button: You can use the following options as limiting conditions for the active usability of your macro button:
| Option name | Option meaning | |
|---|---|---|
Start conditions | On start up | The button is usable as soon as the program has been started and a document has been loaded |
| Start of signing | The button is usable as soon as the first signing process has been started | |
| After first signature | The button is usable as soon as the first signature has been added successfully | |
| After all mandatory signature fields are signed | The button is usable as soon as all fields of a signature-set have been signed, which are marked as mandatory fields | |
| After all signature fields are signed | The button is usable as soon as all fields of a signature-set have been signed, no matter if they are mandatory or optional fields | |
| After signature process is finished | The button will only become usable after the whole signing process itself has been successfully completed | |
| After save | The button is usable as soon as the document has been saved | |
End conditions | Start of signing | The button is usable until any signing process is started |
| After first signature | The button is usable until the first signature has been added successfully | |
| After all signature fields are signed | The button is usable until all fields of a signature-set have been signed, not matter if they are mandatory or optional fields | |
| After signature process is finished | The button is only usable during the signing process itself and will become unusable as soon as the signature has been added | |
| After save | The button is usable until the document has been saved | |
| End of program | The button is usable until the program is shut down |
You can decide, if macro actions should be allowed to be triggered manually while a signature-set is processed. Go to eSignatureOffice's administration menu and in the "General" tab switch the option "Disable macro buttons while signing" on or off.
...
eSignatureOffice offers varous ways to save your signed document.
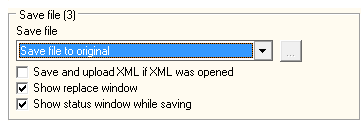
For example, you can choose to not save the file via macro at all, or you can save the file to the original location, which will simply overwrite the original document with your changed version. However, you can also save the file to another saving path, with another name or even upload it directly to a FTP server.
- In case you're using a XML file and you also want to keep it as XML upon saving, please activate the option "Save and upload XML if XML was opened". If this option is not activated, the document will be saved as PDF file. You can find more information about using the XML file format in eSignatureOffice here: /wiki/spaces/PESO/pages/79200348Input-XML.
- The second option "Show replace window" refers to the possibility to dynamically use the document's content, which will be relevant in the next paragraph "Save file as..."
So, while this checkbox is activated and your document is scanned for your search strings, the "replace window" will show up and list all your search strings as well as their corresponding results. - The third option will do as it says: It will show a status window during the saving process.
...
You can upload files either to a FTP server with the usual connection details, which you need for access to your FTP (like the IP, login, password etc). If you already created a FTP connection and saved the neccessary information (see FTP settings), you can choose to load this set in the "FTP-set selection:" drop down list. Please be aware, that this dropdown list offers only FTP-sets from the default FTP-set folder, which you can define in the administration menu in the "Internet" or "Network" tab (the name depends on your version).
Alternatively, you can also upload files via an upload form on a website. For this you have to make sure, if the target website is using the HTTP or HTTPS protocol and select the appropriate tab. In the URL of upload form field, enter the exact link to the website, which contains your upload form field. Then the "Host:" field will be filled automatically and you only have to provide the exact name of the target form field. Below the two pictures, you can see an example source code for such an upload form field.
For both possbilities to upload files, you should consult your IT administrator or department for the correct access data and in both cases, you can use the dynamic processing of document content to rename the files after their successful upload.
...
| Code Block | ||||||
|---|---|---|---|---|---|---|
| ||||||
<?php
if(move_uploaded_file($_FILES['datei']['tmp_name'], $_FILES["datei"]["name"]))
{
   echo '<b>Upload complete!</b>';
}
else
{
 echo " StepOver-Upload:<br><br>
   <form action=\"upload.php\" method=\"post\" enctype=\"multipart/form-data\">
    <input type=\"file\" name=\"datei\" size=100><br><br>
    <input type=\"submit\" value=\"Upload now!\">
   </form>";
}
?> |
It´s also possible to forward additional parameter with the Upload URL, for PHP pages the URL would look like:
...
| Code Block | ||||||
|---|---|---|---|---|---|---|
| ||||||
<?php

if(isset($_POST['additionalParmeter']))
{
	$file = 'C:\xampp\htdocs\Fileupload\info.txt';
	// Open file and read input
	$current = file_get_contents($file);
	// Add the additionalParmeter to the existing file content
	$current .= $_POST['additionalParmeter']."\n";
	// Write of file
	file_put_contents($file, $current);
}


if(isset($_FILES['fileupload']) && move_uploaded_file($_FILES['fileupload']['tmp_name'], $_FILES["fileupload"]["name"]))
{
   echo '<b>Upload complete!</b>';
}

 echo " StepOver-Upload:<br><br>
   <form action=\"upload.php\" method=\"post\" enctype=\"multipart/form-data\">
    fileupload: <input type=\"file\" name=\"fileupload\" size=100><br><br>
    <input type=\"submit\" value=\"Upload now!\">
   </form>";

?> |
...
...
E-Mail (4)
With eSignatureOffice you can also send out an email automatically. In this mail, you could send the signed document or just a simple notification text.
...