...
Open the macro button configuration dialog by clicking "Tools | Configure macro buttons" and you will see the following menu:
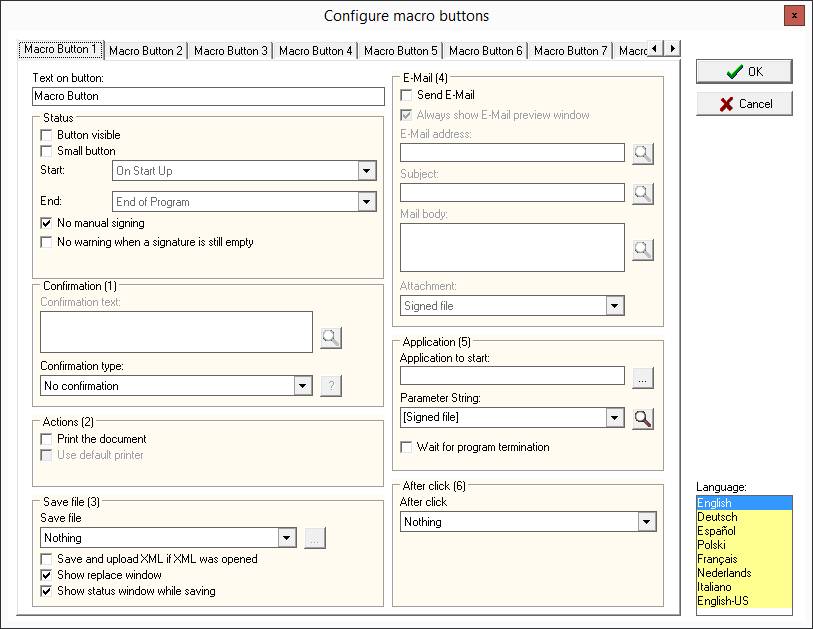
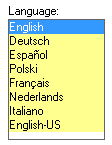
First of all, to configure a macro button, choose the tab of the button, you want to use or select a new tab to create a new macro. Now, you can add a caption to this button ("Text on button"). This caption is only needed, when you want to want to make this button visible to the user. Each caption is only saved for the language, which is currently chosen on the lower right side. This way, you have the possibility to create buttons with separately translated names for all usable languages in eSignatureOffice. Furthermore, it's recommended to name the macro distinctively, for example matching the corresponding document or action, which it is used for.
...
You can use the following options as limiting conditions for the active usability of your macro button:
| Option name | Option meaning | |
|---|---|---|
Start conditions | On start up | The button is usable as soon as the program has been started and a document has been loaded |
| Start of signing | The button is usable as soon as the first signing process has been started | |
| After first signature | The button is usable as soon as the first signature has been added successfully | |
| After all mandatory signature fields are signed | The button is usable as soon as all fields of a signature-set have been signed, which are marked as mandatory fields | |
| After all signature fields are signed | The button is usable as soon as all fields of a signature-set have been signed, no matter if they are mandatory or optional fields | |
| After signature process is finished | The button will only become usable after the whole signing process itself has been successfully completed | |
| After save | The button is usable as soon as the document has been saved | |
End conditions | Start of signing | The button is usable until any signing process is started |
| After first signature | The button is usable until the first signature has been added successfully | |
| After all signature fields are signed | The button is usable until all fields of a signature-set have been signed, not matter if they are mandatory or optional fields | |
| After signature process is finished | The button is only usable during the signing process itself and will become unusable as soon as the signature has been added | |
| After save | The button is usable until the document has been saved | |
| End of program | The button is usable until the program is shut down |
You can decide, if macro actions should be allowed to be triggered manually while a signature-set is processed. Go to eSignatureOffice's administration menu and in the "General" tab switch the option "Disable macro buttons while signing" on or off.
...
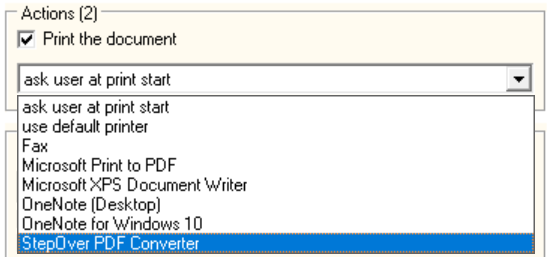
If you activate the option "Print the document" and the macro is triggered, eSignatureOffice will open the printing dialog, in which the user can select the printer to use. With the "Default printer" checkbox, the document will be sent directly to your operating system's default printer.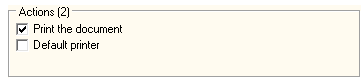 print the document. Besides directly defining which printer to use, you can also activate an option to allow the user to always select the printer himself or alternatively to always use the Windows default printer.
...
Save file (3)
...
- In case you're using a XML file and you also want to keep it as XML upon saving, please activate the option "Save and upload XML if XML was opened". If this option is not activated, the document will be saved as PDF file. You can find more information about using the XML file format in eSignatureOffice here: Input-XML.
- The second option "Show replace window" refers to the possibility to dynamically use the document's content, which will be relevant in the next paragraph "Save file as..."
So, while this checkbox is activated and your document is scanned for your search strings, the "replace window" will show up and list all your search strings as well as their corresponding results. - The third option will do as it says: It will show a status window during the saving process.
Upon choosing any of the options "Save file as..." or "Upload file..." a new dialog will open, in which you can make further settings.
...
Save file as

| Here, you have the options to...
|

- send an info message to a computer by providing its name or TCP/IP address and the desired message
Dynamically Dynamically renaming a file when saving it
...
For both possbilities to upload files, you should consult your IT administrator or department for the correct access data and in both cases, you can use the dynamic processing of document content to rename the files after their successful upload.
| FTP | HTTP/HTTPS |
|---|---|
|  |
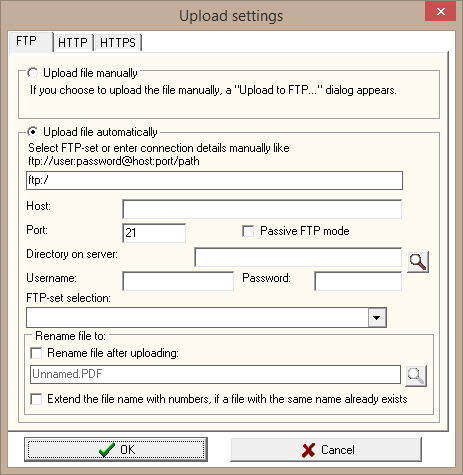
Beware! Please take note, that special characters in an URL can possibly cause problems when uploading to a server. This also includes the saving path for a FTP server. For example when using the Dynamic processing of document content some special characters could be read from the document, which might not be allowed by the communication protocoll or which might be misinterpreted. A good example here are slashes or backslashes, which will create subfolders when used in the saving path. |
Upload form example source code:
...
| Code Block | ||||||
|---|---|---|---|---|---|---|
| ||||||
<?php

if(isset($_POST['additionalParmeter']))
{
	$file = 'C:\xampp\htdocs\Fileupload\info.txt';
	// Open file and read input
	$current = file_get_contents($file);
	// Add the additionalParmeter to the existing file content
	$current .= $_POST['additionalParmeter']."\n";
	// Write of file
	file_put_contents($file, $current);
}


if(isset($_FILES['fileupload']) && move_uploaded_file($_FILES['fileupload']['tmp_name'], $_FILES["fileupload"]["name"]))
{
   echo '<b>Upload complete!</b>';
}

 echo " StepOver-Upload:<br><br>
   <form action=\"upload.php\" method=\"post\" enctype=\"multipart/form-data\">
    fileupload: <input type=\"file\" name=\"fileupload\" size=100><br><br>
    <input type=\"submit\" value=\"Upload now!\">
   </form>";

?> |
Delete original file
This option deletes the originally opened PDF file, which can be useful in combination with folder monitoring and aborting of the signature process.
...
E-Mail (4)
With eSignatureOffice you can also send out an email automatically. In this mail, you could send the signed document or just a simple notification text.
...
- [Signed file] - The document with all of its signatures.
- [Saved file] - The saved document.
- [Original file] - The original, unchanged document.
With the option "State of window at start" , you can define the if the application should start, normal, minimized, maximized or hidden. It is important that the application to be started must adhere to the relevant operating system conventions for this to work.
Furthermore, you have the option to "Wait for program termination", which you can use to delay subsequent macro actions until the started application has been terminated.
...
- do nothing (default)
- exit eSignatureOffice
- close the document
- close the document and minimize
This is always the last action of a macro.
...
In the lower right of your macro configuration screen, you can see a list of languages available in eSignatureOffice.
 |
|