The StepOver RMA tool: a step-by-step guide
Welcome to the guide through the StepOver repair order creation process. This guide is supposed to be extremely detailed and will explain each option and each step of our RMA (Return Merchandise Authorization) portal, although you should just try it once, because the tool is aimed to be very intuitive and self-explanatory.
Step 1: Where to find the tool
The general link to the RMA portal for all language versions is
https://stepover.com/en/service/repair-service/
Step 2: Support Assistant and Login
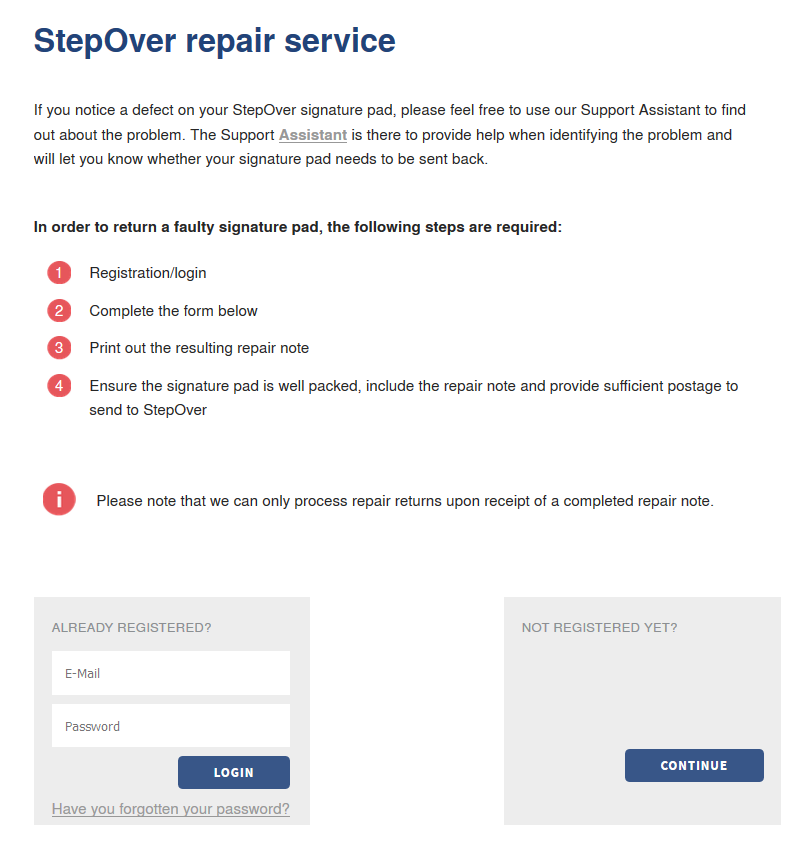
Assuming you're using the English version, you will see the following screen:
In the first paragraph, you can see the offer to use the Support Assistant, which is utilized to identify problems with your signing devices prior to sending them in. In some cases, this could mean, that the device does not have to be sent to us at all and so you can save time and money.
Afterwards, you can see a very short overview of the repair order creation process and two possibilities to start the creation process itself:
- You already have an account and so you can log in on the left side with your email address, which you used for your last repair order, and your password. This normally means, that you already created at least one previous repair order, whose information will still be stored for your next visit. So, you don't have to enter all delivery and billing information again.
- You don't have an account and so you should use the right option saying "Not registered yet?". Using this option will prompt you to set a password at the very end of the whole creation process (see Step 7 ) and in this way will create an account for you.
Step 3: Repair Guidelines
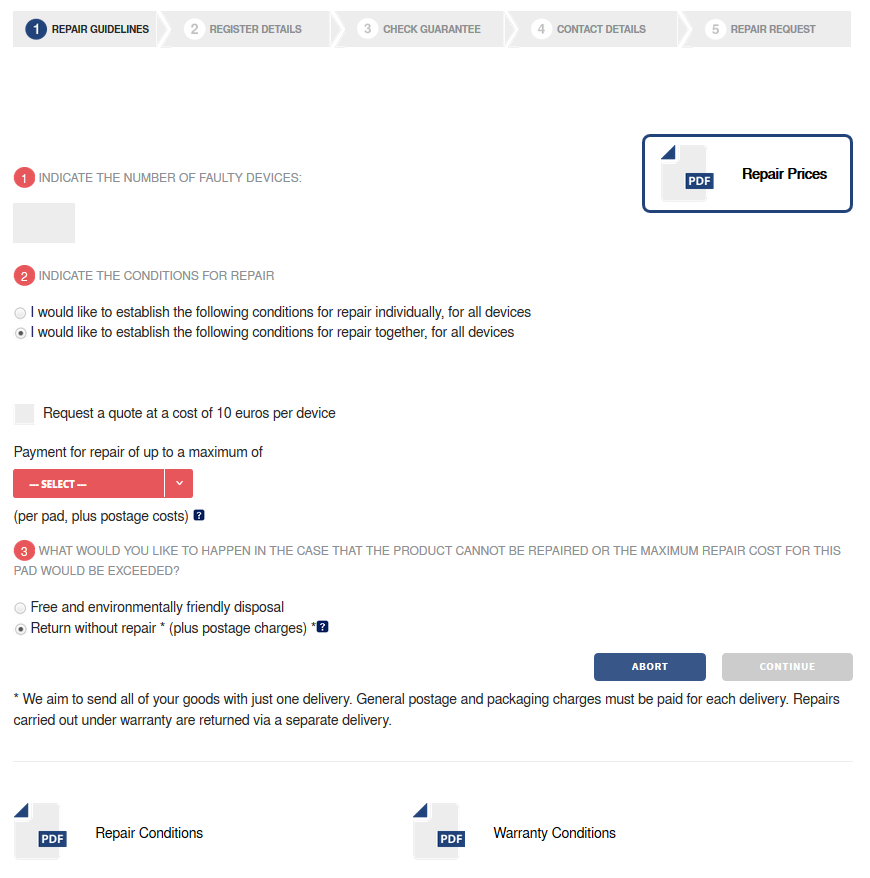
This is the first step of the repair order creation process itself. On the first page, you can set preconditions for the whole order and you can read all necessary information in the provided PDF files.
At the upper screen, you can see the line of steps, which are needed to complete the whole process.
a) Information provided by StepOver
On this first page, you can find the links to three different PDF files:
- the standard Repair Prices in the upper right
- the Repair Conditions in the lower left
- the Warranty Conditions in the lower right
Please read these documents carefully as they contain valuable information about your and also about our rights concerning these repair orders!
b) Information provided by the customer
All the other options on this page offer various possibilities to customize the repair order according to your wishes.
The following options are available:
| Option | Explanation |
|---|---|
| Indicate the number of faulty devices | Here, you have to provide the number of devices, which you want to send to us for repairs. This number is not limited, but to keep the whole order more managable and easier to process, we're recommending not to send too many pads at once. |
| Indicate the conditions for repair | Here, you have two options: either to set the following three conditions for each and every device individually (for example, if you send different kinds of products to us or if you want a quote for only one of the sent devices etc.) or you can set the same options for all pads together. If you want to set these conditions individually, the next three options cannot be changed on this page anymore, but you will get the possibility to change them in the next step. |
| Request a quote | In case you want a quote before we start the repair process, you can activate this option. This way, we will check all devices and make an assumption of their repair prices. This quote will be sent to the email adress provided later. In some cases, especially when we have questions concerning your order or your quote, we might also call you. |
| Payment for repair of up to a maximum of... | This drop down list sets the maximum repair price limit, which you want to pay for each pad. For example, if you set this amount to 0,00€, then we will only perform warranty repairs and none, which would cost you anything. For this limit we will always calculate the complete repair price for all necessary replacements, never partially. In the next option, you can determine, what is supposed happen with pads, whose repair price would exceed your given limit. Please be aware, that we do not calculate taxes or shipping costs into this amount! These are extra! |
| What would you like to happen in the case that the product cannot be repaired or the maximum repair cost for this pad would be exceeded? | With this option, you can tell us what to do with devices, which are either total losses (for example due to damaged displays or circuit boards out of warranty) or whose repair price would be higher than your set limit. We offer to either...
|
After you completed all your settings, the grey "Continue" button in the lower right will become clickable and will lead you to the next step. If the button stays grey, please check your conditions, because at least one of them might not be set, yet.
Step 4: Register Details
This step is all about entering the detailed information about your faulty devices and getting information back about their warranty status.
The needed details here are actually only the serial numbers of your faulty devices. For this step, we're assuming, that you chose to set the same preconditions for all pads together instead of individually. If you chose otherwise, please go to the end of this step to see a picture of the then used user interface.
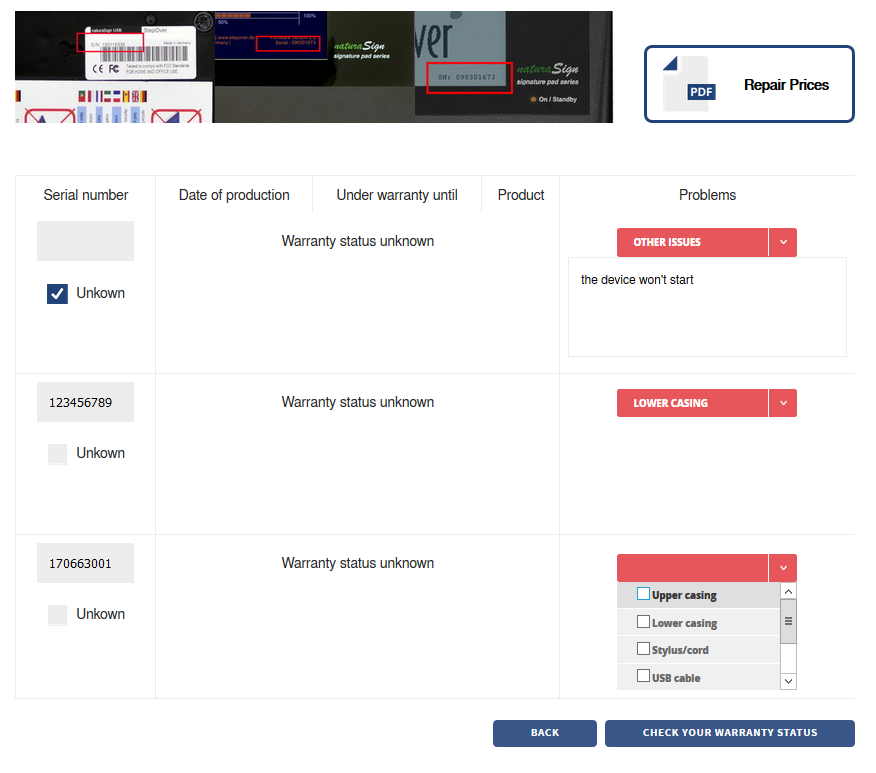
At the very upper part of the screen, you can see pictures showing several ways to read the serial number of a device.
- The easiest way is to turn the pad around and look for a serial number sticker on the backside. Only the original StepOver stickers are useful here and not any other customer supplied inventory or equipment numbers. Generally, StepOver serial numbers will always have exactly 9 digits, never any letters or special characters. Some very old devices might deviate from the 9 digits and have less.
- The second best method is connecting the pad to a computer and keeping an eye on the lower right corner of the display. At some point during the startup procedure, the serial number is shown here. If it's gone too fast, just disconnect and reconnect the pad.
- If none of the two previous methods is useable, for example, because there never was a sticker and the display is damaged, you might read the serial number from the device via software, for example from within eSignatureOffice when choosing a signature device.
If all of these options are not viable for you, you still can send any StepOver device to us without providing any serial number by clicking the checkbox "Unknown" below a serial number field. If you do so, a short notice will pop up to inform you, that devices sent to us without serial number can only be accepted with a copy of your invoice. This is due to legal reasons.
Please be aware, that you have to provide an "Unknown" entry for each of your unknown devices, not one entry for several "unknowns".
After entering a serial number, you can use the red drop down list on the right side to give us information about which part of the device is faulty. There is no need to go too far into details here, just check all options, you wish us to take a closer look at. At the very end of the drop down list, you can find the option "Other issues", which will activate a small text field you can use to describe the problem with your own words. These problems do not have to be provided in this step, but you can also wait until you know the respective warranty status of each pad in the next step.
If we find an issue, which you did not mention here, we might contact you and ask for your permission to repair it (if it's bound to higher costs).
After all serial numbers have been provided or have been set to be "Unknown", the grey "Check your warranty status" button in the lower right corner will become available and clicking it will lead to the next step.
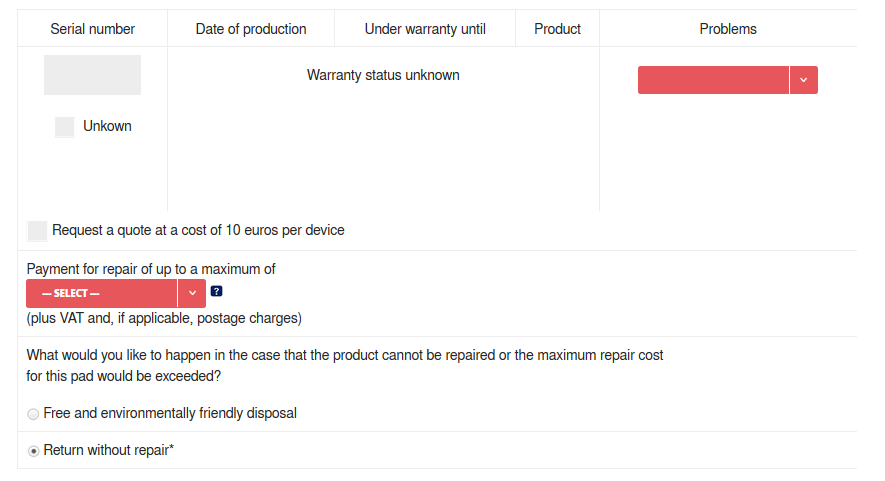
In case, you chose to set the preconditions for all pads individually in the previous step, each device entry will look as follows.
Please consult the previous Step 4.b about your options here as they are exactly the same.
Step 5: Check guarantee
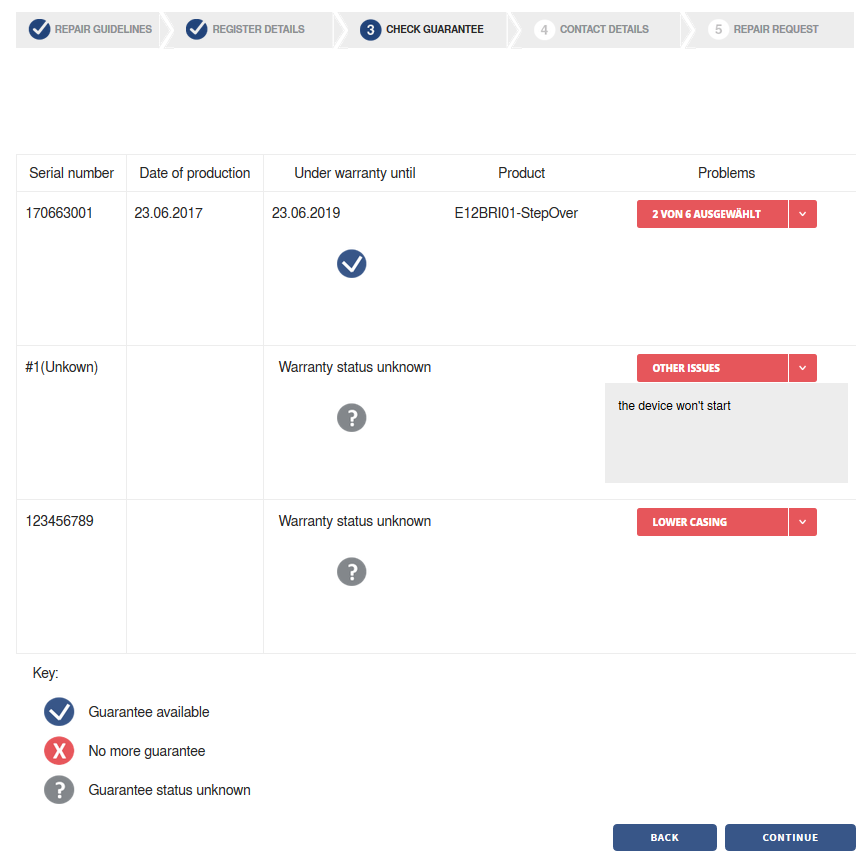
This step is primarily used to check your previously entered data and to get an overview of the warranty status of your devices.
As you can see in the three given examples, we provided:
- one real serial number of a StepOver duraSign Brilliance pad, which is internally abbreviated to the product name "E12BRI01-StepOver" and because it was created just some few days ago, it's still under warranty until 23.06.2019 (two years standard warranty time), which is symbolized by the blue check mark. This device was sorted to the very top, because all pads under warranty shall be sorted together to the beginning of the order (to make processing them later easier).
- one device with unknown serial number. Because the guarantee status is unknown without recognizable serial number, this is symbolized by a grey question mark.
- one wrong serial number (123456789), which could be anything, for example a customer's own inventory number. This just means, that the serial number has not been found in our database due to whatever reasons. So, if you think, the serial number should be correct, please double check it. Sometimes, it could just be a switched number or a typo.
- If a pad would be out of its warranty time, this would be symbolized by the red X icon. You can still send such pads to us for repairs, of course, but those might be liable to costs, which would be free while under warranty.
Here, you can still change the declaration of each pad's problems. Please take note, that each device needs at least one problem declaration before you can go to the next step of the process.
When everything is done, please use the "Continue" button in the lower right corner, which will lead you to the next step.
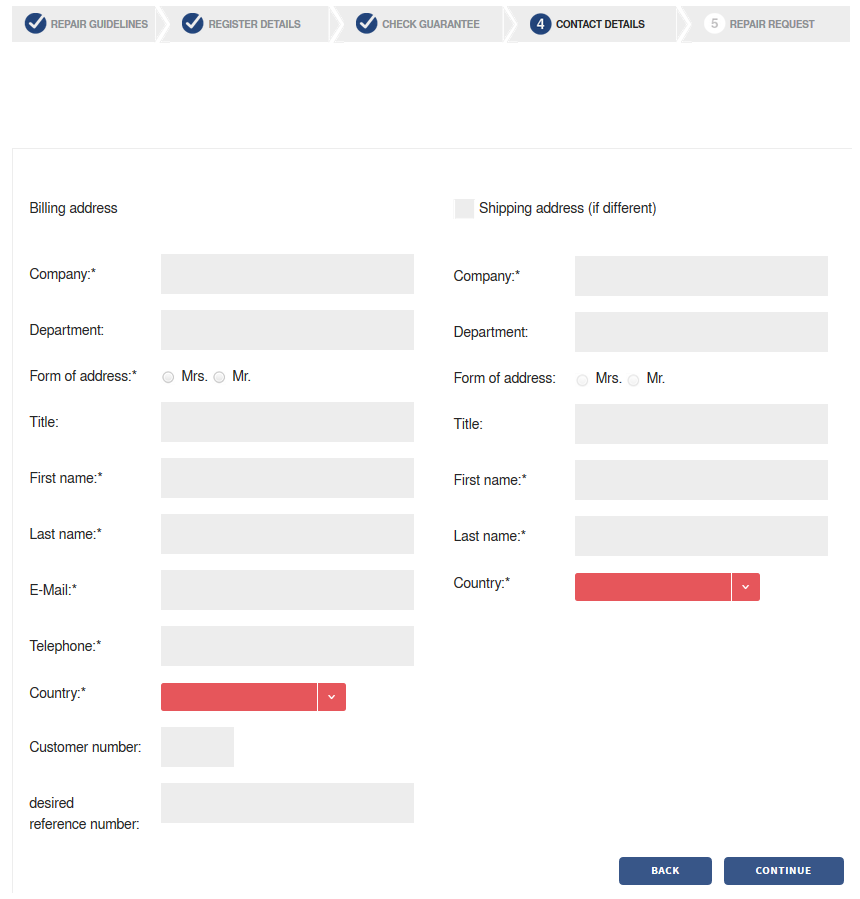
Step 6: Contact details
This step is all about the contact details, which we will need in order to
- send the device back to you
- send the invoice to you
- contact you in case of questions
Please choose your country from the red marked drop down list first! This might change the layout of the rest of the page, depending on country specific requirements by our customers.
- All entries with an asterisk are obligatory and you cannot complete the repair order without providing this information.
- Most of these fields should be self-explanatory, just like in any other address mask
- If the shipping address is not the same as the billing address, please mark the appropriate check box at the upper right of the screen and also provide the needed data.
- If you want, you can provide a special reference number in the "desired reference number:" field. If you do so, we will print this reference number on your delivery slip, the invoice and also add it to the detailed repair report, which you will get after the repair has been completed. This can have any format you wish: numbers, letters, etc.
- All your customer information is highly confidential and will not be given to any 3rd party! However, we need all this data to make processing your order easier (or possible at all) and also to create a legally correct invoice, especially for new customers!
After you have entered all necessary information, please use the "Continue" button to get to the next step, which will only be shown if you have not logged into the RMA tool with an already existing account, but with the "Not registered yet?" option. If you already have an account, please skip to the final Step 9: Repair Request!
Step 7: Creating your account (will appear only once)
If you started the repair order creation process without logging into an existing account, you will be shown the following page now:
The account login name will always be the email address, which you provided in the previous step. In this example, we used a fake mail.
Please set your password now and use this account for your next repair order, because then you won't have to enter the delivery and/or billing addresses again, but they will already be pre-filled. Only the "desired reference number" will be deleted, because we are assuming, that generally every repair order will get a new reference number.
After you entered your future password, use the "Continue" button to go to the final step.
Step 8: Repair Request
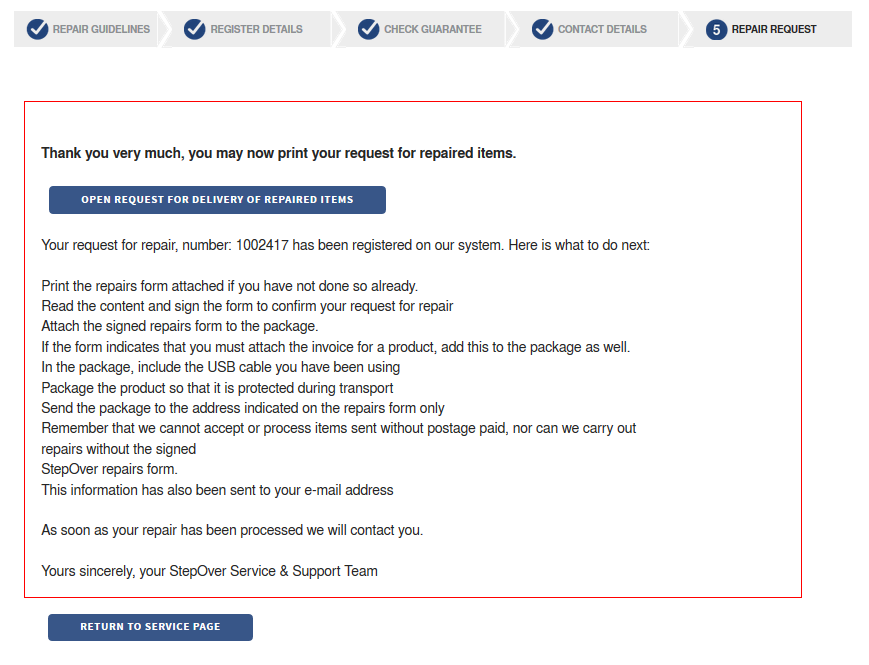
After all information has been provided now, the repair order is complete and the only thing left to do is printing the repair order and sending it to us - together with the faulty device(s).
When you're seeing this page, several things already have happened:
- the repair order has been entered into our database
- an e-mail containing the repair order details as well as the repair order in PDF form has been sent to our service mail address as well as a copy to your own mail address
- a PDF with the repair order has been created and is ready to be downloaded via the "Open request for delivery of repaired items" button
So, please download this file, print it, sign it and send it to us together with the faulty devices. You can even use it as premade delivery slip!
Please take note, that we can only accept signed repair orders!
Congratulations, you created your first StepOver RMA repair order!
Additional information:
- As an example to see how it will look like, you can download the repair order, which was created while writing this guide, here: RMA-1002421.pdf
- After your repair order has been completed, you will get an email from StepOver informing you about the completion and the upcoming return of your signature pads.
- Furthermore, the mail will contain a detailed repair report, which will show for each pad, what has been done and if it was either subject to costs or not (either due to warranty or fairness reasons). This way, you can be sure to know exactly, what you are paying for (or not).
