Signing with mobile devices in eSignatureSuite
- Michael Spreen
These are instructions on how to use eSignatureSuite to sign a document with the help of an app and your Android or iOS smartphone/tablet.
The Bonjour Service
We are using an external service named Bonjour to communicate between eSignatureSuite and the app on the smartphone/tablet.
This service has to be installed on your computer and although it has been developed by Apple, it works not only for the communication with iOS devices, but also with Android devices.
By default it will be installed automatically during the eSignatureSuite setup. If you selected not to install it, you can later still do this later by downloading it from Apple directly: https://support.apple.com/kb/DL999
Necessary settings in eSignatureSuite
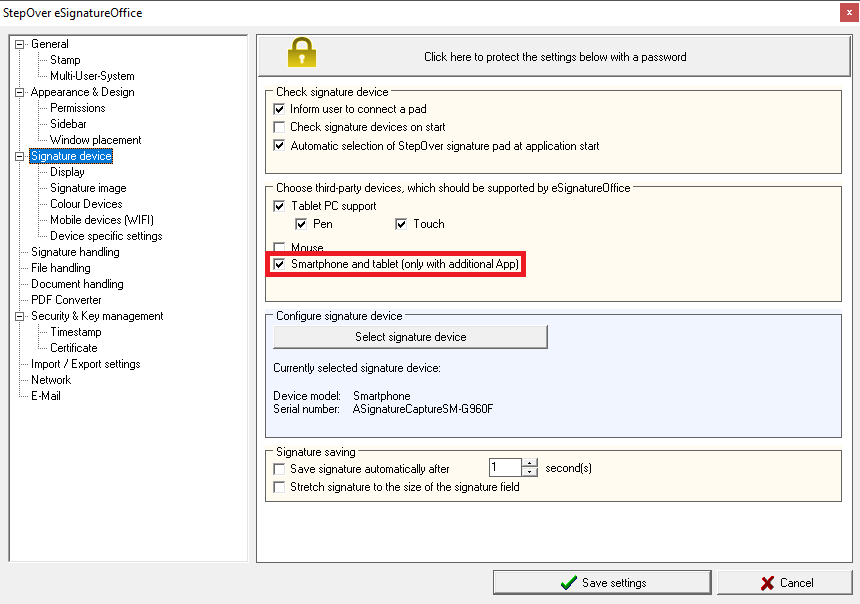
Here, you will find two settings, which are absolutely necessary for using smartphones and tablets in eSignatureSuite . By default, both options are set up correctly, so that they are usable directly after the installation.
Smartphones and tablets as allowed signature devices
In order to use smartphones and tablets as signature devices, it's important that eSignatureSuite allows them to be findable by the device search.
Please make sure, that the appropriate checkbox in the administration menu is active.
You can find it in the submenu "Signature device". If this checkbox is not active, smartphones and tablets are generally excluded from the device search and will not be found.
WIFI networks und local hotspots
To be able to work properly, it's very important that the smartphone/tablet and the computer, on which eSignatureSuite is running, are using the same WIFI network, so they can find each other.
If your computer is only in a protected company network or you are at your customer's home, it might be really time consuming or even impossible for both parties to use an already existing network. That's why eSignatureSuite itself is offering the option to create a temporary local network, a so-called hotspot.
This hotspot will be created by your computer and so requires a network interface card, which is able to do that. If you are using a laptop, which is able to use WIFI, then you can assume, everything will work fine.
To select your favoured behaviour, click in eSignatureSuite in the upper part in the main menu on "Options" and then "Administration". Select the submenu "Mobile devices (WIFI)" and you'll see this:
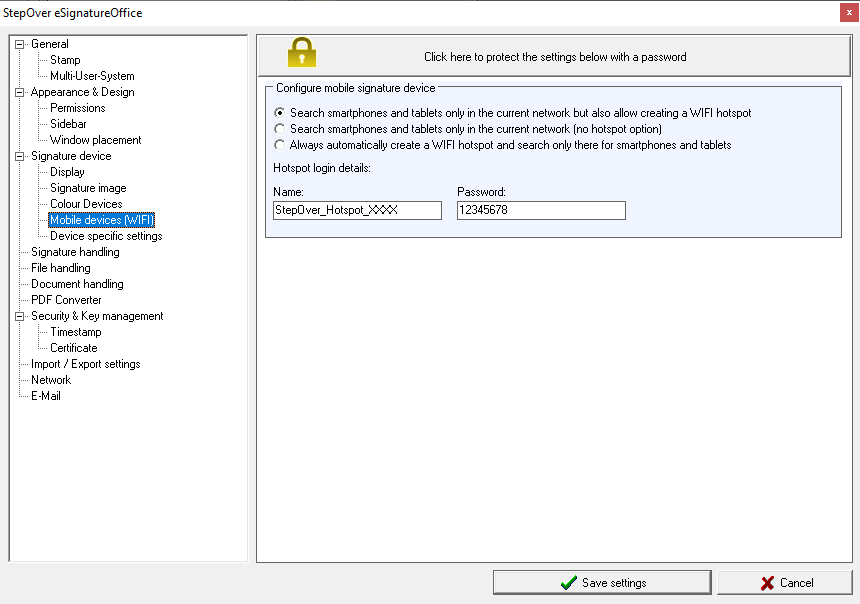 | |
To handle WIFI networks and hotspots, eSignatureSuite offers 3 different options: | |
Search smartphones and tablets only in the current network, but also allow creating a WIFI hotspot | This is the default option and also the most flexible one. With this option all WIFI networks, in which the computer currently is, will be searched for available devices, but the device search dialog also offers an additional option to create a temporary hotspot. You can always spontaneously create this hotspot if you need it. The login details (name of the network and its password) will be shown in the device search dialog after the hotspot has been created. |
Search smartphones and tablets only in the current network (no hotspot option) | With this option creating an additional local hotspot will be prevented and eSignatureSuite will only search for mobile devices in already available networks. |
| Always automatically create a WIFI hotspot and search only there for smartphones and tablets | With this option the additional hotspot network will always be created automatically and eSignatureSuite will search only in this hotspot for matching smartphones and tablets. The login details (name of the network and its password) will be shown in the device search dialog after the hotspot has been created. |
| Hotspot login details: | As soon as you create a temporary hotspot (no matter if manually or automatically), this will be done with the login details, which you can define here. You can either define login details of your own choice or you can use the details already provided here. Please be aware, that those random login details are created during the installation of eSignatureSuite or each time you are resetting eSignatureSuite to its factory settings. The password will always be 8 characters long and contain only numbers and lower case letters. |
Attention!
In case you want to define the hotspot login details yourself, please be aware, that according to the current WPA2 network standards passwords have to be at least 8 characters long!
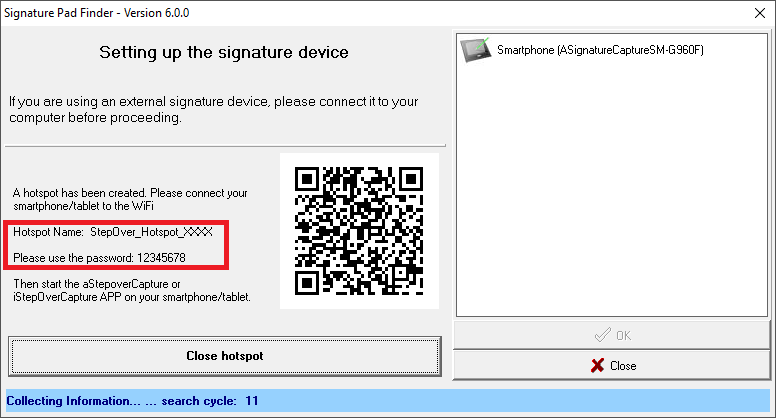
This is how the device search will look after you have created a hotspot. The login details will be shown on the left side, here marked in red.
Alternatively, you can use your default photo app to connect via the QR code.
Attention!
Clicking the "Close hotspot" button will shut down the temporary hotspot again. As soon as you are closing eSignatureSuite, the temporary hotspot will also be automatically closed,too. Please remember to log your smartphone back into your usual WIFI network if it doesn't do this itself.
The app on your smartphone/tablet
To provide a secure and stable communication between eSignatureSuite and your mobile device, you need an additional app on your smartphone/tablet, which is called iStepOverSigner (for iOS devices) or aStepOverSigner (for Android devices).
Installation
You can find those apps in their corresponding app store, either with the following links or a simple search for "StepOver".
iStepOverSigner for iOS: https://apps.apple.com/de/app/istepovercapture/id979963928 (forwards to the Apple Store)
aStepOverSigner for Android: https://play.google.com/store/apps/details?id=com.stepover.android.astepoversigner&hl=de (forwards to the Google Play Store)
Please make sure, that you're using the most recent version, because earlier versions did not yet support the communication with eSignatureSuite.
Preparing for the signature
As soon as you have started, you will see this:
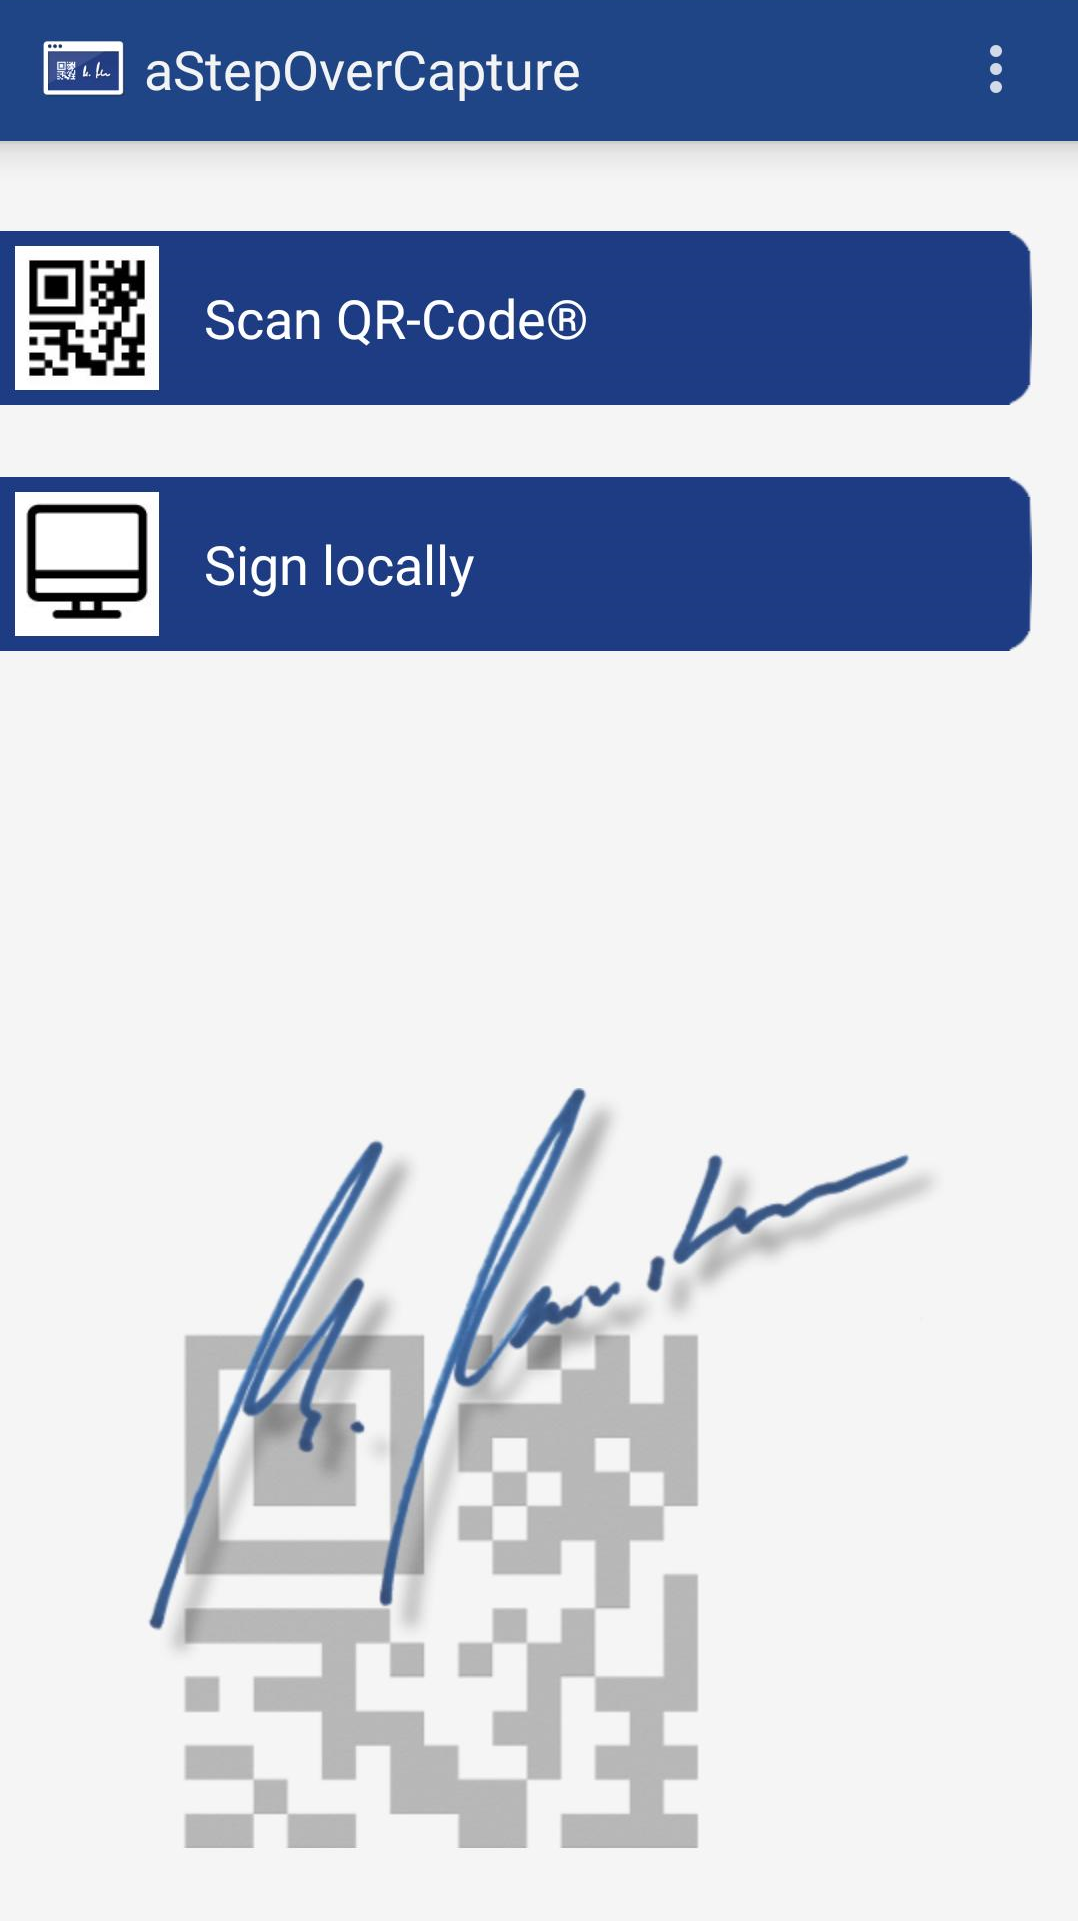
Now please click "Sign locally" and then follow the shown instructions.
The app is ready to be used and in the next step you just have to go to eSignatureSuite and select the smartphone as your signature device.
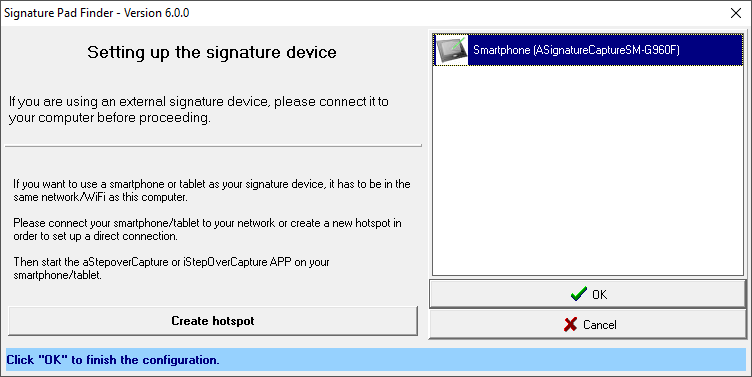
Selecting the signature device
The device search dialog in eSignatureSuite will either pop up itself or you can open it manually by clicking "Options" and then "Set signature device" in the main menu.
Then you will see this dialog. Here in this example with an Android smartphone as available device.
Signing
As soon as a signature field has been created in eSignatureSuite, the part of the document containing this field will be sent to your app on your mobile device and it will be presented to you for signing. The background will be made a bit darker and so the signature field is clearly pointed at.
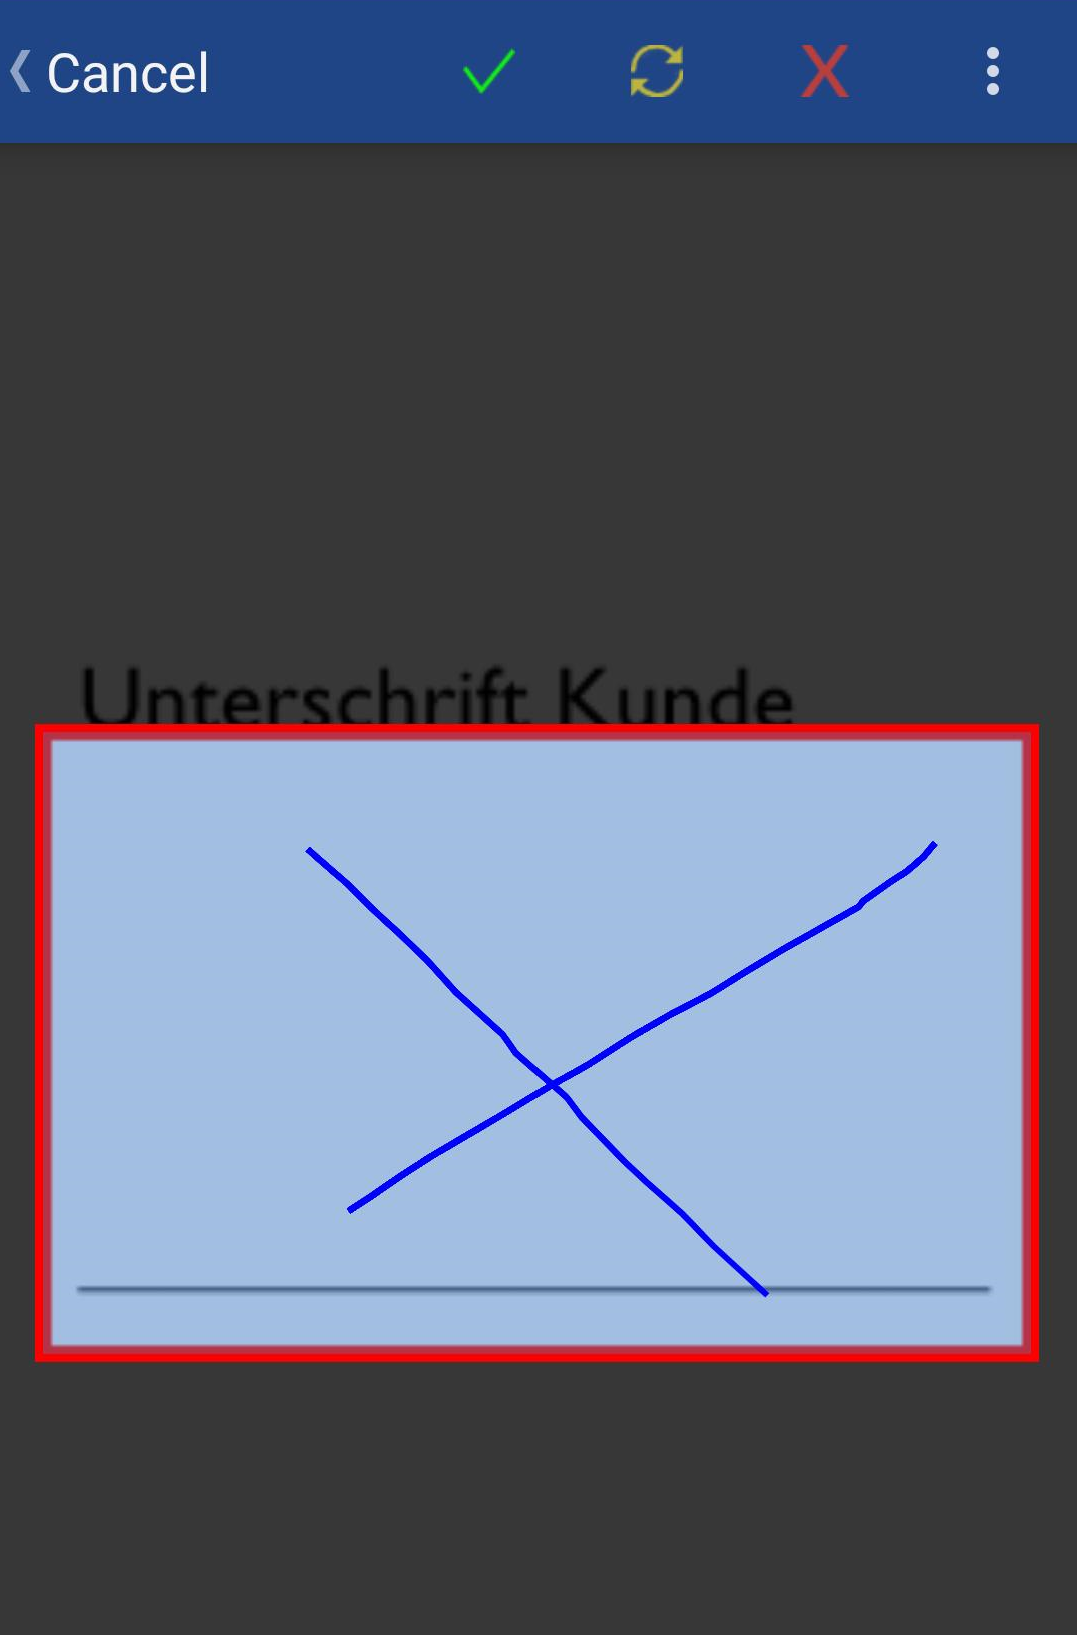
Now either use your finger or a suitable touch pen, if your device offers something like that, and then draw your signature in the red marked rectangle.
At the very top, you have the usual buttons to cancel and to change the settings, but while you are signing the app also offers 3 additional buttons:
| OK (green check mark) | With this button, you're confirming the signature when you're satisfied with how it looks. Then the signature will be added to the document and the signing process will either be finished or the next signature field will be presented to you to sign it. |
| Repeat (yellow arrows) | In case you're not satisfied with your signature, press the yellow Repeat button and then you can restart the current signature from the scratch. |
| Cancel (red X) | In case you decide otherwise and don't want to finish the current signature, press the red Cancel button. This cancellation will also be sent to eSignatureSuite and the signing process will be terminated. |
As soon as all necessary signatures have been done, you can either close the app on your smartphone or keep it running for further documents.