6. The administration menu: settings and options
- Andy Erd
- Michael Spreen
This page will give you an overview over eSignatureOffice's administration menu, in which you can change settings and activate or deactivate optional features. In order to explain all these possibilities, each menu will be shown together with a picture and all of its options and buttons will be explained.
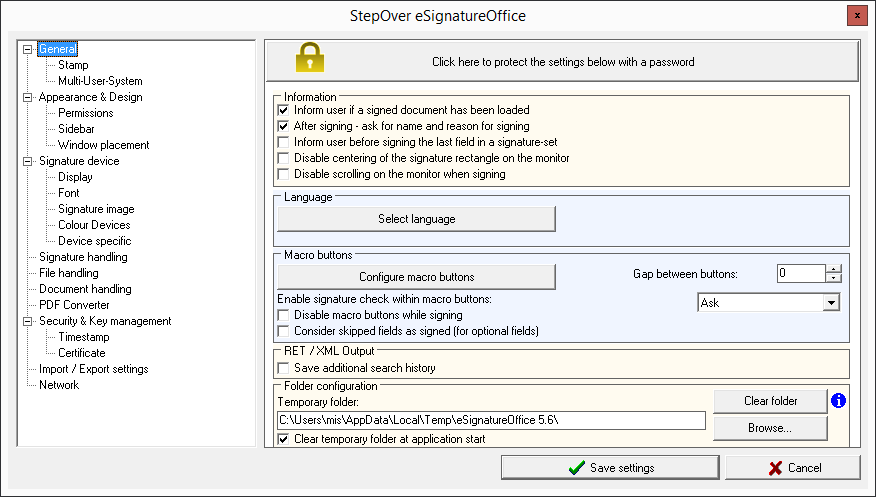
General
| |
| Click here to protect the settings below with a password. | This button is available in all cathegories of the administration and allows to set a password to protect your settings from getting changed. You can do this for each menu separately or for all menus at once. |
| Infom user if a signed document has been loaded | When opening a document, it is scanned for included signatures. With this option, you will be notified of such signatures (or not). |
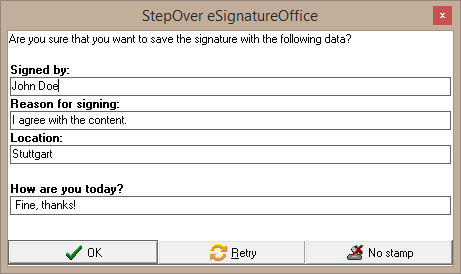
| After signing - ask for name and reason for signing | With this option an additional dialogue after each signature will be presented, the so-called stamp-dialogue, which asks for the signer's name, the location and the reason for the signature. By default this data will be added to your document below the signature and will be linked digitally to its respective signature, too. Learn more about this topic here: Saving the signature |
| Inform user before signing the last field in a signature-set | With this option, you will be notified before the last signature of a signature-set, that it will be the last one and that afterwards the whole signing process will be concluded. If you preset a macro in your signature-set option "What should happen after signing?", it will be executed before concluding the signing process. |
| Language | When clicking this button, you can select the language, with which you want to use eSignatureOffice. Currently the following options are possible: German, English (UK or US), Spanish, French, Italian, Dutch and Polish. |
| Configure macro buttons | With this button, the menu for macro buttons will open. These macros help you to automate complex actions like renaming, saving or sending your document via email. Learn more about this topic here: Automating complex processes: Working with macros. |
| Gap between buttons | As soon as at least one of your macro buttons is set to "visible", a new menu bar will be added below your tool bar in eSignatureOffice. This new bar shows all visible macro buttons and with this option, you can set the size of the gap between these buttons. |
| Enable signature check within macro button | Is this option set to "Ask" and you want to execute a macro while signing, eSignatureOffice will ask, if the signature should be added to the document before the macro is started. Setting this option to "Always overwrite" or "Never save" will not disturb the signing process and the macro will be executed without further enquiry. However, if you included options like "Save as..." or "Send per mail" in your macro, the signature-set will only execute these actions after requesting to add the signature to the document. This option will also be considered for automatically triggered macros, which you eventually designated in your signature sets, like a macro, which is automatically triggered once the signing process is cancelled. So you could define with this option, if an already started signature is supposed to be saved, discarded or if the user shall be asked before the automatic macro after cancelling the whole signature process is triggered. |
| Disable macro buttons while signing | With this option, all macros (irrespective of their visibility) will be deactivated while signing. This means, they can not be executed during the signing process and to further illustrate this, their button names will be written in grey. |
| Consider skipped fields as signed (for optional fields) | If you allow skipping optional signatures in your signature-set, this option here tells eSignatureOffice to consider these skipped fields as correctly signed and thus allows the successful conclusion of the signature-set. |
| Save additional search history | Activating this option while using a Return/XML-file, will save all your search terms (e.g. from signature fields or when using the Dynamic processing of document content) and their respective results in this XML-file. Learn more about using XML-files here: Input-XML |
| Temporary folder | Here you can set a saving path for your temporary files either with the "Browse" button or you copy your desired path into the empty field. By default the following path is used (but not shown): "C:\Users\[your user name]\AppData\Local\Temp\eSignatureOffice[version number]" (the parts in squared brackets can vary depending on your system and program version) |
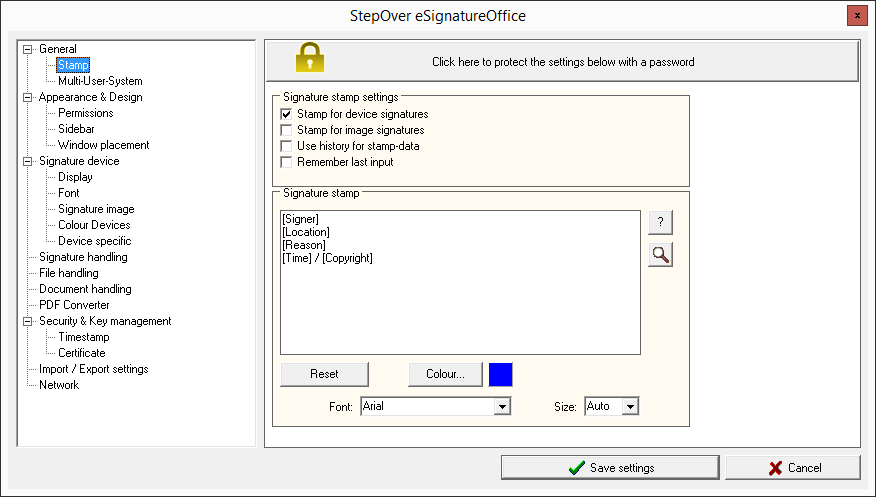
Stamp
In this menu, you can determine if you want to have a stamp attached to your signature and if so, how it should look like.
| |
| Click here to protect the settings below with a password. | This button is available in all cathegories of the administration and allows to set a password to protect your settings from getting changed. You can do this for each menu separately or for all menus at once. |
| Stamp for device signatures | After activating this option, all your data, which you are prompted for in the stamp-dialogue (or which you predefined in your signature-set), will be added below your signature after signing with a signature device like the StepOver sign pads. How you can edit this stamp according to your wishes, will be explained only a little bit further down the line in this chapter. Without activating the option, your signature will be added normally to the document without stamp and so without any additional data. If you chose the option "After signing - ask for name and reason for signing" in the "General" tab, the data, which you provide after the signature, will be used for the stamp. |
| Stamp for image signatures | If you add a signature to your document in form of a picture instead of a manual signature, this option allows adding additional information below the picture, too. |
| use history for stamp-data | If this option is activated, eSignatureOffice will remember all added data for "signer", the "reason for signing" and the "location". Furthermore, you can predefine text items in the appearing side bar to have them available later on in the stamp-dialogue. This makes it easier to work with frequently used input like signer's names or locations, for example. |
| remember last input | Using this option makes eSignatureOffice prefill the stamp-dialogue with the same input as in the previous stamp. |
Signature stamp text field Reset Colour... Font Size | Here in this text field, you can modify your stamp to a standard form of your choice. Some options are already shown and also explained via the small question mark button. All these options in the squared brackets are keywords. Text outside of these brackets is shown directly in the stamp. Those keywords are:
You can edit these options freely by deleting, copying or adding them to your stamp. In case you deleted these predefined options (either partially or completely) and you need them back, you can use the "Reset" button to go back to the default stamp, which is shown in the screenshot above. You can set the font and its size and colour for the complete stamp with the respective drop down menus or buttons, while the button with the magnifying glass allows using the dynamic processing of document content just like in other menus. |
In addition to the previously given static keywords, there are four further options to modify the signature stamp:
| |
Beware! All these options here in this menu will be used for all your signatures, but in a signature-set you can modify each stamp for every signature separately! This is done by editing or creating a signature-set (more about this in the Stamp section of the chapter Automatic creation of signing fields: Working with signature-sets) or you can use a text editor to add this information directly to your *.sss-file (StepOver Signature-Set). Learn more about this here: SSS File Structure. |
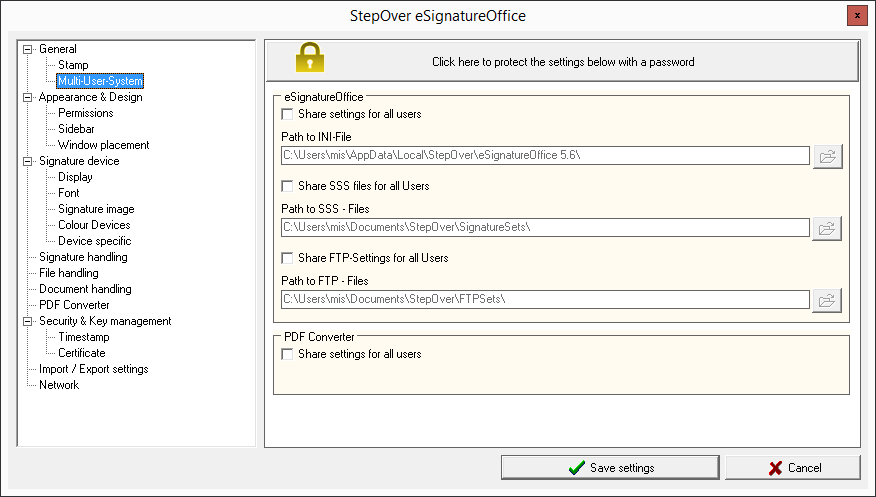
Multi-User-System
If you are not the sole user on your computer, but use the system together with your colleagues with separate accounts, you can use this menu to make all users use the same, centralised options.
| |
Share settings for all users | Normally, all setting are saved for each user separately. With the given options, you can change this behaviour and set up a shared path for collectively used (and saved) settings. Please take note, that all users need to have permission to read and write in the given folder! Furthermore, it's important to know, that all registering data is saved to this INI-file! So, if multiple users of a computer are using the same eSignatureOffice installation, they each have to register their version separately, if they don't have access to a collectively shared settings file. So, if you set a shared settings file here in this menu, these persons using this file don't have to register separately. |
| Share SSS files for all users | SSS files are StepOver Signature-Set files, which are generally saved to a user specific folder (for example "C:\Users\Testuser\Documents\StepOver\SignatureSets"). By activating this option here, you can select your own path, which, of course, should not be user specific and which will be saved to your operating system's registry. Please make sure, that all users have permission to read and write in the given folder! |
| Share FTP-settings for all users | FTP settings are saved by eSignatureOffice to special SFS-files, which are generally saved to a user specific folder (for example "C:\Users\Testuser\Documents\StepOver\FTPSets"). By activating this option here, you can select your own path, which, of course, should not be user specific and which will be saved to your operating system's registry. Please make sure, that all users have permission to read and write in the given folder! |
| PDF Converter | Common settings for the PDF Converter don't need a special saving path because all required information is read directly from your system's registry. |
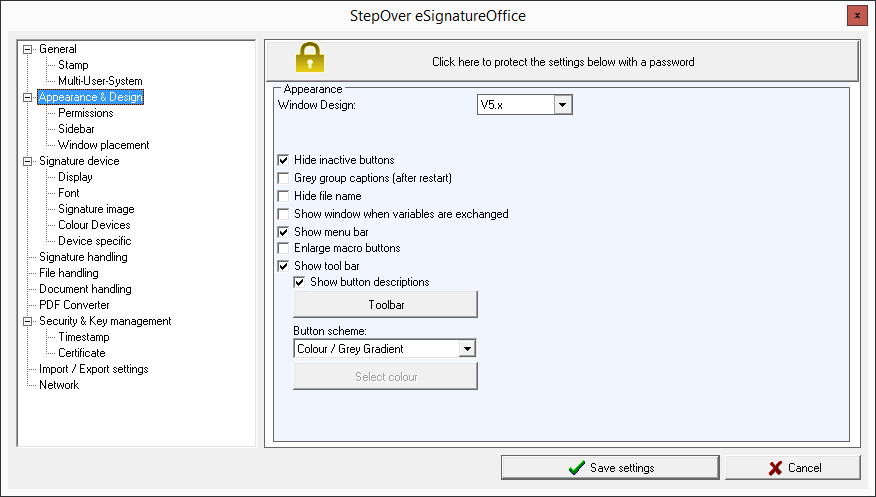
Appearance & Design
Just as the name suggests, you can change the graphical user interface in this menu, either on a grand scale by using completely different colour designs or you just change the appearance of individual facets like labels, display options and colours.
| |
| Click here to protect the settings below with a password. | This button is available in all cathegories of the administration and allows to set a password to protect your settings from getting changed. You can do this for each menu separately or for all menus at once. |
| Window Design | Here you can select the general appearance of your graphical user interface when using eSignatureOffice. In this manual, we generally show version "5.x", but you can also use the "4.x" and "Classic" designs from earlier versions. |
| Show pen icon in signature field | With this option, you activate a small icon depicting a hand |
| Hide inactive buttons | This option affects primarily the eSignatureOffice window designs "Classic" and "4.x" and allows to hide all buttons and menus, which can be deactivated in the "Permissions" tab (see below). When using the design "5.x", you already have the ability to show or hide each and every button in your toolbar by using the "Toolbar" button, which is explained some lines below this one. |
| Gray group captions (after restart) | With this option, you can deactivate the coloured background for several menu names in window design "4.x" and so make the whole user interface appear in grey. For window design 5.x, this option is not used. |
| Hide file name | Activating this option hides the file name of the currently opened document in the lower right status bar. Then, only the page number will be shown there. |
| Show window when variables are exchanged | This checkbox activates an additional dialogue, which will be shown each time you are using the dynamic processing of document content to search for keywords. This dialogue will show what is being searched and what is being found. |
| Show menu bar | This option makes the main menu bar (File, View, Tools, Options, Help) visible or hides it. Beware: When this option is deactivated, there is no way back to this administration menu besides using the "StartManager.exe", which you can find in your eSignatureOffice installation folder. |
| Enlarge macro buttons | This option is especially helpful for devices with smaller displays, like some Tablet-PCs for example. It enlargens the button size of the visible macro buttons and so allows easier usage. |
| Show tool bar | This option activates the tool bar, which contains most basic options like signing, navigating the document, opening and saving etc. |
| Show button descriptions | By deactivating this option, you can make all text lables of your tool bar buttons disappear and so make the whole tool bar more compact. Only the icons will be shown. |
| Toolbar | This button leads to a new menu, which allows you to customize the complete tool bar of window design "5.x" according to your wishes. Learn more about this in the section Customizing the toolbar. |
| Button Scheme | The dropdown-menu next to the text "Button Scheme" offers the choice of many different, predefined colour combinations to change the appearance of your eSignatureOffice in a fast and easy way. Lean more about this in the following section Customizing the user interface colours. |
| Select colour | This button is only usable after choosing one of the options containing the keyword "User" from the button scheme dropdown menu. This leads to a new menu, which allows to customize eSignatureOffice's colouring according to your individual wishes. Lean more about this in the following section Customizing the user interface colours. |

Customizing the user interface colours
 | Attention! The following options and explanations apply only for window design "5.x"! |
The colouring of eSignatureOffice's graphic user interface is highly customizable, down to the colour gradient of single buttons. This allows using your company colours for the whole design, for example.
For this, there are basically two different ways in the administration menu "Appearance & Design":
- Basic customization: This can be done with the dropdown menu "Button Scheme" and changes the overall appearance.
These schemes are named according to their respective design. The first word points our the icon (or glyph) colour, while the second word describes the colour of the button background.
- For the glyphs the optioons "Colour", "Grey" or "Blue" are predefined.
- The buttons themselves offer more options, but the basic designs in "Colour", "Grey" or "Blue" are available as well as the additional options for colour gradients and "User". The gradients range from light-coloured on the upper edge to dark-coloured on the lower edge of a button. "User" leads to the next option with a new menu.
Detailed customization is offered with the previously mentioned option "User" in the "Button Scheme" drop down menu, which activates the button "Select colour" directly below the drop down menu and which leads to a new menu.
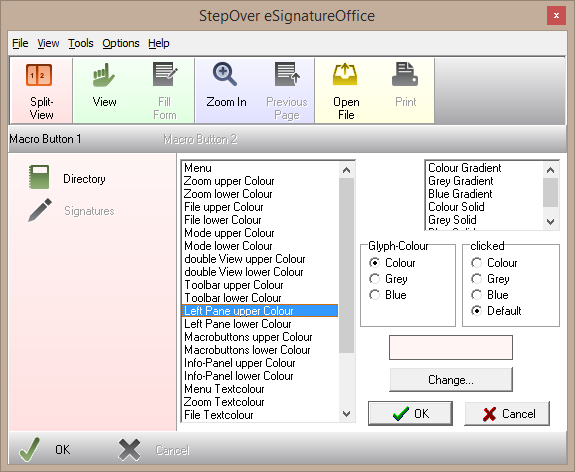 | This overview is just an example view to show directly, how your colour choices will change the appearance as soon as you confirm them by pressing the "OK" button and then leave the administration menu with "Save settings". Some advice about this topic: |
Just try, whatever suits your wishes! With these manifold possibilities, you could show the user interface for example in your company colours. | |
At the very top, at the very bottom and on the left side, you can see examples of the different parts, whose colours you can customize in this menu. For this, each section shows a button in its normal state and another one in its deactivated state (when it's not usable but still visible), but your changes will affect all visible parts of the appropriate section. | |
| Clicking on any menu bar or button will jump directly to the appropriate entry in the list and allows you to customize it. | |
| Alternatively, you can choose each option directly, in case you already know, what you are looking for. Generally, all names are self-explanatory. | |
On the right side, you can do (from top to bottom):
| |
For colour gradients, you have to choose an upper and a lower colour, between which the gradient will be created. |
Customizing the tool bar
| Attention! The following options and explanations apply only for window design "5.x"! |
The tool bar of window design "5.x" is not only customizable in terms of colour as described in the previous section, but you can also move or hide each button and each partial bar individually. Furthermore, you can enable the group "Extra", which containts additional functions, which do not belong in any of the other groups and which will be explained directly after this table.
| Here you can...
|
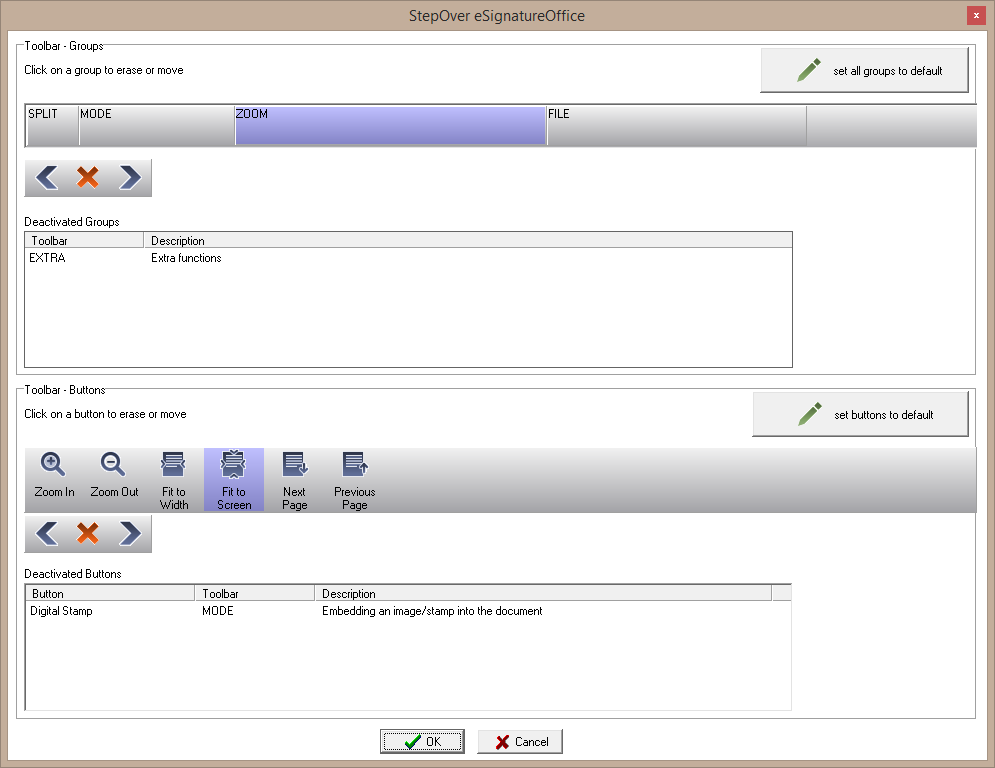
Extra
If you add the optional group "EXTRA" to your toolbar, the following options will be available:
| Option | Explanation |
|---|---|
| Set sign pad | This is a shortcut for your toolbar, which allows to directly change your signature device without having to go the longer routes over either the main menu oder the administration menu. |
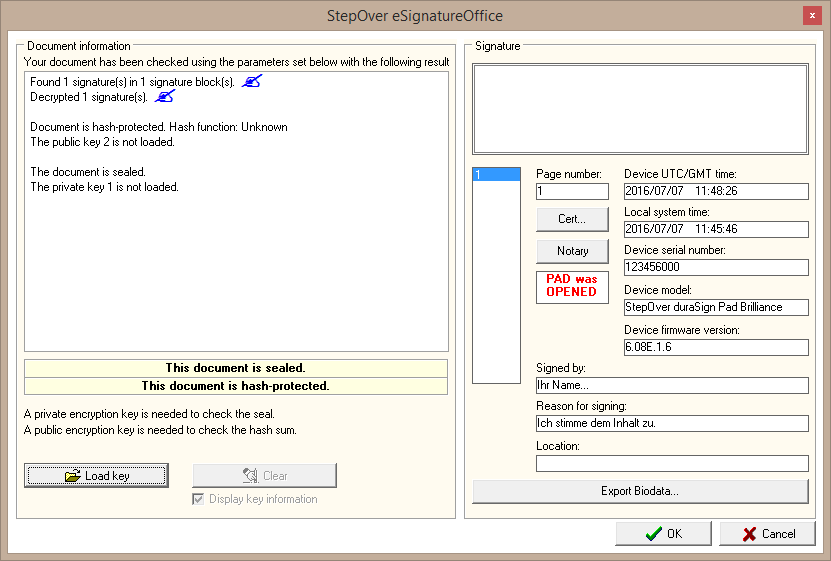
| Check | This option is supposed to be visible only to experienced users or administration, because it offers the possibility to check the details of all signatures in the currently loaded document and to verify their data security. As shown on the pictures, this includes for example:
|
Permissions
This menu allows to set up rules for the end user's access rights by hiding or deactivating certain buttons.
|
With the shown options here, you can either block all buttons and menu options with the appropriate names (then they will be displayed in grey) or you can hide them directly, no matter where they are or how often they can be found in the graphic user interface. This can be achieved in other ways, too (for example via the "Toolbar" button in the "Appearance & Design" tab of the administration menu), but the options given here will block all access points. This is especially helpful when being combined with the possibility to password protect the access to this Permissions menu. To do this, you can use the big grey button with the yellow lock icon, just like in all other tabs of the administration menu. |
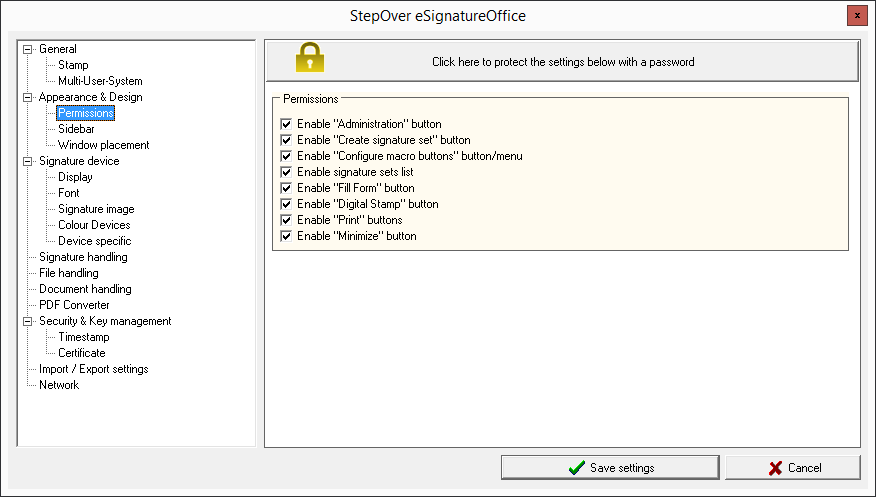
| Attention! By removing the first check mark for access to the whole administration menu, you lock everybody (including yourself) out of the administration settings and this is only reversible by using the "StartManager.exe" from the eSignatureOffice installation folder. Please use this option only, when you don't want the end user to have any permission to change settings. |
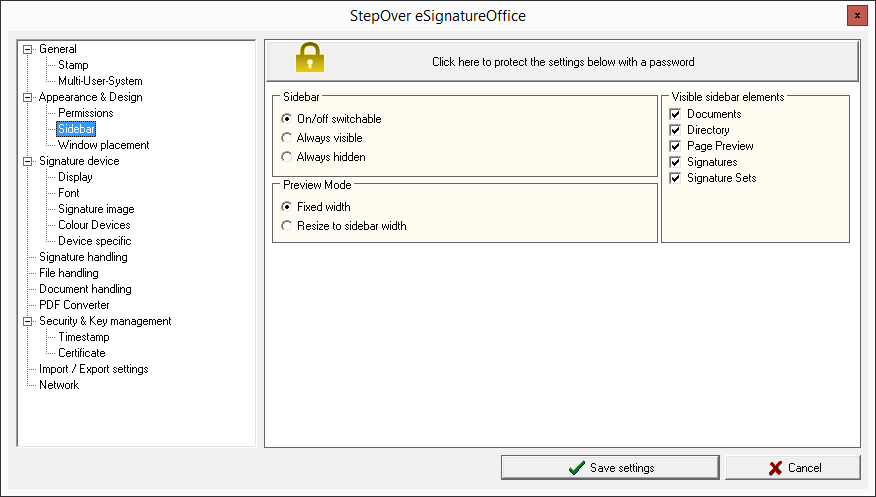
Sidebar
 | ||
| Click here to protect the settings below with a password. | This button is available in all cathegories of the administration and allows to set a password to protect your settings from getting changed. You can do this for each menu separately or for all menus at once. | |
| Sidebar | Within this menu, you set up options for the behaviour of the directory pane on the left side of the user interface. This includes the general option to either have the directory pane always shown, always hidden or switchable with a simple press on the "Split-View" button in the tool bar. | |
| Preview Mode | The directory pane allows switching between different options to show (see picture on the right side):
The option "Page Preview" allows to show the separate pages of the document either small and with a fixed size to make the preview of many pages appear in several columns (as soon as there is enough place to show them) or the page preview always uses all available space in the directory pane to show the pages as large as possible. | 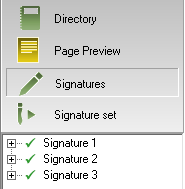 |
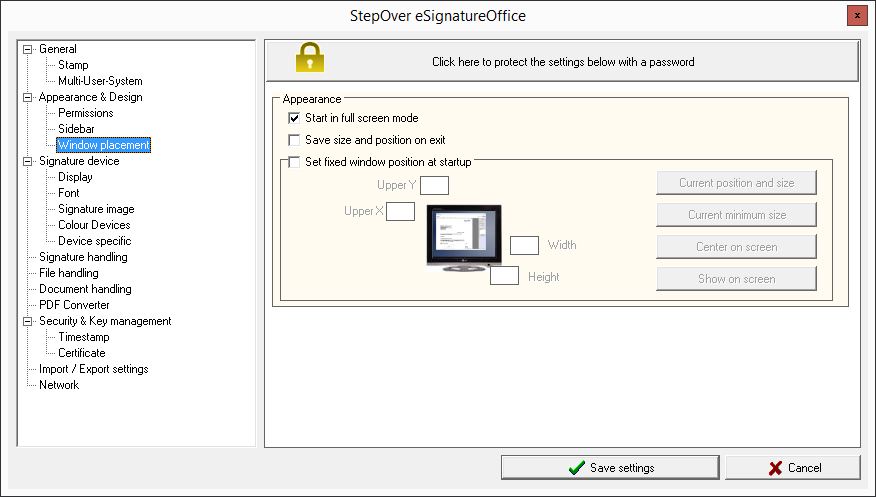
Window Placement
This menu offer different options to change the window size as well as the position when starting eSignatureOffice.
 | |
| Click here to protect the settings below with a password. | This button is available in all cathegories of the administration and allows to set a password to protect your settings from getting changed. You can do this for each menu separately or for all menus at once. |
| Start in full screen mode | This is the default setting, which makes eSignatureOffice start in a maximized window and so use the whole display size (also called full screen mode). In the shown screenshot, another option is currently chosen to make it easier to see and explain. |
| Save size and position on exit | With this option, eSignatureOffice will save the window size as well as the position (if not maximized) when closing the program and will restore them upon the next program start. |
| Set fixed window position at startup | This option allows to further customize the appearance of the program by offering the possibility to set the exact window position and it's size in pixels: Please note that...
|
| Current position and size | If you have set the program window to your desired size and position prior to entering the administration menu, you can use this button to read the current values in the appropriate fields (and afterwards use/save them). |
| Current minimum size | By using this button, you reduce the eSignatureOffice window to its current minimal possible size. As explained previously, the minimum size is limited by the fact, that the whole visible user interface has to fit into this window. This means, that each time this features is used, it checks, which parts of the interface are activated and have to shown to calculate the current minimum size. |
| Center on screen | This features makes the window centered on the display with its current size. |
| Show on screen | After having entered your desired values (Upper X/Y = starting position and width/height), this button allows to see the result directly. This way, you don't have to restart the program each time you want to test your customized values. |
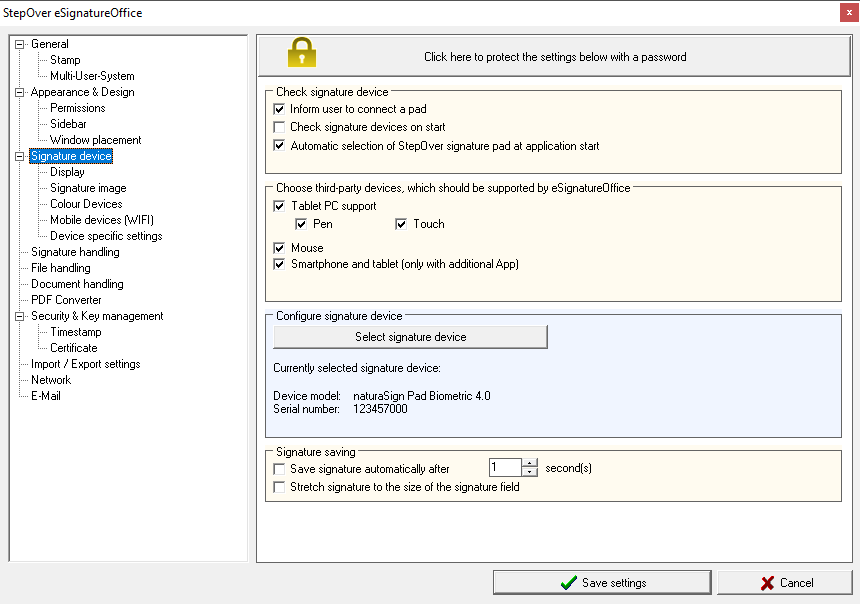
Signature device
This menu allows to set up different options, which generally influence your work with your signature device. This is true for StepOver signature pads as well as third-party devices like Tablet-PCs, touch screens etc.
 | ||
| Click here to protect the settings below with a password. | This button is available in all cathegories of the administration and allows to set a password to protect your settings from getting changed. You can do this for each menu separately or for all menus at once. | |
| Inform user to connect his pad | If this option is activated and eSignatureOffice can't find any eligible signature devices when starting a signature process, you will be prompted to connect a device. | |
| Check signature device on start | If this option is activated, eSignatureOffice also searches for connected signature devices on startup and depending on your settings in the previous option ("Inform user..."), you will be prompted (or not). | |
| Automatic selection of StepOver signature pads at application start | If this option is activated and no signature device has been selected beforehand, eSignatureOffice will automatically select one for you during the program start. If a signature pad is connected to a tablet pc, the pad will also be selected. If more than one pad is connected, devices with colour display will be favoured over those with black-and-white displays. | |
| Choose third-party devices, which should be supported by eSignatureOffice | With the checkboxes here available, you can select those kinds of devices, which should be searched for and shown in the device search additionally to the usual StepOver signature pads. Please take note, that a special tablet-PC licence is needed if you want to use tablet-PC touches or pens to sign your documents. The demoversion allows using all these devices. Please also take note, that using iOS as well as Android smartphones and tablets is possible, but you will need an additional app on your smartphone to do this. Find out more about this here Signing with mobile devices | |
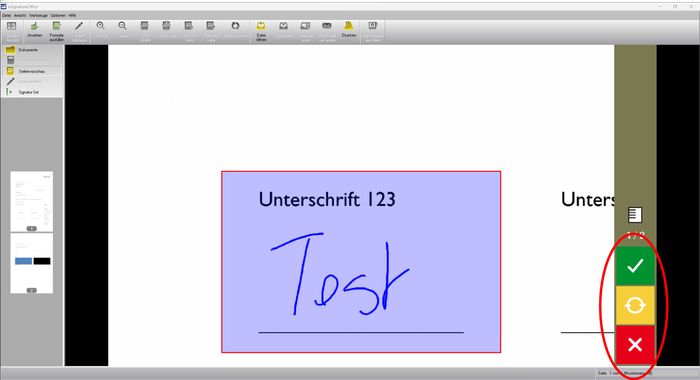
| Button: "Select signature device" | Using this button, will - after a short search - list all available, connected signature devices, which are also allowed by your limitations (see previous options). An example picture with a computer mouse, two tablet-PC devices and a StepOver sign pad is shown to the right. After choosing the desired signature device and confirming your choice by using the "OK" button, eSignatureOffice will automatically configure the connection to the chosen device and its settings. Now your device is ready to use. Please be aware, that you can connect multiple signature devices to your computer simultaneously as shown in this example, but you can always use only one device actively for your signatures! If you wish to change your choice, you have to repeat the process either as just described here via the administration menu oder by using "Options | Set signature device..." in your eSignatureOffice main menu. |  |
| Save signature automatically after X seconds. | If this option is chosen, eSignatureOffice uses an automatic timeout counter, which starts after registering the last input on the signature device. By default, two seconds are preset here, which, according to experience, offers enough time to switch between different words or add lines or points to your signature. It's recommended to set this timer not too low in order to prevent a premature end of your signature process as well as to offer the signer enough time to push the "Repeat" button when being not satisfied with the signature. If this option is deactivated altogether, there will be no timeout at all and you either have to use the "OK" button at the bottom of the eSignatureOffice user interface to finish the signature process or - in case your device offers this option - by using the "OK" button | |
| Stretch signature to the size of signature field. | If this option is activated, your signature will not be added to the document with its original size, but it will be enlargened to fit as close as possible to the whole given signature rectangle. However, the width-to-height ratio stays the same and the biodata will not be altered! Only the final picture of your signature is optically changed to present it larger in your document. | |
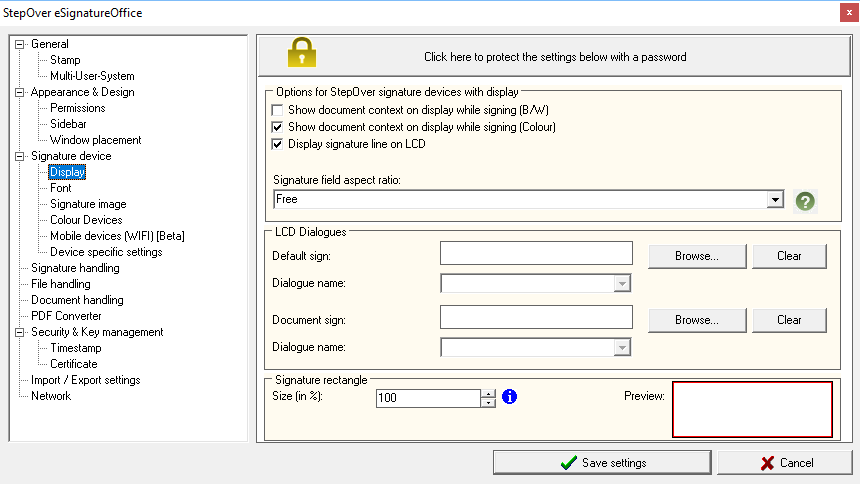
Display
 | ||
| Click here to protect the settings below with a password. | This button is available in all cathegories of the administration and allows to set a password to protect your settings from getting changed. You can do this for each menu separately or for all menus at once. | |
Display document context on LCD while signing (B/W) | With this option, you can determine, if the loaded document should be shown on your signature device display when switching from viewing the document to signing the document or if a standardized background should be shown. Contrary to devices with coloured displays, black-and-white device are only able to show a limited part of the document, which is within the boundaries of the chosen sign rectangle. Furthermore, if you wish to display custom text on the device, this option has to be deactivated. By default, this option is not used for black-and-white devices, because only on devices with colour displays, the presentation of the document can be offered in satisfying quality. | |
Display document context on LCD while signing (Colour) | With this option, you can determine, if the loaded document should be shown on your signature device display when switching from viewing the document to signing the document or if a standardized background should be shown. Contrary to devices with coloured displays, black-and-white device are only able to show a limited part of the document, which is within the boundaries of the chosen sign rectangle. Furthermore, if you wish to display custom text on the device, this option has to be deactivated. Deactivate this option to speed up your signature process a little bit, because then the transfer of the document from the computer to the sign pad (to show it there) is not required anymore and so saves time. | |
| Display signature line on LCD | This option makes black-and-white devices show a line near the bottom of the display while signing. This line shall assist the user, for example to achieve a straight-lined signature and to further the impression of a normal signature on paper. | |
| Signature field aspect ratio: | With this drop down menu, you can specify a certain fixed aspect ratio when manually drawing a sign rectangle. For example, if you use a device with a flat but wide aspect ratio of 10:2,5 (Classic or Standard pads), set the appropriate option and the sign rectangle will always keep this aspect ratio. This makes the sign rectangle fit better with the size of the actual signing area of your pad and so offers a better feeling for the signature to the user. If you are using eSignatureOffice only in combination with signature sets, this feature is irrelevant. By default it's set to "Free" (like in free handed) and so allows to set width and height according to your wishes. In case you are not sure, which type of device you are using, you can use the small button with the magnifying glass icon | |
| LCD Dialogues | With the help of this option, you can upload premade signature dialogues to your sign pad, for example to show customized buttons or notes. Currently, there are only two dialogues for the naturaSign Mobile Pad available in your eSignatureOffice subfolder named "dialogs". These can, for example, be used to show a "OK/Repeat/Cancel" dialogue, which normally would not be available for this type of pad. | |
Signature rectangle | With this option, you can set the percental size of the signature rectangle on the display of the connected signing device with colour display. To achieve this, the background of the document to sign will be zoomed in or out to get to the desired size. However, due to the possibility to choose the ratio of your signature rectangle yourself instead of it being a set value, there are some limitations to this function:
With a set percentage of 100% and matching ratio, the full display size will always be used. The picture on the right side of the menu will show you an approximate preview of the future signature rectangle, if the matching ratio is kept. By zooming in, this feature seemingly provides the user with more space on the signing pad, which can be really useful, for example with long names. | |
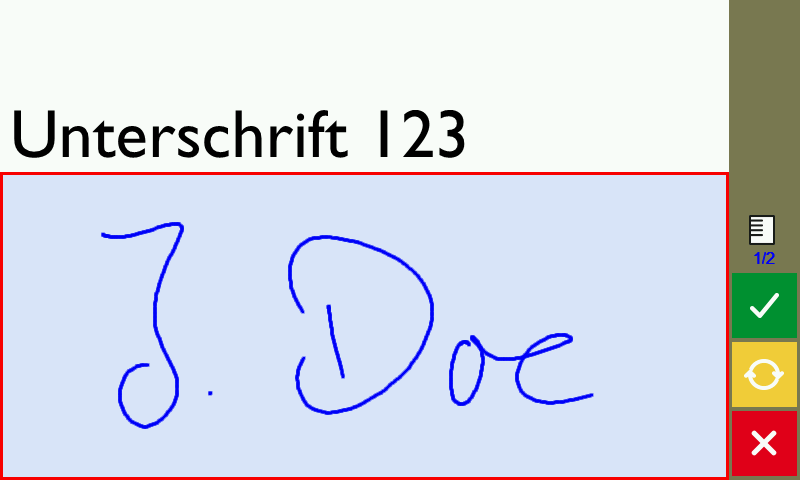
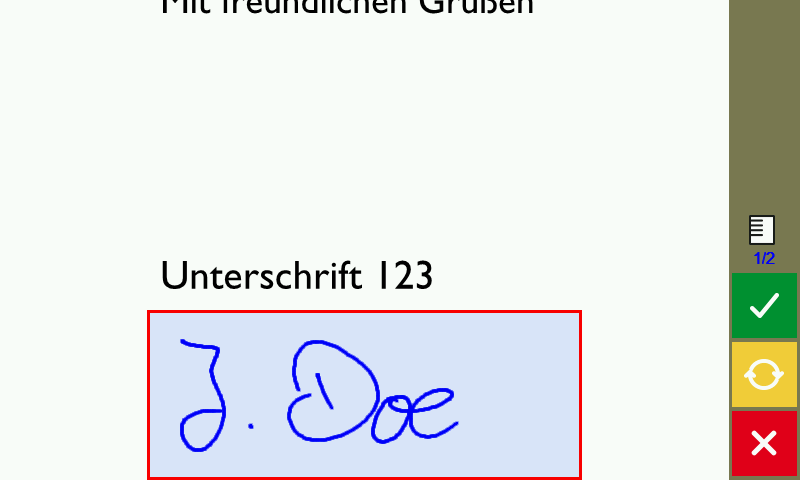
| Here some example pictures of duraSign Pad Brilliance displays while signing with different percentages: | ||
100%:
| 60%:
| |

Font (naturaSign series)
In this menu, you can predefine templates to represent a small, medium and large font, which later can be used in signature-sets or to show text on the signature device. Learn more about this in the paragraph Text on pad.
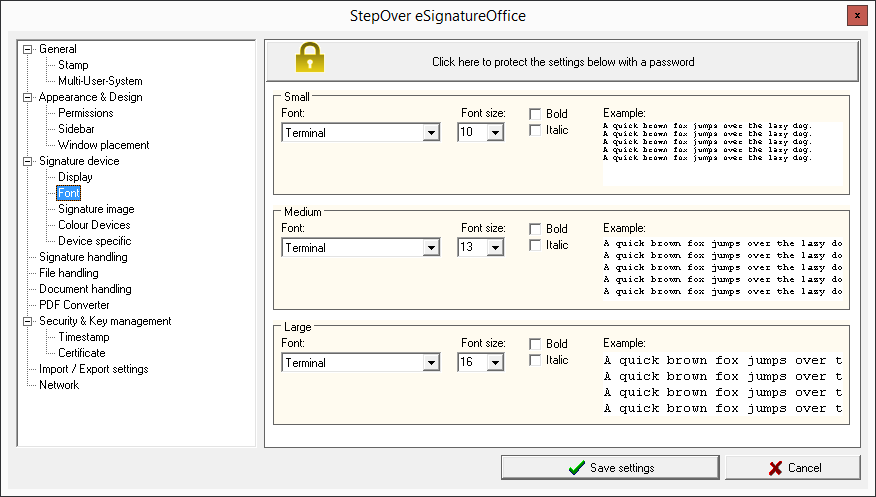 |
The templates "Small", "Medium" and "Large" can be encountered in other menus, too, and you can customize them here with several options, which are typical for text formatting:
For each of these three templates, you can directly see how it will look later, for example when used on your sign pad to show custom text. |
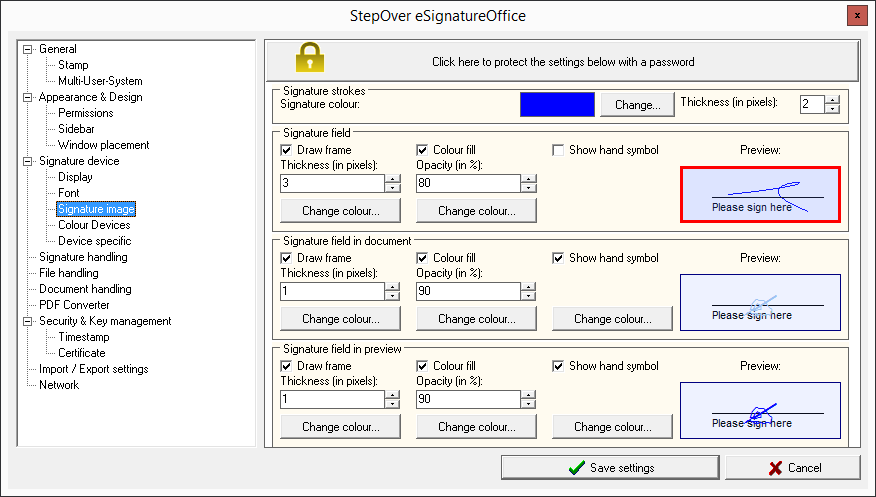
Signature image
In this menu, you can adjust the colour as well as the visibility options for your signature field and for some devices the signature line itself.
 | |
| Click here to protect the settings below with a password. | This button is available in all cathegories of the administration and allows to set a password to protect your settings from getting changed. You can do this for each menu separately or for all menus at once. |
| Signature strokes | With this option, you can set the colour of your signature line - this counts for eSignatureOffice as well as for your signature device. Please take care, however, that coloured signature lines can obviously only be seen with their correct colour on devices with coloured display (e.g. Colour, Brilliance). When using black-and-white devices, this option only influences the colour of your signature lines in the program but not on the device display.
|
| Draw frame | Setting this check mark activates a visible frame around your signature field while drawing the field as well as while signing. This frame will be visible in eSignatureOffice and on your signature device. Bewow the check mark, the frame thickness can be set in pixels, while its colour can be set via the "Change colour..." button. Please be aware, that these settings can only be visualized on devices with coloured displays (e.g. Colour, Brilliance pads), because black-and-white devices generally never show a distinct signature field, but the whole display area is used as signature field. This frame will not be included, when the signature is added to the document. It's only visible during the signing process. |
| Colour fill | Setting this check mark activates a visible coloured filling to your signature field. You can use this option to complement the colours of the signature, the frame and the background filling, in eSignatureOffice as well as on your signature device. You can change the opacity (in %) as well as the colour with the "Change colour..." button. Please be aware, that these settings can only be visualized on devices with coloured displays (e.g. Colour, Brilliance pads), because black-and-white devices generally never show a distinct signature field, but the whole display area is used as signature field. Moreover, colours are obviously not shown on black-and-white displays. This coloured filling will not be included, when the signature is added to the document. It's only visible during the signing process. |
| Preview | This shows a preview of the current settings for your future signature field. |
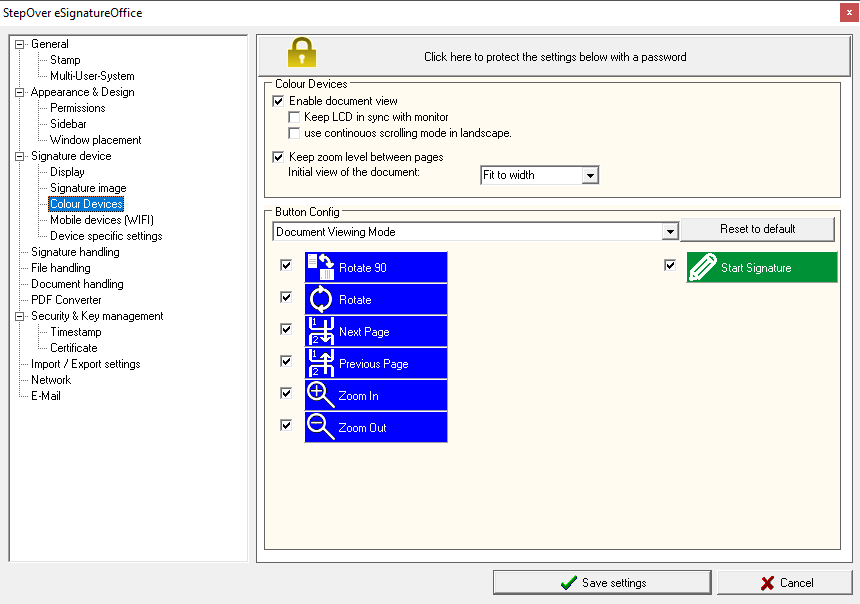
Colour devices
In this menu, you can set different options, which affect the usage of devices with coloured displays (e.g. Colour, Brilliance pads). The options for these pads are shown separately, because only devices with coloured displays allow a document preview and don't offer customizable side bar buttons, for example. Black-and-white devices (e.g. Classic, Mobile) will not be affected by these settings.
 | |
| Click here to protect the settings below with a password. | This button is available in all cathegories of the administration and allows to set a password to protect your settings from getting changed. You can do this for each menu separately or for all menus at once. |
| Enable document view | Activating this option allows the document to be shown on your colour devices after being loaded in eSignatureOffice. If this option is enabled, the two following options will be usable, too. |
| Keep LCD in sync with monitor | If this option is active, eSignatureOffice will always show the same part of the document on your pad display as you are currently seeing on your computer monitor. There is a slight delay of 1 second before eSignatureOffice reacts to this. This is done to prevent continuous loading of the document while you are scrolling. So, as soon as you stop on a document page for 1 second to read it, this document page will be sent to your pad to be shown there, too, so that your customer might read the same part. |
| Use continuous scrolling mode in landscape | This option is currently only effective on the duraSign Pad 10.0 and it allows scrolling through the pages of a document on the device without the need to load each page separately. You can just use the pen and push the document page up and down until the next one is shown and so on. Please take note that this is only usable while the duraSign Pad 10.0 is in landscape mode. |
| Keep zoom level between pages | Activating this option saves the zoom level when turning the pages while viewing the document on your signature device. If this option is deactivated, each turn of a page on the device will result in the page being fit to width. |
| Initial view of the document: | This option determines, which zoom level shall be used initially on the signature device with colour display (not in eSignatureOffice). Of course this can be changed on the run with the zoom buttons on the device. |
| Button Config | These buttons mean the buttons on a signature device, which are displayed in a separate side bar and at the time of this manual's creation are only supported by devices of the duraSign product range and the naturaSign Colour. In the drop down menu, choose the mode, whose buttons you want to edit: Here you can...
A detailled description of the three different modi and their respective buttons will follow right now. |
Document Viewing Mode
This is the default mode for devices with colour devices after loading a document and it shows this document before and after adding a signature to allow inspecting or verifying it.
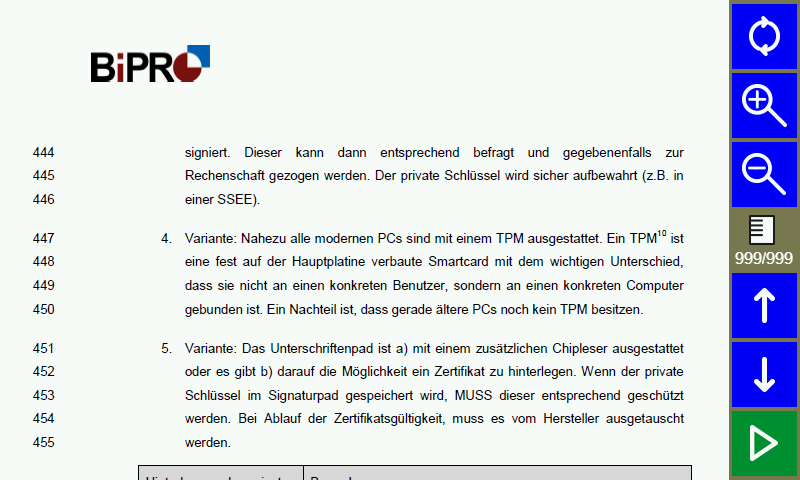 | Rotate: Rotates the view on the sign pad to left handed mode. |
| Zoom In: Enlargens the document on the device display. | |
| Zoom Out: Scales the document on the device display down. | |
| Previous Page: Loads the previous page of your document. | |
| Next Page: Loads the next page of your document. | |
Start Signature: This button is only visible when starting eSignatureOffice in combination with a signature set and when the button in this signature set is not set to invisible! Using this button will make the signature set start at the first signature field, which has not been signed, yet. Learn more about signature sets in Automatic creation of signing fields: Working with signature-sets. |
Sign Mode (without showing the document)
This mode (or a similar looking one) will be shown, when you deactivate the option "Display document context on LCD while signing (Colour)" in the administration menu "Signature Device | Display". This can be useful when you either want to show custom text on the pad using a signature set or when you generally want to speed up the whole signature process.
 | Rotate: Rotates the view on the sign pad to left handed mode. |
Next Signature: Jumps to the next signature field within a signature set. This button is only visible when using a signature set and when there are still signatures left to do. | |
Previous Signature: Jumps back to the last signature of a signature set, which has not been added, yet. | |
Okay: This button confirms the current signature, if you either don't want to wait for the automatic timeout or if this timeout is deactivated. You can change this behaviour in the administration menu "Signature Device" by either changing the time value or removing the check mark at "Save signature automatically after X seconds" | |
Repeat: Removes the whole current signature from the display and restarts the signature field. | |
Cancel: Stops the current signing process. If the current signature field is a mandatory field within a signature set, you will be prompted in eSignatureOffice, that cancelling a mandatory field leads to cancelling the whole signature process. |
Sign Mode (showing the document)
This mode is the default view for devices with colour display. So you can show a section of the document surrounding the current signature field and thus can always be sure, that you add the signature, where you want to add it.
 | Rotate: Rotates the view on the sign pad to left handed mode. |
| Next signature: Jumps to the next signature field within a signature set. This button is only visible when using a signature set and when there are still signatures left to do. | |
| Previous signature: Jumps back to the last signature of a signature set, which has not been added, yet. | |
| Okay: This button confirms the current signature, if you either don't want to wait for the automatic timeout or if this timeout is deactivated. You can change this behaviour in the administration menu "Signature Device" by either changing the time value or removing the check mark at "Save signature automatically after X seconds" | |
| Repeat: Removes the whole current signature from the display and restarts the signature field. | |
| Cancel: Stops the current signing process. If the current signature field is a mandatory field within a signature set, you will be prompted in eSignatureOffice, that cancelling a mandatory field leads to cancelling the whole signature process. |
Mobile devices (WIFI)
In this menu you define how mobile devices (smartphones and tablets based on Android or iOS) are allowed to be found by the device search. For this, several network options are available. You can find more detailed instructions on how to use mobile devices here: Signing with mobile devices
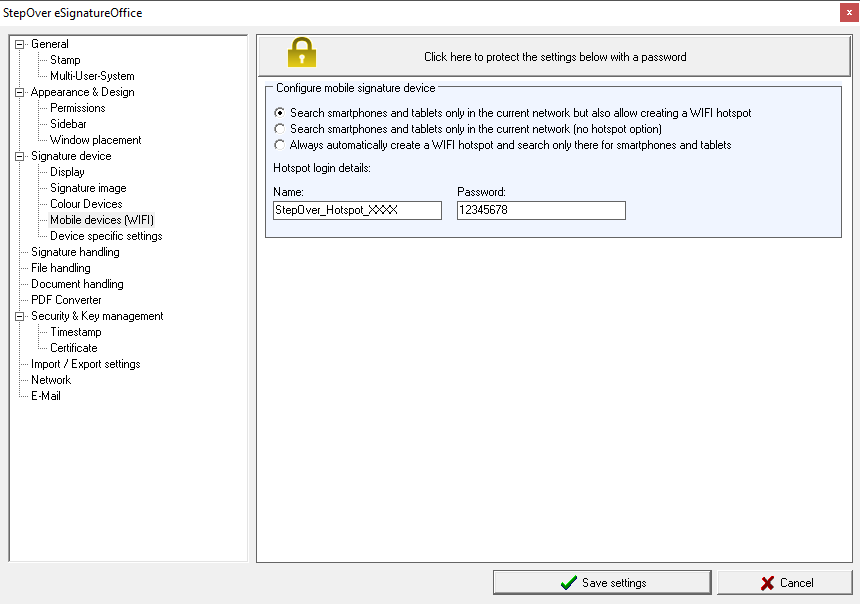 | |
Search smartphones and tablets only in the current network but also allow creating a WIFI hotspot | With this choice you will get an additional option in the device search menu to allow creation of a lokal hotspot (always given your computer hardware is capable of doing so). This way, each time you want to select your signature device, you can decide if you want to create a new hotspot network or if the already available WIFI network is already sufficient. If an additional hotspot network is created, then always with the login details shown here and where you can also change them. These login details will also be shown in the device search menu after the hotspot has been created. |
Search smartphones and tablets only in the current network (no hotspot option) | With this choice, the optional creation of an additional hotspot will not be available and mobile devices will only be found, if they are already in the same WIFI network as the computer, on which eSignatureOffice is running. |
Always automatically create a WIFI hotspot and search only there for smartphones and tablets | With this choice, an additional lokal hotspot will always be created automatically (of course given that your computer hardware is capable of doing so). For this hotspot, the login details given here will be used. These login details will also be shown in the device search menu after the hotspot has been created. |
| Hotspot login details: | With these login credentials, you can define the name as well as the password of your potential lokal hotspot. Please be aware that according to the current WPA2 standard this password has to be at least 8 characters long. When eSignatureOffice is first installed (and also with each reset to factory settings) a random network name as well as a random password will be created for you. |
duraSign NG Serie
This section contains options that are specific for the NextGen Pad.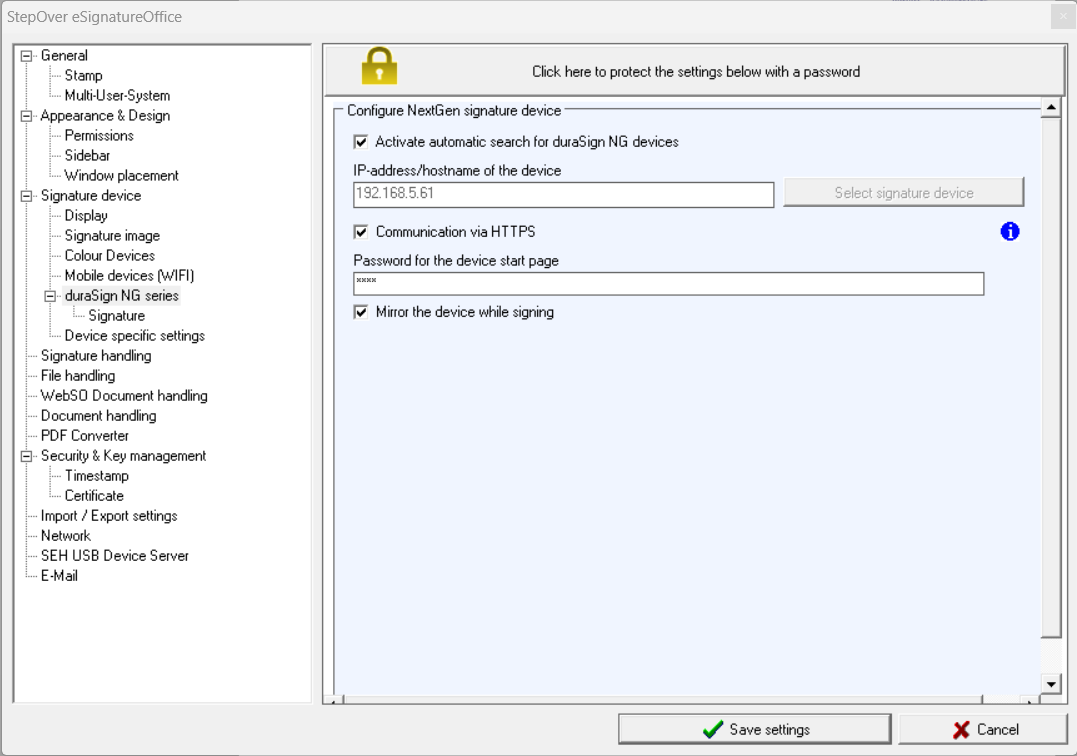
Activate automatic search for duraSign NG devices | For example, for a fixed selection of a NextGen Pad you can specify its name or IP address here. Alternatively, if you have activated the automatic search for NextGen devices, eSignatureOffice will search for corresponding devices in the network when you start.
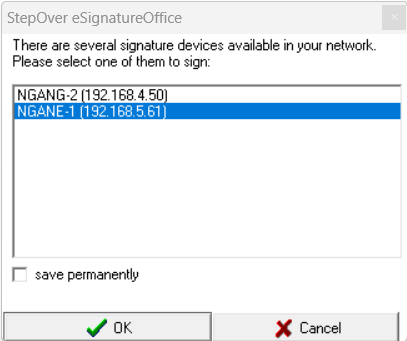
If more than one NextGen Pad is found in your LAN when starting eSignatureOffice, you will be given a selection option when starting.
With the "save permanently" option, this selection will no longer be displayed the next time you start. You can also change the selection again using the “Set signature device” menu button. |
| Communication via HTTPS | With this option, communication with the pad occurs over HTTPS instead of just HTTP. To use the HTTPS setting, HTTPS communication must also be enabled on the pad (default option). |
| Device Password | If you have protected access to the homepage with a password, you must store this in eSignatureOffice. Otherwise, access to the NextGen Pad for eSignatureOffice is not possible. |
| Mirror the device while signing | With this option, the display on the pad within eSignatureOffice is mirrored during signature mode. You can also operate the buttons in the mirrored view while mirroring.
|
Signature
The following options allow you to customize the placement and size on the NextGen display.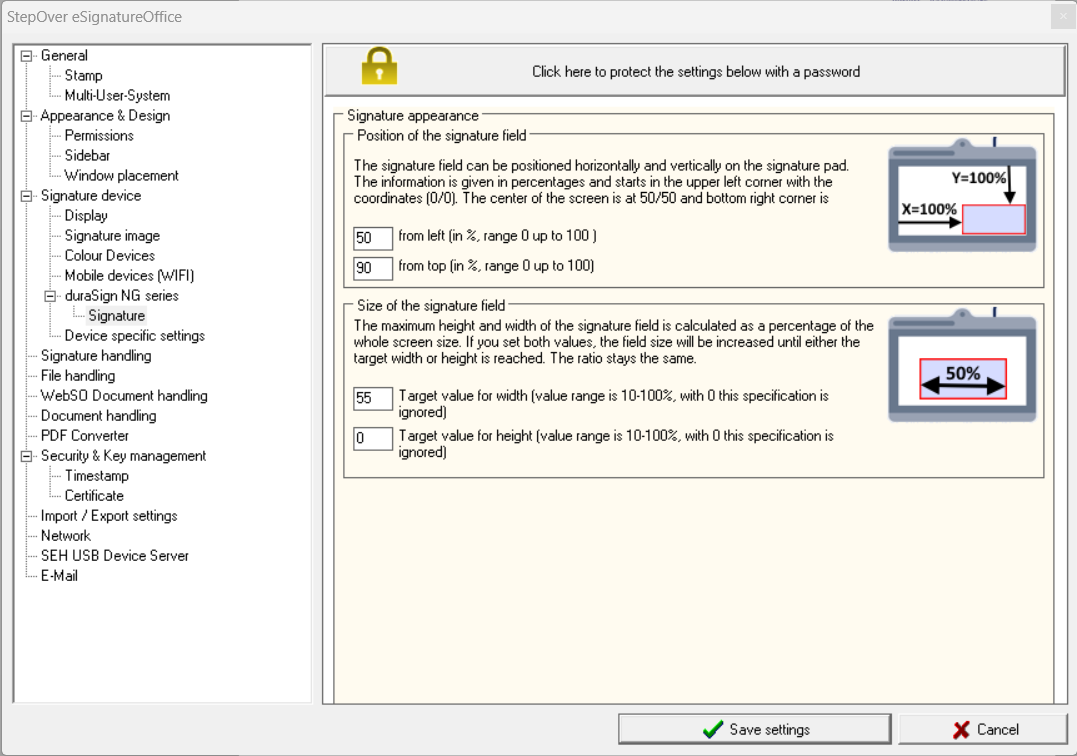
Position of the signature field | Here you can define the horizontal and vertical position of the signature as a percentage of the display width and height. The horizontal placement takes place from the left edge (0%) to the right edge (100%).
Vertical placement is from top edge (0%) to bottom edge (100%). With 50/50, the signature field is placed exactly in the middle of the device display. |
Size of the signature field | The height and width can also be defined as a percentage of the display. The minimum value is 10%, the maximum value is 100%. If you specify 0%, there will be no enlargement to the target width/height.
If you use a target value for the height and width, the signature will be proportionally enlarged until one of the two values is reached. |
Device specific
In this menu, you can find multiple settings which only apply as long as the signpad variant ist used, for which the particular setting has been done. This allows using different products at the same time while using settings, which are only relevant to this specific pad type. This includes features like a reduced area, in which the user can sign on the signpad (e.g. when using a custom background image), a precisely chosen target position and target size of the signature rectangle on pad with a large device display or if a device is supposed to be started or finished either in left- or right handed mode. As soon as this menu tab is selected, the currently connected signature pad is automatically detected and preset in the drop down list "Device Type".
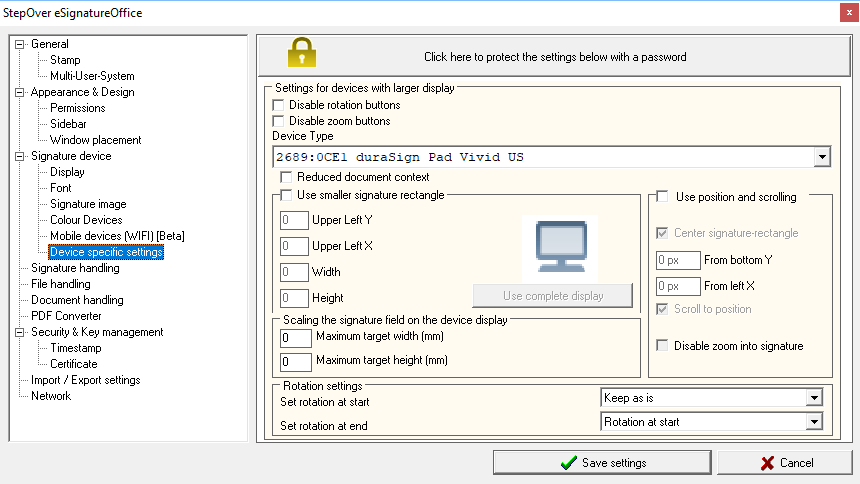 | |
| Disable rotation buttons | With this option, you can deactivate all rotation buttons on the signature pad. This includes the buttons to switch between left and right handed mode as well as to switch between portrait and landscape mode on the StepOver duraSign 10.0 pad. Please be aware, that this setting applies to all signature device types, independant from the selection in the Device Type list. |
| Disable zoom buttons | With this option, you can deactivate all buttons on the signature pad, which are used to either zoom in or zoom out. Please be aware, that this setting applies to all signature device types, independant from the selection in the Device Type list. |
| Device Type | In this list, you can decide for which product type the following settings are supposed to apply. Here, it is possible to generally select all device types or to make very specific settings, and so to define settings only for the StepOver duraSign 10.0 Biometric pad when it's used in the portrait mode, for example. Additionally, as soon as you enter this tab of the administration menu, the currently connected signature pad is detected and preset in this list. If no device is connected or none is found, the last used product type will be selected. |
| Reduced document context | Activate this option to speed up the signature process a little bit by sending only the smaller, necessary section of the current document to the pad instead of the usual complete page. Especially for the duraSign 10.0 pads, this can speed up the signing process quite a lot. |
| Use smaller signature rectangle | With these 4 text fields you can choose the size and position of your target signature rectangle on your signature device in pixel. With the first two fields "Upper left X" and "Upper left Y" you can define the upper left corner point of your rectangle. Width and Height is then used to calculate the final size. With the "Use complete display" button, the total available size of the chosen product is automatically written in the fields. |
| |
| Use position and scrolling | With the following options, you can determine the position of the signature rectangle on the device display when using the Document Signing Mode. If this feature is deactivated, the signature rectangle will be presented as large as possible, while still respecting the rectangle's aspect ratio and the value specified in the administration menu tab "Display". With the two text fields you can specifiy, how far away from the left and lower borders, the signature rectangle is supposed to be positioned. In doing so, you can use pixel, millimeters or percentages by entering the desired values, followed by
Without the measuring unit, eSignatureOffice will interprete your value always as given in pixel. You can also mix up the measuring units in both text fields and so you could specify a percental distance from the bottom and a distance in pixel from the left side. |
| Center signature rectangle | If this checkbox is activated, the following text fields are deactivated and instead of a custom position, the signature rectangle will be displayed in the center of the device display. Of course, this can only take effect when the following option named "Disable zoom into signature" is not active, because then the signature rectangle would be shown in maximum size and thus would always be centered. |
| Scroll to position | If this option is activated, the signature rectangle on the device display will be positioned "smoothly" by moving the rectangle from a close position to the final position. This is only a visual effect and does not affect the functionality of the workflow. If this option is deactivated, the signature rectangle will be shown directly in its final position without scrolling. |
| Disable zoom into signature | This option is an important switch, which various other options in this menu depend on. With this option, you control if eSignatureOffice is allowed to adjust the size of the final image of the document on the device display. So, if the zoom is deactivated, neither the target size can be adjusted automatically (see next option) nor the distance of the signature rectangle from display border can be specified. If this option is activated, the program will always try to show the document page on the device display as close to the original size as possible. |
Scaling the signature field on the device display | With these two text fields, you can specify the maximum target size of the signature rectangle on the device monitor, both in width and/or height. eSignatureOffice will then try to adjust the zoom of the document until the target size is reached. If the aspect ratio does not match with both values, the final size will be scaled up or down until the first of the target values has been reached. Of course, the other one will only be adjusted as far as the original aspect ratio is allowing to. This way, you will always get the same signature rectangle as you originally wanted; only with an adjusted zoom level. Please take note, that the target size is compared to the specified rectangle position. If size and position cannot both be shown on the display of the currently selected signature pad, then the two contesting values will be shown in red an additionally, you will get a notification as soon as you try to leave the administration menu. |
| Rotation settings | With this option, you can choose how the rotation of the used signature pad is supposed to be set. Separately choosable for the start as well as the exit of the program. Please take note, that the alternate portrait view mode can currently be used solely with the StepOver duraSign 10.0 pad. The other product types can also show the landscape mode like a normal TV or computer display. |
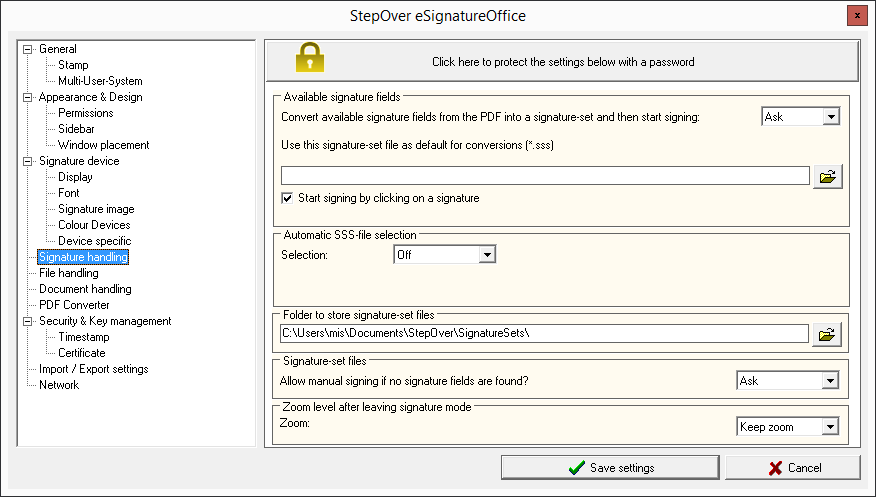
Signature handling
In this menu, you can determine how eSignatureOffice should handle signatures before actually signing, for example together with digital signature fields or signature-sets.
 | |
| Click here to protect the settings below with a password. | This button is available in all cathegories of the administration and allows to set a password to protect your settings from getting changed. You can do this for each menu separately or for all menus at once. |
| Convert existing signature fields from the PDF into a signature-set and then start signing | If there are already digital signature fields (also called DigSig fields) in the opened document, you can determine with this option, if eSignatureOffice should convert all these fields into one combined signature-set. For this, the following options are available:
|
| Use this signature-set as default for conversion (*.sss) | If you have chosen either "Always" or "Ask" in the previous option, you can provide any signature-set here, which is then used as template for the temporary signature-set file for the DigSig fields. Almost all specifications from this set will be used, of course, except for the position of the signature fields as they are provided by the position of the DigSig fields themselves. This includes all "Common settings" as well as confirmation dialogs and "Additional field properties". In case there are more DigSig fields than presettings in the signature-set, then - after processing all available field presets - the set is restarted from the beginning. So, for example, a template with three different signatures will make each third signature use the same "additional field properties" and so show the same text on the pad etc. If you want to know more about creating and using signature-sets, you can find more detailled information here . |
Start signing with click on the signature | The preview in the sidebar as well as the document show digital signature fields in a light blue by default (these settings can be changed in the administration submenu "Signature image"). If this option is activated, you can start the signing process for such a DigSig field by simply clicking on it, either in the sidebar as well as in the document itself. |
Automatic selection of SSS-file | With the help of this option, you can use the automatic selection of signature-sets and their matching documents. This means, that simply pressing "Sign" in the main user interface can be used to automatically choose the signature-set, which matches your document. You can find a more detailled explanation in the Steps 4 and 4b here in the instructions about signature-sets. With the following three options, you can change this behaviour: |
| Selection | With this dropdown menu, you determine if the automatic selection is off, should always be used or if the user shall be asked each time.This feature is deactivated by default in order to prevent a slow down of the the program. Such a slow down can happen if there is a large number of signature-sets in the chosen signature-set folder. |
| Selection of file when finding more than one | With this option, you can tell eSignatureOffice what to do, if multiple signature-sets have been found, whose settings match with the document. Determine if either the first found file should be used or if a list of all matching signature-sets shall be presented to the user, where he can choose another one each time (= Ask user which to use) |
| Search engine | With this option, you can choose the search engine to be used. Due to the way PDF-documents are created, sometimes search terms cannot be found in the document. In such cases, it can be helpful to test all of the given options. |
| Folder to store signature-set files | Here choose the folder, in which your signature-sets can be found. The automatic selection works only for those sets, which can be found in the destination path given here (and of course those sets, which use this feature). |
| Do manual signing if no signature fields found | If it should happen, that the automatic selection of a signature-set was successful but in the chosen signature-set there is no signature field, which matches with the currently loaded document, you can determine with this option here, if you wish to have the possibility to manually create a signature field and sign it afterwards. The following options are available:
|
| Change zoom after signing | With this option, you can determine, which zoom level is to be used for the document after signing. This setting affects only the display of the document in the "View" mode in eSignatureOffice, but not displaying the document during follow-up signature processes or the display of used signing devices with document viewing abilities (for example naturaSign Colour. By default, the zoom change is off. |
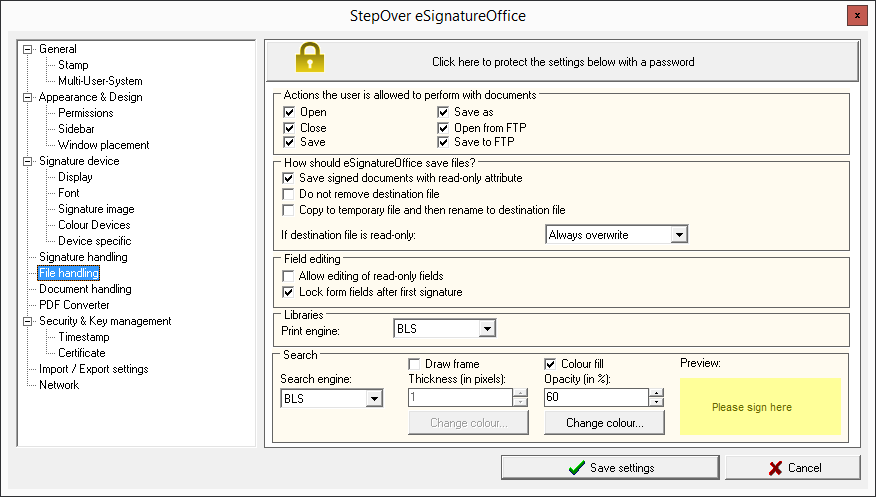
File handling
On the one hand, you determine in this menu, what the end user will be allowed to do in regards of using files such as opening, saving etc. On the other hand, you can tell eSignatureOffice how it should handle the content as well as the PDF structure of your files.
| |
| Click here to protect the settings below with a password. | This button is available in all cathegories of the administration and allows to set a password to protect your settings from getting changed. You can do this for each menu separately or for all menus at once. |
| Action the user can perform with documents | With these options, you either allow or forbid the end user to use the stated options for opening, closing or saving files. This way, the corresponding buttons in the eSignatureOffice user interface will be deactivated. However, this does not stop macros from executing these actions! We are assuming, that macros are not created by end users and so those options to handle files should remain available. |
| Save signed documents with read-only attribute | If you activate this option, eSignatureOffice will check all documents upon saving them for contained signatures. If there are any, saved documents will automatically receive the file attribute "read-only". This option shall prevent losing signatures by accidentially overwriting existing files. However, for this, it's important to pay attention to the next option, too! |
| Do not remove destination file | Activate this option when using the web application SharePoint by Microsoft and you want version control of your files.This way, the original file of your document will not be deleted prior to saving and re-writing it afterwards, but it will be copied first and then the previous file will be overwritten. This is the only way SharePoint can recognize your file as a changed one instead of a new one. |
| If destination file is read-only | With this option, you determine how an existing file with read-only attribute is to be handled when using "Save" (but not "Save as..."!). This is applied to manual saving procedures as well as macros.
Addendum: When trying to overwrite a read-only file manually via "Save as...", this will normally be prevented by your operating system. In these cases, please use another file name. The options here are not able to affect the "Save as..." function. |
| Allow editing of read-only fields | When using a PDF document with included form fields (e.g. text fields or check boxes), they can already be set to read-only by the creator of these fields, regardless of the file's general read-only attribute. With this option, you can determine if such fields should be allowed to be edited anyway or not. |
| Lock form fields after first signature | Because PDF form fields often contain information, which is important for the signature itself, you have the option to prevent editing these form fields after at least one signature has been added to the document (this applied to picture signatures/digital stamps as well as normal signatures with a signature device). In consequence this also means, that all form fields have to be filled prior to the first signature. This feature is security-relevant and you should only deactivate it, when you are aware of the risk this brings with it. |
| Libraries | Basically, PDF libraries advice the application on how to use PDF files - how to read them, illustrate them, print them etc. With the two provided drop-down menus, you can change the relevant library in order to make eSignatureOffice use another way to search text within the document or print the document. For example, when a search term consisting of multiple words cannot be found for an intelligent signature set, this can be due to the internal structure of your PDF document. This internal structure can be totally different from what you see in the end, depending on how the file was created. In these cases, it can be worthwhile to test the other provided libraries. |
| Search | Using the options to search document text in the "Tools" main menu or by using the standard search hot keys (CTRL + F/N/P), eSignatureOffice will jump to the search results and mark them for better visibility - just like in other text editing programs. In this part of the menu, you can change the used search library as well as the appearance of the search result marking. By default, no frame is added and the background of the text is set to 60% yellow. If you change these settings, you can instantly see the preview for your changes on the right side. |
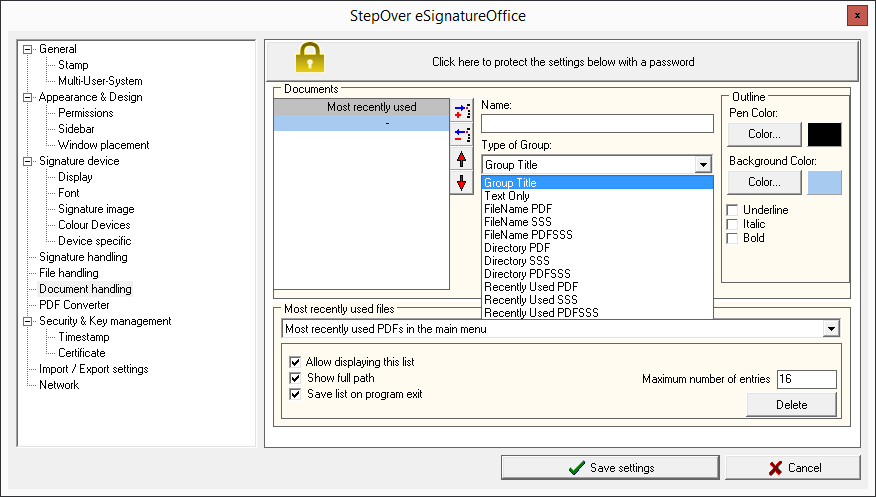
Document handling
This menu allows to create an easy-to-access and hightly detailed sidebar list of all your preferred or frequently used documents and signature-sets.
 | |
| Click here to protect the settings below with a password. | This button is available in all cathegories of the administration and allows to set a password to protect your settings from getting changed. You can do this for each menu separately or for all menus at once. |
| Documents | This is the list, which previews all your entries, which you can do in this menu with their respective colours, text formats and icons for the different options (PDF only, signature set only, PDF + signature set) to make them easily recognizable. All your entries will later be visible in the sidebar under the first tab named "Documents". This tab will hold all your entries, no matter if they are only single files, whole folders or the list of the most recently used files in each category. By default, there are already two entries:
|
Insert  | Clicking this button adds a new entry to your list and then you can change the settings of this new entry by using the other options described here. |
Remove  | Select one of your entries from the list and click the Remove button to delete this entry from the list. |
Up and down arrows   | With these arrows you can determine the order in which the different entries will be shown in the sidebar. |
| Name: | Please enter a name for your new entry here. Please be aware, that this name field will behave different for either single-entries or list-entries, which consist of multiple files (either because you are showing a whole folder or the most recently used files). The different behaviours will be explained with the help of examples after all the options have been described in this table. If you don't add a name, you will be prompted for one when you try to save your settings upon leaving the administration menu. You can also use only a dash as name, which will not show any name plate at all, but only the list, which has been selected for this entry. Please be aware, that due to how the sidebar entries work, nothing will be shown, if you are using the dash as name for a single-entry (e.g. a single file). |
| Type of Group: | This is the most influential choice in this menu, because this decides the type of entry, you are adding to your sidebar list. The following options are available:
With the options in the lower part of the menu, you can further customize these entries. (Explained below) |
| Start expanded | This option is only available for directory types of groups and when activated, the chosen group is initially always shown expanded and so shows all its content. Clicking on the small arrow icon in the group name allows closing the list again. |
| Do not show icons | This option can be used to disable the icons next to each entry in the chosen group. This helps to reduce space usage in the side bar (for example when you want to show longer file names and/or only have a low resolution display) |
Bring application to top when files are changed | This option is only available for directories and makes eSignatureOffice to show in the foreground as soon as a new document is detected in the configured folder. With this option, you can keep eSignatureOffice in the background or minimized and when a new file is detected, the program is brought to the top, where you can select, open and sign the new document. |
| Open new documents automatically | This option can be used to automatically load and show documents, which are detected in a supervized folder to be new documents. In combination with the previous option, you can run eSignatureOffice minimized or in the background and new files are opened automatically as soon as they are detected. |
| Open new documents in alphabetical order | This option can only be used together with the previous option "Open new documents automatically". If multiple documents are copied in a short time into a monitored folder, these documents are queued and will be opened one after another as soon as the each file is closed. When activating this option here, those new documents will be sorted alphabetical before being opened. |
| Start signing after opening the new document | This option can only be used together with the previous option "Open new documents automatically". If you decided to open new documents automatically, you can use this option here to start the signing process automatically just as if you had clicked on the "Sign" button in the user interface or on the signature pad. |
| Outline | In this part of the menu, you can customize the appearance of any entry, you have chosen from the list on the left side. Here you can change the typical properties: font colour, background colour, formatting the text in bold, italic or underlining it. |
| Most recently used files | In this part of the menu, you can customize the behaviour of the different "Most recently used" file lists by choosing one of the options from the dropdown menu. 3 of the 4 possible entries are the group types previously described. However, the entry "Most recently used items in the main menu" is not seen in the sidebar but as - the name suggests - in the main menu of eSignatureOffice under "File | Open Last Used". Please be aware, that the next few options all apply only to the one list type, which you are selecting here in this dropdown menu. |
| Allow displaying this list | Activate this checkbox to make the type of list visible, which you selected from the dropdown list (either one of the 3 sidebar group types or the list in the main menu). Please take note, that this will not automatically show these lists in the sidebar, but only allow showing them. You still need to create an entry with the appropriate group type as described above! |
| Show full path | With this option you can decide, if only the file names are supposed to be shown for the selected list (including the file extension) or if the whole file path shall be shown. |
| Save list on program exit | Without this option, each file list is only saved temporary for the current eSignatureOffice session. Leave this option activated to permanently save the currently in the dropdown menu selected list. |
| Maximum number of entries | In the lower right, you can find a text field named "Maximum number of entries" in which you can write down how many entries shall be saved at max, before the oldest entry is removed. |
| Delete | Clicking this button deletes the content of the currently selected list. The list entry itself is untouched and can be filled again with the next opened file. |
Here is an example of how it could look like with an explanation of the different settings afterwards:
| In the end, these settings... | ...can lead to this sidebar | Explanation |
|---|---|---|
 |
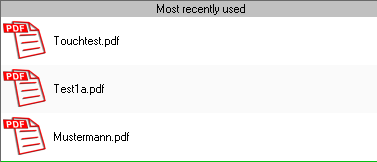
| The first two entries have stayed the same: a group title named "Most recently used" with grey background and below that the second entry has the group type "Recently Used PDF" with light blue background and just the dash as name (so no separate name will be shown in the sidebar). So it shows the 3 latest PDF files, which have been loaded. As soon as the list would exceed 32 files (with default settings), these files would be removed from the list, starting with the oldest, counting from the bottom to the top. The default red PDF icon is easily recognizable for this type of files. |
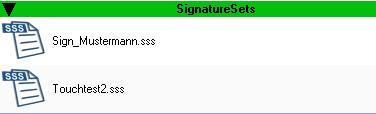 | The 3rd entry is a "Directory SSS" group. For this group type it's mandatory to select a folder, in which the desired files are located. Otherwise, no file can be shown. For these group types, you can decide to show the list expanded or not. The background is green and the name has been set manually to "SignatureSets". Signature set files are easily recognizable with their blue SSS icons. | |
| This is a single entry and not the file name of the chosen PDF behind the entry is shown, but only the custom name, you have given the entry. The icon is still pointing toward the standard PDF file. Clicking this entry in the sidebar, will now open the document. With such entries, you do not have to care about the file name of your document (for example, because it might be very complicated for further file processing). | ||
 | The last entry is currently selected to show its settings for this example. It is named "MRU PDF+SSS" and its group type is "Recently Used PDFSSS", which will create a list of file pairings: always one PDF and the signature set, which has been started with this PDF document. The list will initially be shown in its expanded state and it shows the full path for its entries. The combined pairings of PDF + SSS are easily recognizable with their green icon. |
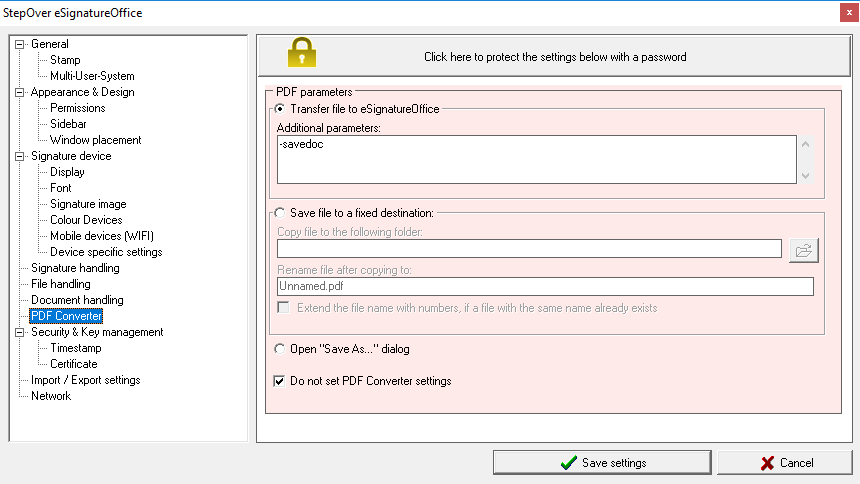
PDF Converter
In this menu tab, you can configure the StepOver PDF Converter. You can predefine startparameters or change the saving behaviour for documents after their conversion. You can learn more about the PDF converter in the chapter 3. The StepOver PDF Converter: Setup and utilisation
 | |
| Click here to protect the settings below with a password. | This button is available in all cathegories of the administration and allows to set a password to protect your settings from getting changed. You can do this for each menu separately or for all menus at once. |
| Transfer file to eSignatureOffice | This is the PDF Converter's default behaviour, when using it via another application (for example Word). This way, your document will be converted to a PDF-file with the help of the printer driver and afterwards it will be automatically transmitted to eSignatureOffice and opened. Please take care, that this will not work, when eSignatureOffice is already started, because there can always be only one active instance of the program. |
| Additional parameters: | In addition to the already preset "-savedoc", you can provide further parameters here, which shall be passed from the PDF Converter to eSignatureOffice. Learn more about this in the chapter: Startparameter. |
| Save file to a fixed destination: | With the help of this option, you can make the PDF Converter save a converted file to a fixed file destination of your choice and rename it, instead of starting eSignatureOffice with it. However, there are three important things to remember:
|
| Open "Save As..." dialog | With this option, after each succesful conversion a normal "Save As..." dialog will be shown by your operating system, in which you can manually choose the destination and file name of your choice. |
| Do not set PDF Converter settings | This checkbox is only a supportive option, which is supposed to prevent unintended changes to the PDF Converter settings, if they were originally set not by eSignatureOffice but externally with the help of the sopconf.exe file in the Converter installation path. Without this checkbox, the default settings provided here would overwrite the external settings each time the administration menu settings are saved. As soon as you make any changes in this menu tab, this checkbox is automatically deactivated and your voluntary changes will apply. |
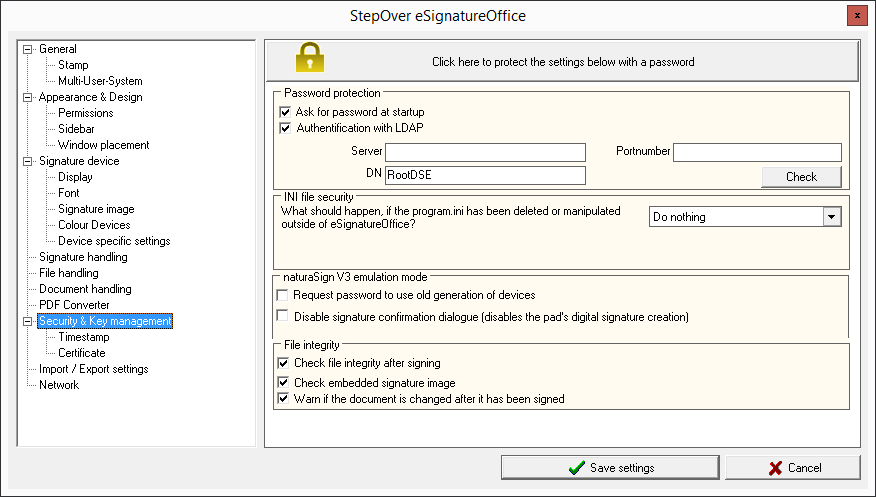
Security & Key management
 | |
| Click here to protect the settings below with a password. | This button is available in all cathegories of the administration and allows to set a password to protect your settings from getting changed. You can do this for each menu separately or for all menus at once. |
| Ask for password at startup | With this option you can prevent the unauthorized execution of the whole eSignatureOffice program instead of only protecting just parts of it like the administration menu. After assigning a password, you will be asked for it at the next program start.
|
| Authentification with LDAP | The Lightweight Directory Access Protocol can be used to allow password protected access to eSignatureOffice, independant from StepOver. For this function, you need your own server with corresponding LDAP directory structure. Enter the IP address and portnumber (if not using the default port) in the corresponding textfields. The field "DN" (= Disinguished Name) defines the LDAP directory path on the server. With the "Check" button, you can test, if the given data can really be used or if there is any problem with it. When starting eSignatureOffice the next time, the user has to enter his login name and password. You can find an example of detailled documentation for the LDAP network protocol here: https://en.wikipedia.org/wiki/Lightweight_Directory_Access_Protocol |
| Actions to be taken if the file program.ini is deleted or changed from outside eSignatureOffice | This Program.ini is normally located at "C:\Users\[Benutzername]\AppData\Local\StepOver\eSignatureOffice 5.0" or a similar location, depending on your version of eSignatureOffice. In this file many important settings are saved and with the given option, you can choose what should happen, if the file has been manipulated:
|
| Require a password to use old generation of devices | With this option, you can activate the password request feature for older devices (prior to the naturaSign devices) before the user is able to use these pads. |
| Disable signature confirmation dialogue (disables digital signature creation inside the pad) | Activating this option, makes the so-called "hash-dialog" disappear, which normally is shown after each signature on your signing device as well as in eSignatureOffice. This dialog is used to confirm the performed signature. If this dialog is activated, the digital signature is created within the pad's own software with the pad's own security certificates. Without hash-dialog, the digital signature is created by eSignatureOffice and the whole signing process is sped up, because there is one less user interaction. This setting has no influence on the encryption of the signature biodata and so is not critical in terms of data security. However, please be aware, that there will be no pad security certificate available to be shown when the signature is checked later, for example in Adobe. |
| Check file integrity after signing | This option makes eSignatureOffice avouch the integrity of all signatures in the whole signed document by checking all digital certificates of each and every included signature. |
| Check embedded signature image | With the help of this option, eSignatureOffice checks after a signature, if it contains enough image data to be displayed at all. For example does this prevent a signature from being added, if the signing colour has been set to "white" and so with a white document background, in the end nothing would be seen anymore. |
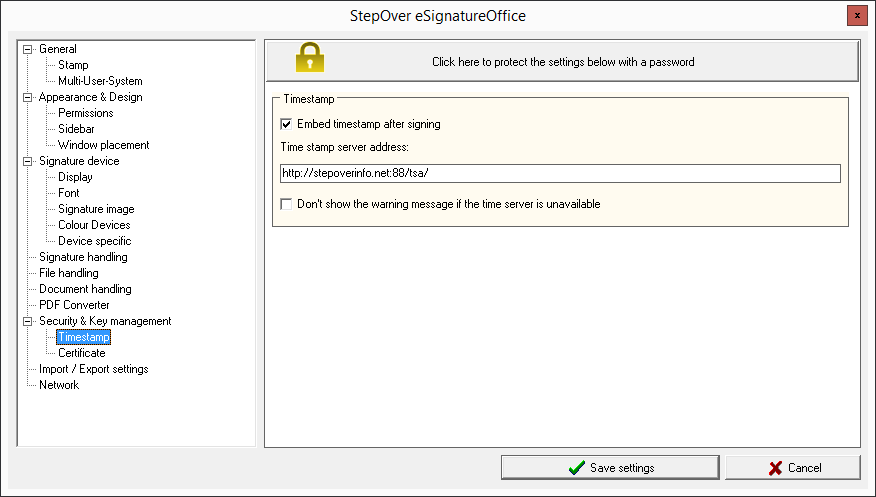
Timestamp
In this menu, you can make eSignatureOffice include your signatures with a time stamp to prove the exact time of the signature. For this, StepOver provides an independant time stamp server.
 | |
| Click here to protect the settings below with a password. | This button is available in all cathegories of the administration and allows to set a password to protect your settings from getting changed. You can do this for each menu separately or for all menus at once. |
Embed time stamp after signing | If this option is activated, after capturing your signature but before adding it to the document, eSignatureOffice will send a request to the time server at the internet address in the given field to provide the exact time and will ad this information to the signature data. This feature allows to provide a secure, non-manipulatable reference point to verify the exact time of signing, no matter where in the world a document is signed. If you don't have access to the internet on the used computer, it would be wise to deactivate this option to speed up the whole signing process. Otherwise, the sent request will need a while to time out. |
| Time server address | In case you want to use another time server than the one provided by StepOver to ensure the time, enter its address here. However, please be aware, that this has to be a TSA (Time Stamping Authority) server according to the RFC 3161 standard. Due to technical reasons, other time server variants are currently not possible to use. |
Do'nt show warning message if the time server is unavailable | If your access to the internet (and so your access to a time server) is varying, it might be useful to activate this option. This way, the signing process isn't slowed down in case the time server cannot be contacted. If this is the case, the local system time will be used for the time stamp. |
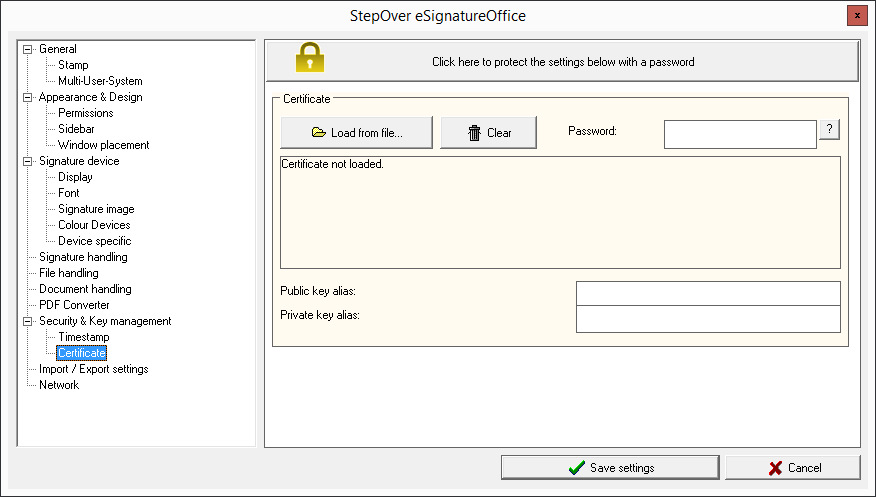
Certificate
If you are using custom certificates in your company, you can configure your personal certificate here in this menu. Otherwise, the default StepOver certificates will be used.
 | |
| Click here to protect the settings below with a password. | This button is available in all cathegories of the administration and allows to set a password to protect your settings from getting changed. You can do this for each menu separately or for all menus at once. |
| Load from file | With this button, you can load your own (personal oder company) certificate and so tell eSignatureOffice to use this certificate from now on for all your signatures. However, there are some important points about this:
|
| Clear | This button deletes the loaded custom certificate from the eSignatureOffice settings and so all your signatures will be digitally signed with the default certificates, again. |
| Password | If your certificate file is encrypted, please provide your password here. With the small question mark button next to this text field, your entered password will be made visible. |
| Public/Private key alias | If there are multiple certificates in your PKCS#12 container-file, you can determine which of the certificates is to be used by providing the name (the alias) for the public key as well as the private key here. |
Import / Export settings
If you want to transfer all your settings to another installation (for example for a rollout in your company or a new setup of your system), you can easily do this by exporting and re-importing all your eSignatureOffice settings or only parts of them. The export compiles all your settings in a single file. The import restores all saved settings. This way you could also make sure, that all users have the same configuration on their systems.
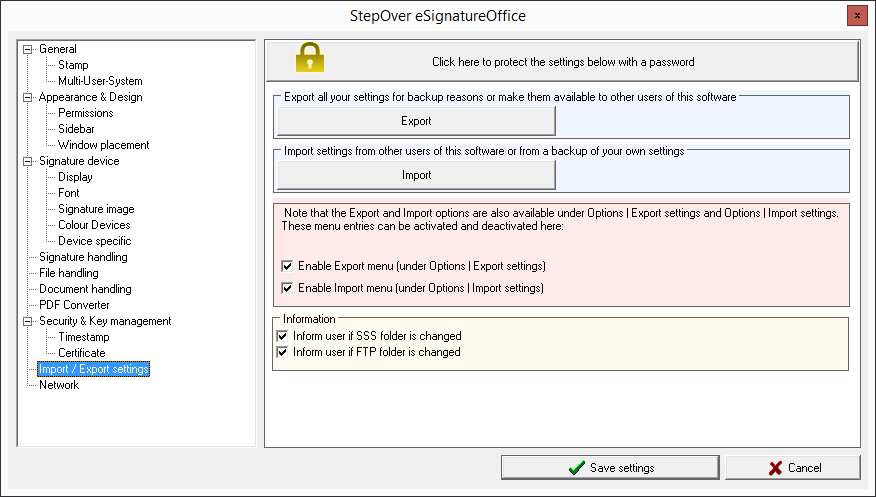 | |
| Click here to protect the settings below with a password. | This button is available in all cathegories of the administration and allows to set a password to protect your settings from getting changed. You can do this for each menu separately or for all menus at once. |
| Export | Pressing this button opens the dialog to export your eSignatureOffice settings. This dialog will be explained right after explaining the other options of this menu. |
| Import | Here you can choose an already available configuration file (*.scs = StepOver Configuration Set) in order to import the settings saved therein. After choosing the file, a menu will appear which looks like the export menu and which will be explained below. |
| Enable Export/Import menu (under Options | Export/Import settings) | With these two checkboxes, you can make both the Export and Import buttons be available in the main user interface in the "Options" menu. Otherwise, importing or exporting is only available via this administration menu oder by using parameters. |
| Inform user if SSS folder is changed | If this option is activated, the user will get feedback when importing a configuration file with a path for the signature set file, which cannot be created (for example because the destination folder protected by the operating system due to security settings). In this case, the default path for signature sets will be used (C:\Users\[username]\Documents\StepOver\SignatureSets). |
| Benutzer informieren wenn FTP Verzeichnis geändert wird | If this option is activated, the user will get feedback when importing a configuration file with a path for the FTP connection data file, which cannot be created (for example because the destination folder protected by the operating system due to security settings). In this case, the default path for FTP sets will be used (C:\Users\[username]\Documents\StepOver\FTPSets). |
The import/export menu
If you are using the possibility to export all your eSignatureOffice settings combined in a single file or if you want to import this data from an earlier installation or another user, the following menu will appear after pressing the "Export" button or after loading the chosen configuration file (*.scs) via the "Import" button.
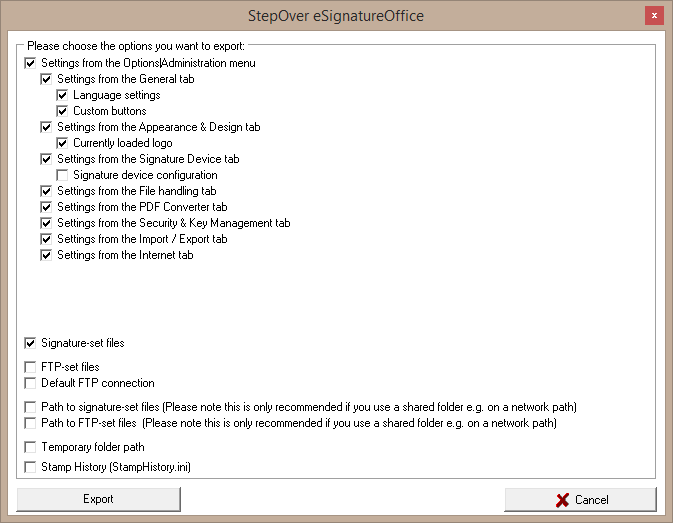 | The first half of the menu (all lines, which start with "Settings...") include all your settings from each of these administration submenus. Here you can separately save and transfer all your choices, checkboxes, folders etc. or respectively apply these settings to your system upon import. Please be aware, that some options are by default not exported nor imported, because they are deemed to be too system- oder user specific. This includes mainly file paths, which you can still choose manually. More about this in the following explanations: |
The signature-set files include all your signature-sets from the currently chosen signature-set folder. These files will be added to the SCS-file upon export and during the import they will be reproduced to your own signature-set folder, or - if you have chosen the option to do so (see below) - they will be reproduced to the signature-set destination path saved within the SCS-file: | |
The FTP-set files include all your signature-sets from the currently chosen FTP-set folder. These files will be added to the SCS-file upon export and during the import they will be reproduced to your own FTP-set folder, or - if you have chosen the option to do so (see below) - they will be reproduced to the FTP-set destination path saved within the SCS-file: | |
When exporting, the path to the signature-set files is always the currently chosen path ("main menu | Tools | Set signature-set folder..."). When importing, this path will be read from the configuration file, set as your default path and if necessary, the destination folder will be created. | |
When exporting, the path to the FTP-set files is always the currently chosen path ("main menu | File | Open from FTP or Save to FTP"). You can find the default destination path option next to the "Edit" button. When importing, this path will be read from the configuration file, set as your default path and if necessary, the destination folder will be created. | |
Just like the destination paths, your currently chosen FTP-connection will also be assumed to be the default FTP-connection. This connection can be exported and imported as well. | |
The path to your temporary files folder can be setup in the administration submenu "General", but this path will not be saved to the configuration file by default when exporting those settings. | |
The last point is about the Stamp History, which can be activated in the administration submenu "General | Stamp". Due to privacy protection reasons, this option is not exported by default. Learn more about stamps and the stamp history here here. |
Network
In this menu, you can choose how eSignatureOffice should handle the connection to the internet. This includes, amongst others, the connection to FTP server and proxy settings.
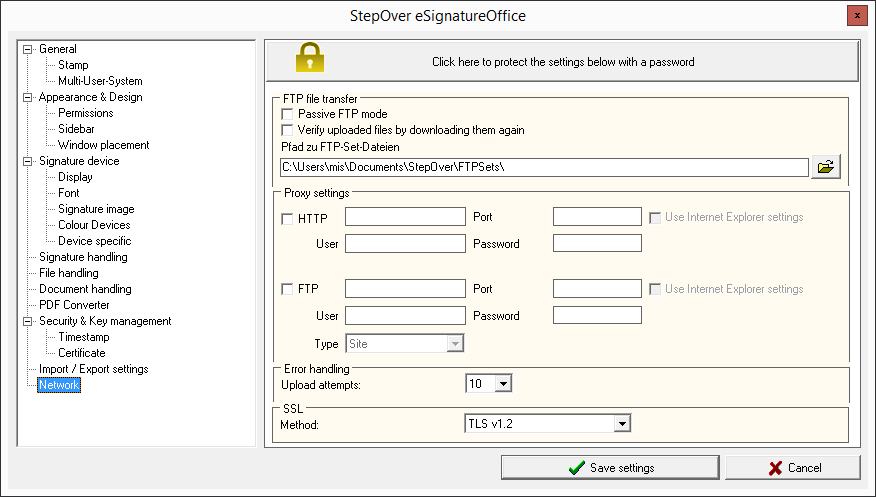 | |
| Click here to protect the settings below with a password. | This button is available in all cathegories of the administration and allows to set a password to protect your settings from getting changed. You can do this for each menu separately or for all menus at once. |
| Passive FTP mode | Some systems may require to activate the passive FTP mode, for example when a firewall is restricting the access to the connected FTP server. If you are not sure, please contact your IT consultant or administrator. |
Verify uploaded files by downloading them again | If you want to make sure, that your file upload to the FTP server was successful, you can choose this option to verify the uploading by downloading the saved documents afterwards. |
| Path to FTP-set files | Here, you can define the default path for your FTP-set files, which you can save in the "Open from FTP" dialog. This path will then be used as default path, when you want to select a FTP-set in a macro or to connect to a server in the "Open from FTP" dialog. |
| Proxy settings HTTP | With this checkbox and the following 4 text fields, you can set the IP, port, user name and the password for your HTTP proxy connection. |
| Proxy settings FTP | With this checkbox and the following 4 text fields, you can set the IP, port, user name and the password for your FTP proxy connection. |
| Use Internet Explorers settings | By activating this option, the connection and access data will be read from your Internet Explorer settings, if there are any available. |
| Error handling | Upload attempts: | This is the number of uploading attempts you want the system to make to transfer documents to a FTP server or via HTTP upload (with a macro) over the internet. This option can be helpful with a slow internet connection. |
SSL | Method | In this drop down menu, you can choose the encryption protocol, which shall be used for secure data transfer via internet. Learn more about SSL/TLS at Transport_Layer_Security (Wikipedia). |
This menu allows you to define, how sending emails in eSignatureOffice is to be handled. These settings are used for the manual sending of mails via tool bar as well as sending mails automatically with the help of macros.
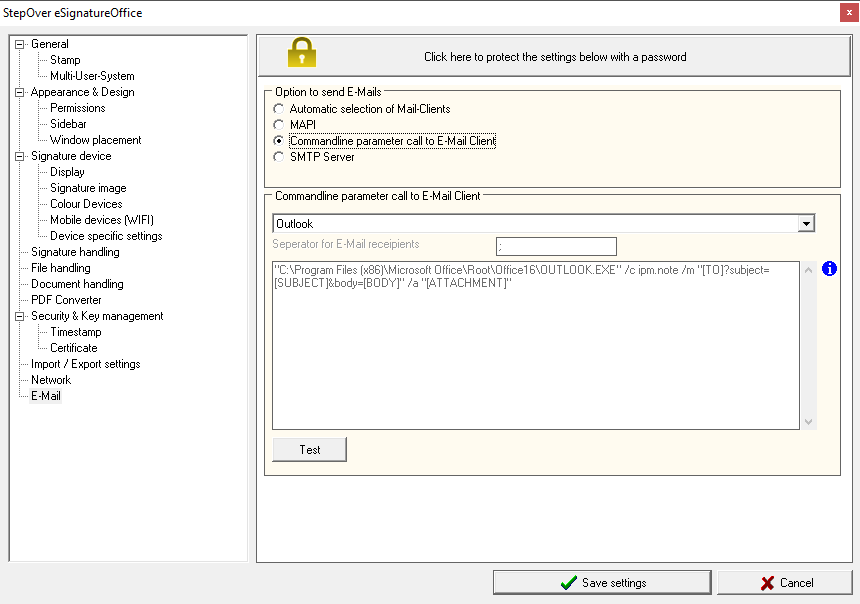 | |
| Click here to protect the settings below with a password. | This button is available in all cathegories of the administration and allows to set a password to protect your settings from getting changed. You can do this for each menu separately or for all menus at once. |
| Automatic selection of mail clients | This is the default setting. Using this option, your computer will be searched for installed e-mail software and then this software will be called in the order, which is shown in the menu here. By default this order is: 1. Outlook 2. Thunderbird |
| MAPI | This is the Windows Mail API and this means, that eSignatureOffice will send out a default command to your Windows operating system to start the current default mail program. As Microsoft updates and changes these functions sometimes, this option is prone to possible problems. |
Command line parameter call to mail client | Here you can edit the default call of your mail client (e.g. Outlook or Thunderbird) if you know the neccessary parameters. It's also possible to create your own parameter call. We recommend this option only to experienced users, who know exactly, what they are doing. |
| SMTP Server | With this option, you can use your own email server to send mails from eSignatureOffice. If you don't know the neccessary information, your IT department might be able to help you. |
| Test | Use this button to test your current settings by creating a test email. In case you currently have no document opened, which could be attached to this test mail, a new dialog will be shown, in which you can select a file to be used for this test. |